
Navigating the Crypts
Welcome, brave soul, to the chilling depths of the Underground Cemetery! This guide will meticulously lead you through every shadowy corner, ensuring you emerge victorious and well-equipped. This area is a crucial early-game segment, introducing you to new enemy types, valuable souls, and essential traversal mechanics. Prepare for a gauntlet of undead horrors and environmental puzzles.
Entry Point: The Underground Cemetery is typically accessed from the Castle Corridor. After defeating the Great Armor and proceeding right, you'll find a vertical shaft leading downwards. This shaft serves as your gateway to the crypts below. Do not confuse this with Death's room; Death is a boss encountered much later in the Clock Tower.
Area Overview & Initial Exploration
Upon entering the Underground Cemetery from the Castle Corridor, you'll find yourself in a dimly lit, vertical passage. Your primary objective in this initial phase is to reach the first Save Room and Warp Room, securing your progress.
Enemies Encountered:
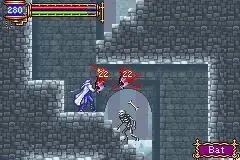
- Skeleton: The most basic undead. Easily dispatched, but their thrown bones can be annoying.
- Zombie: Slow-moving, but can inflict the Curse status. Be wary of their touch.
- Ghoul: Similar to Zombies but often appear in greater numbers.
- Bone Pillar: Stationary enemies that shoot fireballs. Their projectiles can be tricky to dodge in narrow corridors.
- Bloody Zombie: A more resilient variant of the Zombie. They can drop a valuable soul.
Step-by-Step Walkthrough:
- From the entrance shaft, head right. You'll immediately encounter Skeletons and Zombies. Practice your basic combat here.
- Continue right through a short corridor. You'll soon reach a larger, more open crypt area.
- In this area, you'll find your first Bloody Zombie. These enemies are slightly tougher than regular Zombies.
- Proceed downwards through a series of platforms, battling more Skeletons and Ghouls. Watch out for the Bone Pillars embedded in the walls; time your movements to avoid their fireballs.
- At the bottom of this vertical descent, you'll find a passage leading right. Follow it.
- You will arrive at a crucial junction: a Save Room and a Warp Room.
- Save Room: Always activate and use these! They are your lifeline.
- Warp Room: Activating this allows for fast travel between other activated Warp Rooms, saving you immense backtracking later.
Deepening the Crypts: Towards the Chapel
With your save point secured, it's time to delve deeper. Your general direction will be downwards and to the right, eventually leading you towards the Chapel area.
New Enemies Encountered:
- Hellhound: Fast, aggressive dog-like enemies that breathe fire. They can be dangerous in groups.
- Merman: Found in watery sections. They jump out of the water and spit projectiles.
- Skull Archer: Skeletons equipped with bows, shooting arrows from a distance.
- Fleaman: Small, agile creatures that jump erratically. Difficult to hit.
Step-by-Step Walkthrough:
- From the Save/Warp Room, head right. You'll enter a long, horizontal corridor.
- Here, you'll encounter Hellhounds for the first time. Their fire breath can deal significant damage. Try to dispatch them quickly or dodge their attacks.
- Continue right, navigating past more Skeletons and Zombies.
- You'll eventually reach a vertical shaft leading downwards. Descend carefully, dealing with any enemies on the way.
- At the bottom, head left. You'll find a small room with a breakable wall (marked by a subtle crack). Break it to reveal a hidden passage.
- Inside the hidden passage, you'll find a valuable item: Potion.
- Return to the vertical shaft and this time, head right.
- You'll enter an area with some water. Here, you'll encounter Mermen. Their projectiles can push you back into the water, so be careful.
- Continue right, and you'll find another vertical shaft. Descend this one.
- At the bottom, head left. You'll find a room containing a Leather Plate armor.
- Return to the vertical shaft and head right. This path will lead you to the transition point to the Chapel.
Key Souls & Items in the Underground Cemetery
The Underground Cemetery is rich with opportunities to acquire powerful souls and essential gear. Pay close attention to enemy drops and explore every nook and cranny.
Notable Enemy Souls:
| Soul Name | Enemy | Type | Effect | Rarity |
|---|---|---|---|---|
| Skeleton Soul | Skeleton | Bullet | Throw a bone forward. | Common |
| Zombie Soul | Zombie | Enchant | Increases resistance to Curse. | Common |
| Bloody Zombie Soul | Bloody Zombie | Bullet | Summon a Bloody Zombie to attack. | Uncommon |
| Bone Pillar Soul | Bone Pillar | Bullet | Shoot a fireball forward. | Uncommon |
| Hellhound Soul | Hellhound | Bullet | Breathe fire forward. | Uncommon |
Recommended Soul Usage:
- Bloody Zombie Soul (Bullet): While not incredibly powerful, it can provide a useful ranged attack option early on.
- Hellhound Soul (Bullet): This is a fantastic early-game Bullet Soul. Its fire breath has good range and damage, making it excellent for clearing groups of enemies or dealing with tougher foes.
- Zombie Soul (Enchant): While Curse isn't a constant threat in this area, having resistance is always a good idea. Consider equipping it if you find yourself getting cursed frequently.
Key Items Found:
- Potion: Restores a small amount of HP. Always useful to stock up on.
- Leather Plate: An early-game body armor that provides a modest defense boost. Equip it immediately if it's better than your current armor.
- Short Sword: A basic weapon, likely what you start with or find very early. Keep an eye out for stronger alternatives.
- Castle Map 1: Crucial for navigation! This item reveals a significant portion of the castle layout on your map screen. Ensure you pick it up in a hidden room accessible from the vertical shaft leading to the Chapel.
Strategies & Tips for the Underground Cemetery
- Explore Thoroughly: The Underground Cemetery has several hidden passages and breakable walls. Always attack suspicious-looking walls or floors to uncover secrets, including the vital Castle Map 1.
- Soul Farming: If you're struggling, consider spending some time farming Hellhounds for their soul. The Hellhound Soul is a significant upgrade for your Bullet Soul slot.
- Manage Your HP: Potions are scarce early on. Try to avoid unnecessary damage. If your HP gets low, don't hesitate to backtrack to the Save Room.
- Watch for Status Effects: Zombies and Bloody Zombies can inflict Curse, which prevents you from using souls. If cursed, either wait it out or use an Uncurse Potion if you have one.
- Equip Best Gear: Always check your equipment screen (Start button) and equip the strongest weapon and armor you possess.
- Understand Soul Types:
- Bullet Souls (Red): Active abilities, typically attacks. Only one can be equipped at a time.
- Guardian Souls (Blue): Active abilities, often defensive or utility-based. Only one can be equipped at a time.
- Enchant Souls (Yellow): Passive stat boosts or effects. Multiple can be equipped simultaneously.
- Ability Souls (Green): Permanent movement or traversal abilities. Once acquired, they are always active.
By following this comprehensive guide, you will not only survive the Underground Cemetery but also emerge stronger, better equipped, and ready to face the challenges of the Chapel and beyond. Remember to save frequently, explore every corner, and experiment with your newfound souls!