Boss: Carmilla (Stage 3')
Carmilla, one of Dracula's most devoted servants, presents a unique and challenging boss encounter in Stage 3' of Castlevania: Rondo of Blood. This battle is exclusive to the alternate, more difficult route of Stage 3, which is accessed by taking the lower path after the initial segment of Stage 3. This fight is a two-phase engagement, demanding distinct strategies depending on whether you are playing as Richter Belmont or Maria Renard. Carmilla is accompanied by her spectral companion, Laura, throughout the first phase, adding an extra layer of complexity to the fight.
Accessing Stage 3'
To face Carmilla in Stage 3' instead of the Minotaur in the standard Stage 3, you must take a specific route:
- In Stage 3, after the initial outdoor section with the falling platforms and ghost enemies, you will enter a castle interior.
- Proceed through this area until you reach a section with a large, crumbling staircase leading upwards.
- Instead of going up the staircase, look for a breakable wall or a hidden passage on the ground floor to the left or right (depending on the specific version of the game, though generally it's a hidden path downwards). In the PSP/PS4 versions, it's typically a hidden path downwards near the end of the first indoor section, often requiring a jump or a specific action to reveal.
- Taking this alternate path will lead you to a different segment of the stage, eventually culminating in the Carmilla boss fight instead of the Minotaur. This route is generally more challenging and rewards players with a different experience and often better items or secrets.
Carmilla's Attack Patterns & Phases
Carmilla's fight unfolds in two distinct phases:
Phase 1: Carmilla and Laura
In her initial form, Carmilla floats gracefully around the arena, accompanied by her spectral familiar, Laura. Laura will periodically lunge at the player, attempting to drain their blood. Carmilla herself will often throw scythes in an arc or directly at the player. Both characters are vulnerable during this phase.
- Carmilla's Scythe Attack: Carmilla will throw multiple scythes in a fanning pattern or a direct line. These are relatively slow but cover a wide area.
- Laura's Lunge: Laura will periodically detach from Carmilla and lunge horizontally or diagonally towards the player. If she connects, she will latch on and drain health rapidly. Rapidly mashing attack or movement buttons can break free faster.
- Movement: Carmilla floats erratically, making her a moving target. Laura's movements are more predictable, usually a direct charge.
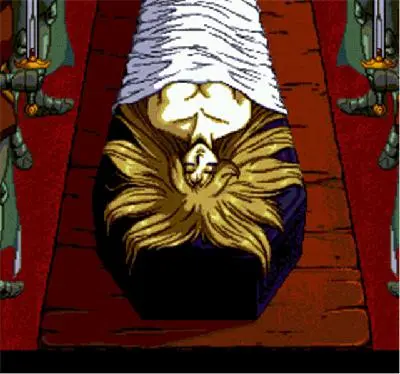
Phase 2: Giant Bleeding Mask
Upon defeating Carmilla's human form, she transforms into a grotesque, giant bleeding mask that hovers in the center of the arena. This mask is stationary but has a large hitbox and a devastating attack pattern.
- Blood Tears: The mask will continuously weep large blood projectiles that fall vertically downwards. These projectiles are numerous and can cover a significant portion of the screen.
- Vulnerability: The mask's primary weak point is its "mouth" or lower portion. It will periodically lower itself, making this area accessible for attacks.
Richter Belmont Strategy
Richter's fight against Carmilla requires precise movement, strategic sub-weapon usage, and careful timing.
Phase 1: Carmilla and Laura (Richter)
- Sub-Weapon Recommendation: The Holy Water or Cross are highly effective here.
- Holy Water: Throwing Holy Water directly at Carmilla will cause continuous damage as she floats through the flames. It's also excellent for hitting Laura if she lunges.
- Cross: The Cross sub-weapon, when thrown, will hit Carmilla multiple times as it travels and returns, dealing significant damage. It can also clear Laura if she's in the way.
- Movement and Positioning: Stay mobile! Carmilla's scythes and Laura's lunges can be deadly. Try to stay on the ground as much as possible to avoid Laura's aerial lunges, but be ready to jump over scythes.
- Whip Attacks: When Carmilla is within range, use your whip. A well-timed jump-whip can hit her multiple times. Focus on hitting Carmilla directly to end this phase quickly.
- Dealing with Laura: If Laura latches onto you, mash the attack button to shake her off. Try to anticipate her lunges and either whip her out of the air or use a sub-weapon.
Phase 2: Giant Bleeding Mask (Richter)
- Dodging Blood Tears: This is the primary challenge. The blood tears fall in patterns, often leaving small gaps. Observe the patterns and move into the safe zones. Richter's backflip (double-tap back) can be useful for quick repositioning.
- Attacking the Mask: The mask is only vulnerable when it lowers itself.
- Whip Strikes: When the mask lowers, jump and whip its lower portion. You can often get 2-3 hits in before it rises again.
- Item Crash (Holy Water/Cross): If you have enough hearts, using the Item Crash with Holy Water (Holy Cross) or the Cross (Grand Cross) can deal massive damage to the mask, often ending the fight quickly if timed correctly. The Grand Cross is particularly devastating.
- Patience: Don't rush. Wait for the mask to lower itself. Trying to hit it when it's high up is futile and will only expose you to more blood tears.
Maria Renard Strategy
Maria's superior mobility and unique attacks make the Carmilla fight significantly easier for her.
Phase 1: Carmilla and Laura (Maria)
- Primary Attack: Maria's standard bird attacks are incredibly fast and can be spammed. She can also attack while moving, which is a huge advantage.
- Special Attack Recommendation: The Guardian Knuckle (Down, Down-Forward, Forward + Attack) is devastating. It launches a powerful projectile that can hit Carmilla multiple times.
- Dragon Sub-Weapon: If you have the Dragon sub-weapon, it can clear the screen of both Carmilla and Laura, dealing massive damage.
- Cat Sub-Weapon: The Cat sub-weapon can also be effective, as it homes in on enemies.
- Aggressive Play: Maria can afford to be more aggressive. Get close to Carmilla and unleash a barrage of bird attacks. Her double jump allows for easy evasion of scythes and Laura's lunges.
- Dealing with Laura: Laura is less of a threat to Maria. Her bird attacks can easily dispatch Laura if she gets too close, or Maria can simply double jump over her.
Phase 2: Giant Bleeding Mask (Maria)
- Dodging Blood Tears: Maria's double jump is your best friend here. It allows her to easily navigate between the falling blood tears and reach safe spots. Her slide can also be used for quick horizontal movement.
- Attacking the Mask:
- Guardian Knuckle Spam: This is Maria's most effective attack against the mask. When the mask lowers, stand directly underneath it and spam the Guardian Knuckle. It will hit the mask repeatedly for massive damage.
- Bird Attacks: While not as powerful as the Guardian Knuckle, Maria can jump and spam her bird attacks at the mask's lower portion. Because she can attack while moving and jumping, she can maintain constant pressure.
- Item Crash (Dragon/Cat): If you have the Dragon or Cat sub-weapon, their Item Crashes can deal significant damage to the mask, potentially ending the fight quickly.
- Positioning: Try to stay close to the mask, directly underneath it if possible, to maximize Guardian Knuckle damage. Use your double jump to avoid the blood tears while maintaining this position.
Common Pitfalls and Tips for Both Characters
- Don't Be Greedy: Especially in Phase 2, don't try to get too many hits in if it means taking damage from the blood tears. Patience is key.
- Heart Management: Keep an eye on your heart count. Sub-weapons and Item Crashes are powerful but consume hearts rapidly. Collect heart drops from candles in the stage leading up to the boss.
- Health Management: If you're low on health, consider using a healing item if you have one. There are typically no health drops during boss fights.
- Practice: Carmilla's patterns, especially the blood tears in Phase 2, require some practice to master. Don't get discouraged if you don't beat her on your first try.
- Know Your Character: Understand the strengths and weaknesses of Richter and Maria. Richter is slower but has powerful sub-weapons and Item Crashes. Maria is faster, more agile, and has incredibly potent regular attacks and special moves.