
2-2: The Overlord's Ambition
Objective: Defeat all enemies.
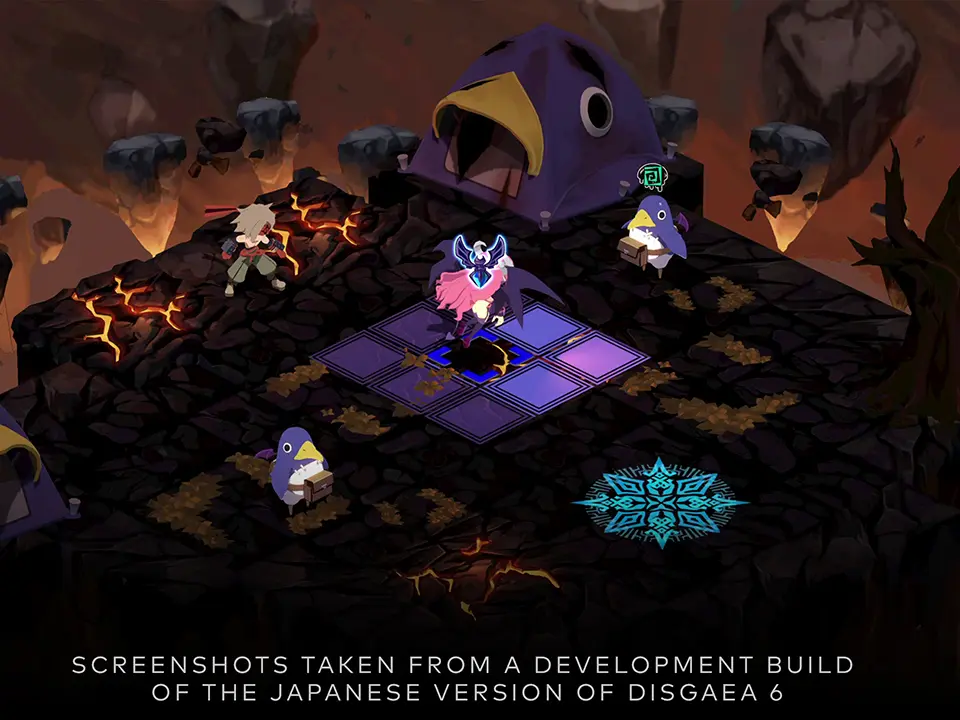
Welcome to "The Overlord's Ambition," a stage that introduces a more complex Geo Panel puzzle than you've encountered thus far. Mastering Geo Panel manipulation here will be key to an efficient and successful clear. The enemies are growing stronger, so strategic positioning and Geo Panel exploitation are paramount.
Geo Panel Configuration and Strategy
This stage features a crucial Geo Panel setup that, if ignored, will make the fight significantly harder. Understanding and manipulating these panels is your primary objective.
- Red Panels (Enemy Boost +50%): A large section of the map, particularly where the bulk of the enemies are positioned, will be covered by red panels. These panels grant a substantial +50% stat boost to any unit standing on them. This means enemies on these panels will hit harder and take less damage.
- Yellow Panels (Ally Damage -50%): A smaller, isolated section, often near your starting area or a path leading to it, will be covered by yellow panels. These panels inflict -50% damage dealt to any unit standing on them. This is a trap for your units if you're not careful.
- Geo Symbols:
- Red Geo Symbol (Enemy Boost): This symbol is typically located on the red panels themselves, often slightly elevated or tucked away. Destroying this symbol will remove the +50% Enemy Boost effect from all red panels.
- Yellow Geo Symbol (Ally Damage): This symbol is usually found on or near the yellow panels. Destroying it will remove the -50% Ally Damage effect.
Recommended Geo Panel Strategy:
- Prioritize the Red Geo Symbol: Your absolute first priority should be to locate and destroy the Red Geo Symbol. This will remove the +50% stat boost from the majority of the enemies, making them much easier to defeat.
- Utilize Throwing: If the Red Geo Symbol is on a panel that's difficult to reach or is surrounded by strong enemies, consider using the Throw mechanic. Pick up one of your weaker units (or even a Prinny) and throw them towards the symbol's location. This can bypass enemy lines and allow for a quick Geo Chain.
- Geo Chain Opportunity: Observe the Geo Panel colors. If destroying the Red Geo Symbol causes a color change that hits the Yellow Geo Symbol, you can create a beneficial Geo Chain, clearing both negative effects in one go. Even if it doesn't, destroying the Red Geo Symbol is far more impactful.
- Avoid Yellow Panels: Until the Yellow Geo Symbol is destroyed (or if you can't reach it quickly), ensure your units do not end their turns on yellow panels. The -50% damage penalty will severely cripple your offensive capabilities.
Enemy Composition
You'll encounter a mix of standard enemies here, slightly stronger than previous stages. Expect the following:
- Zombies: Low movement, decent HP, and often have a counterattack.
- Imps: Fast, low HP, but can be annoying with their speed and ability to flank.
- Prinnies: Standard explosive units. Be careful when defeating them adjacent to your units.
Step-by-Step Walkthrough
- Deployment Phase:
- Deploy your main attacker(s) and a high-movement unit (or a unit with good throwing range).
- Consider deploying a healer if you have one, though healing items might suffice at this point.
- Turn 1 - Geo Symbol Rush:
- Identify the location of the Red Geo Symbol. It's usually on an elevated platform or in a corner of the large red panel area.
- Use your highest movement character (e.g., a Thief, Fairy, or even Zed if he has movement-boosting Evilities/gear) to rush towards the Red Geo Symbol. If direct movement isn't enough, use other units to throw your designated Geo Symbol destroyer closer.
- Once within range, attack and destroy the Red Geo Symbol. This will trigger a Geo Chain, removing the Enemy Boost effect from all red panels. This is a massive advantage.
- If a Geo Chain also hits the Yellow Geo Symbol, even better! If not, ignore the Yellow Geo Symbol for now unless it's directly in your path and easy to destroy without diverting too much.
- Turn 1/2 - Initial Engagement:
- With the Enemy Boost removed, your main attackers can now safely engage the nearest enemies.
- Focus fire on one enemy at a time to eliminate threats quickly. Remember to utilize Team Attacks by positioning adjacent units to a target.
- Keep an eye on the Yellow Panels. If you haven't destroyed the Yellow Geo Symbol, avoid ending your turns on them.
- Subsequent Turns - Clear the Map:
- Systematically advance across the map, defeating remaining enemies.
- Utilize elevation for ranged attackers if available.
- If you have a unit with a powerful area-of-effect (AoE) skill, this is a good stage to use it, especially after the Enemy Boost is gone.
- check for any hidden item boxes or treasure chests, though this stage is fairly straightforward in terms of hidden items.
Recommended Characters for Geo Panel Manipulation (Early Game)
At this point in the game, you might not have a vast roster, but certain unit types excel at reaching Geo Symbols:
- Thief: Naturally high movement and jump stats make them excellent for navigating complex terrain and reaching distant Geo Symbols. Their "Steal" skill can also be useful for acquiring items from enemies, though not strictly necessary for this stage's objective.
- Fairy: Another unit with good movement and jump. While not a powerhouse attacker, their ability to reach symbols quickly is invaluable.
- Zed: As your protagonist, Zed often has decent movement. Equipping him with movement-boosting gear (like Shoes) or teaching him the "Move +1" Evility (if available through the Skill Shop or Item World) can make him a viable Geo Symbol destroyer.
- Any Unit with High Throwing Range: Even if a unit can't reach a Geo Symbol on its own, a unit with a high "Throw" stat can launch another character (even a weak Prinny) across gaps or over enemies to hit the symbol. Look for units with a high "Throw" range in their stats.
Common Pitfalls & Tips
- Ignoring Geo Panels: The biggest mistake players make here is trying to brute-force through the boosted enemies. Always prioritize the Red Geo Symbol.
- Wasting Turns on Yellow Panels: Accidentally ending a turn on a yellow panel will severely reduce your damage output on the next turn. Pay attention to your unit's final position.
- Underestimating Enemy Strength: Even without the boost, enemies are getting tougher. Don't spread your damage too thin; focus on eliminating one threat at a time.
- Utilize Auto-Battle (Carefully): While Auto-Battle can be tempting, for stages with crucial Geo Panels like this, it's often better to manually control your units for the first few turns to ensure the Geo Symbols are handled correctly. Once the panels are cleared, Auto-Battle can be more efficient.
Rewards
Upon successful completion of "2-2: The Overlord's Ambition," you will receive:
- EXP: Standard experience for your units.
- HL: Standard currency reward.
- Item: Typically a common early-game item like a Common Orb or a Beginner's Sword.
- Unlocks: Progression to the next story stage, 2-3.
By following this strategy, you'll not only clear "The Overlord's Ambition" efficiently but also gain valuable experience in manipulating Disgaea 6's dynamic Geo Panel system, a skill that will serve you well throughout your journey.