
The Void Dragon
The Void Dragon is one of the most formidable late-game encounters in Divinity: Original Sin, serving as a significant challenge that tests your party's build synergy, tactical positioning, and resource management. This ancient monstrosity unleashes devastating area-of-effect attacks and possesses high resistances, often accompanied by swarms of Voidlings. Mastering this fight requires a deep understanding of its mechanics and exploiting its specific vulnerabilities.
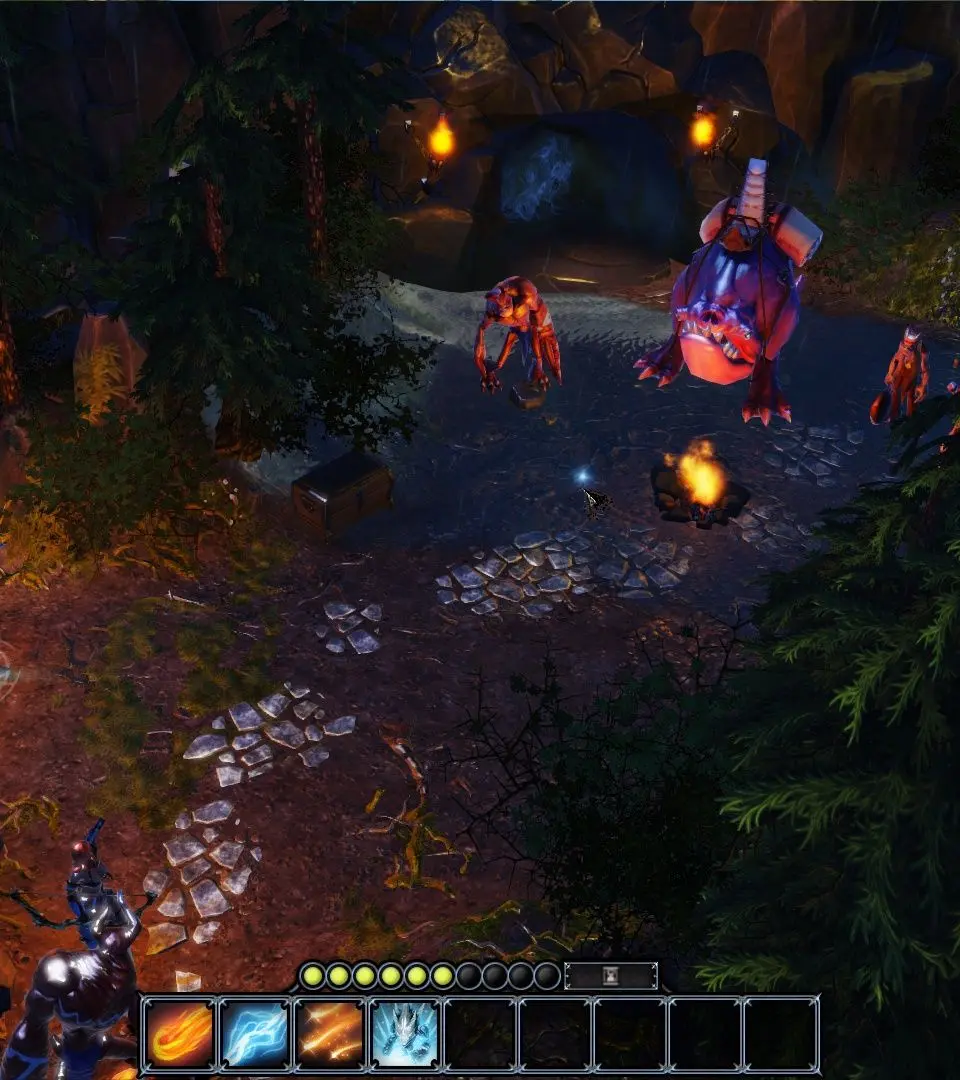
Encounter Overview and Location
You will typically face the Void Dragon in the final acts of the game, often as a culmination of a major questline involving the void. Its lair is usually a desolate, corrupted landscape, providing limited cover but ample space for strategic movement. Prepare for a multi-phase battle where adaptability is key.
Void Dragon Abilities and Mechanics
The Void Dragon is a powerhouse of destruction. Understanding its attack patterns and phases is crucial for survival.
Phase 1: Initial Assault
- Void Breath (Cone AoE): The Dragon's signature attack. This is a massive cone-shaped breath attack that deals significant Magic Damage (often a mix of Air and Void damage) and can apply statuses like Stunned or Suffocating. It has a long wind-up, indicated by the Dragon rearing its head, giving you a brief window to reposition.
- Tail Swipe (Melee AoE): If any party members are too close to its flanks or rear, the Dragon will perform a sweeping tail attack, dealing Physical Damage and potentially knocking down characters.
- Summon Voidlings: Periodically, the Dragon will summon 2-4 Voidlings (typically Void-Touched Ghouls or Void-Touched Imps). These creatures have lower health but can quickly overwhelm your party with their numbers and status effects (e.g., Poisoned, Weakened).
- Void Aura: The Dragon emanates a passive aura that deals minor Void damage to all nearby characters at the start of its turn.
Phase 2: Empowered State (Below 50% Health)
Once the Void Dragon's health drops below approximately 50%, it enters an empowered state, indicated by a visual change (e.g., glowing eyes, darker scales) and often a roar. Its abilities become more potent:
- Enhanced Void Breath: The range and damage of Void Breath increase, and it may apply more severe or additional status effects, such as Decaying or Crippled.
- Void Nova (Radial AoE): A new, powerful radial explosion centered on the Dragon. This deals massive Magic Damage and can apply Stunned to anyone caught within its radius. This attack often has a longer cooldown than Void Breath but is more devastating.
- Increased Voidling Summons: The Dragon will summon more Voidlings (3-5) at a faster rate, or summon stronger variants (e.g., Void-Touched Abominations).
Elemental Vulnerabilities and Resistances
Unlike some bosses with fluctuating vulnerabilities, the Void Dragon in Divinity: Original Sin typically maintains consistent elemental affinities. It is generally:
- Vulnerable to: Earth and Air damage. Spells like Fossil Strike, Earthquake, Dazing Bolt, and Chain Lightning are highly effective.
- Resistant to: Void, Water, and Fire damage. While not immune, these damage types will be significantly less effective due to its high resistances. Physical damage is moderately effective but often less so than its elemental weaknesses.
Specific Resistances Table:
| Damage Type | Resistance Level | Effectiveness |
|---|---|---|
| Physical | Moderate (20-30%) | Moderate |
| Fire | High (60-70%) | Low |
| Water | High (60-70%) | Low |
| Air | Low (-10% to 0%) | High (Vulnerable) |
| Earth | Low (-10% to 0%) | High (Vulnerable) |
| Poison | Moderate (30-40%) | Low-Moderate |
| Void | Immune (100%+) | Ineffective |
Recommended Strategy and Tactics
Party Composition and Gear
- Elemental Mages (Aerotheurge/Geomancer): Essential for exploiting its weaknesses. Load up on Dazing Bolt, Chain Lightning, Fossil Strike, Earthquake, and Medusa Head (for petrify).
- Support/Healer: A dedicated healer with access to cleansing spells (e.g., First Aid, Mass Cleanse Wounds) is vital to remove status effects like Stunned or Suffocating.
- Crowd Control Specialist: While the Dragon itself is resistant to many CCs, its Magic Armor can be stripped. Once gone, Stunned (from Air spells) and Petrified (from Earth spells or Medusa Head) are incredibly effective. use CC on the Voidlings!
- Physical Damage Dealer (Optional): A strong physical damage dealer can help clear Voidlings quickly and contribute to stripping the Dragon's physical armor for potential Knockdown.
- Gear: Prioritize gear that boosts Air and Earth damage, Magic Armor, and resistances to Void damage. Potions of Magic Armor and resistance potions are highly recommended.
Battle Tactics
- Prioritize Voidlings: This is non-negotiable. Voidlings, especially in later phases, can quickly overwhelm your party. Use area-of-effect spells (like Rain of Arrows, Whirlwind, or elemental AoEs) to clear them efficiently. If left unchecked, they will chip away at your armor and apply debilitating status effects.
- Positioning is Key:
- Spread out your party members to avoid having multiple characters caught in the Void Breath or Void Nova.
- Keep melee characters away from the Dragon's flanks and rear to avoid Tail Swipe damage.
- Utilize high ground if available for damage bonuses and better sightlines.
- Use teleportation spells (e.g., Teleportation, Nether Swap) to reposition allies out of danger zones or to move the Dragon itself into a more favorable position (e.g., into a pool of oil for a combo).
- Armor Management: Focus on stripping the Dragon's Magic Armor. Once its Magic Armor is gone, it becomes vulnerable to powerful crowd control effects like Stunned (from Air spells) or Petrified (from Earth spells). This can buy you crucial turns to deal damage or recover.
- Exploit Elemental Weaknesses: Spam your most powerful Earth and Air spells. Combine them for devastating effects (e.g., Dazing Bolt after Rain to create electrified surfaces).
- Crowd Control on the Dragon: Once Magic Armor is down, use Dazing Bolt, Chain Lightning (for Stun), or Medusa Head/Petrifying Visage (for Petrify). A petrified Dragon cannot act, allowing your party to unleash uninterrupted damage.
- Healing and Cleansing: Be ready to heal and cleanse status effects. Keep your Magic Armor high, especially on your mages, to resist the Dragon's magical attacks.
- Source Spells: Don't hold back on your Source spells. Abilities like Meteor Shower (if you have a Pyromancer for Voidlings, though less effective on the Dragon itself), Hail Storm, Superconductor, or Earthquake can turn the tide.
Common Pitfalls and How to Avoid Them
- Ignoring Voidlings: This is the most common mistake. They will overwhelm you. Clear them as soon as they appear.
- Clumping Up: Standing too close together makes your party vulnerable to the Void Dragon's wide-reaching AoE attacks. Always maintain distance between characters.
- Lack of Magic Armor: The Dragon's primary damage output is magical. If your characters have low Magic Armor, they will be quickly stunned or incapacitated. Invest in Magic Armor on gear and use potions.
- Using Ineffective Damage Types: Wasting turns on Fire, Water, or Void damage will prolong the fight and increase your chances of defeat. Stick to Earth and Air.
- Not Using Crowd Control: While the Dragon has high armor, once it's stripped, CC is your best friend. apply Stun or Petrify to gain tactical advantage.
Rewards
Defeating the Void Dragon yields significant experience points, often enough to level up or get close to it. You will also typically find:
- Legendary or Divine Quality Gear: Often a unique weapon, armor piece, or accessory with powerful stats and potentially unique abilities. This gear is usually scaled to your level.
- Source Orbs: Valuable items used for crafting or empowering Source abilities.
- Rare Crafting Materials: Components for high-tier crafting.
- Gold: A substantial amount of gold.
- Quest Completion: Progresses or completes a major questline, unlocking further story elements or achievements.
By following these detailed strategies and preparing your party effectively, the Void Dragon will fall, and you will emerge victorious, securing your place as a true master of Rivellon.