
Revolver Ocelot
Revolver Ocelot, the infamous gunslinger and former Spetsnaz operative, presents a significant challenge early in your mission on Shadow Moses Island. Known for his distinctive single-action army revolvers and ricochet shots, Ocelot is a formidable opponent who demands patience, precise timing, and strategic use of cover. This guide will walk you through his boss encounter, detailing his attack patterns, weaknesses, and the best strategies to emerge victorious.
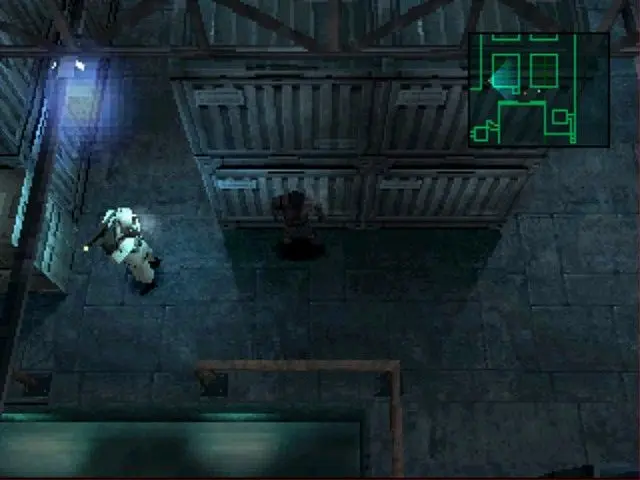
Encounter Location: Warhead Storage (B2)
You will face Revolver Ocelot in the Warhead Storage facility on the second basement level (B2). This area is characterized by numerous pillars, crates, and a central platform, all of which can be utilized for cover.
Recommended Loadout
- Weapon:
- SOCOM Pistol: Your primary weapon for this fight. Its accuracy and decent damage output make it ideal for targeting Ocelot during his reload animations.
- FAMAS (Optional): If you're confident in your aiming, the FAMAS can deliver higher burst damage, but its recoil can make precise shots difficult. Stick to the SOCOM for reliability.
- Equipment:
- Ration: Essential for recovering health if you take too many hits. Have several on hand.
- Gas Mask: Highly recommended. While not strictly necessary if you react quickly, it provides immunity to Ocelot's stun grenades, allowing you to maintain your offensive.
- Body Armor (Optional): Reduces damage taken, but its effectiveness against Ocelot's powerful shots might be limited. Focus on avoiding damage instead.
Phase 1: Duel in the Warhead Storage
Ocelot begins the fight showcasing his signature ricochet shots. He will fire a series of bullets that bounce off the walls and pillars, making direct line-of-sight attacks dangerous. Your primary objective in this phase is to exploit his reload animations.
Strategy:
- Utilize Cover: Immediately take cover behind the large pillars or crates scattered around the room. These are your best defense against his ricocheting bullets. Constantly move from cover to cover to avoid being flanked or caught in the open.
- Observe His Pattern: Ocelot typically fires a burst of shots (usually 6-8) and then pauses to reload his revolvers. This reload animation is your critical window of opportunity.
- Attack During Reloads: As soon as you see Ocelot begin to reload, pop out from cover and unleash a quick burst of shots with your SOCOM Pistol. Aim for his head for critical damage, or his body if headshots are too difficult under pressure.
- Stun Grenades: Ocelot will occasionally throw a stun grenade. If you see him wind up for a throw, immediately sprint away from your current position or, if equipped, activate your Gas Mask to negate its effect. Getting stunned leaves you vulnerable to his follow-up attacks.
- Maintain Distance: While you need to be close enough to land shots, avoid getting too close to Ocelot, as he can perform a quick melee attack if you're within his immediate vicinity.
- Patience is Key: Do not rush your attacks. Wait for the reload animation. Trying to shoot him while he's actively firing will likely result in you taking unnecessary damage.
Phase 2: Final Stand - Increased Aggression
As Ocelot's health diminishes (roughly below 50%), he becomes noticeably more aggressive and his reload animations become shorter. While there isn't a distinct environmental change or new attack type, his behavior shifts, demanding quicker reactions and more precise execution of your strategy.
Strategy:
- Faster Reloads, Shorter Windows: The most significant change is the reduced duration of his reload animations. Your window to attack will be much smaller, requiring you to be ready to fire the moment he starts reloading. Anticipate his reloads rather than just reacting to them.
- More Frequent Stun Grenades: Expect Ocelot to throw stun grenades more often. Keep your movement fluid and be prepared to sprint away or use your Gas Mask.
- Increased Movement: Ocelot will move around the arena more frequently, making it harder to predict his next position. Adapt by quickly repositioning yourself behind new cover.
- Conserve Ammo: While you should be aggressive during his reload windows, avoid wasting ammo on speculative shots. Every bullet counts, especially if you're running low.
- Ration Usage: Don't hesitate to use Rations if your health drops significantly. It's better to heal and stay in the fight than to risk being defeated.
- No CQC: While technically possible if you run out of ammo, attempting Close Quarters Combat (CQC) against Ocelot is extremely risky and generally not recommended. His quick draw and powerful shots will likely defeat you before you can land a meaningful CQC combo. Stick to ranged combat.
Common Pitfalls & Tips
- Getting Cornered: Avoid staying in one piece of cover for too long. Ocelot will try to flank you.
- Ignoring Stun Grenades: A stunned Snake is a dead Snake. Prioritize avoiding or negating these.
- Wasting Ammo: Only shoot when Ocelot is reloading or clearly vulnerable.
- Panicking: Ocelot's aggression can be intimidating, but stick to your strategy. Patience and precision will win the fight.
- Listen for Reload Sounds: Pay attention to the audio cues. The distinct sound of Ocelot reloading his revolvers is your signal to attack.
Reward for Defeating Revolver Ocelot
Upon successfully defeating Revolver Ocelot, you will receive a crucial item necessary for progressing through Shadow Moses Island:
- PAL Key: This key is essential for accessing and manipulating the Metal Gear REX launch sequence in the later stages of the game. It is NOT a numbered Card Key; those are found elsewhere.
Mastering this encounter sets the stage for the challenges ahead. Good luck, Snake!