Locating the Bryyo Seed
With the Grapple Beam now integrated into your arsenal, your next critical objective on Bryyo is to locate and secure the Bryyo Seed. This journey will take you deep into the fiery heart of Bryyo, through treacherous environments, past ancient guardians, and ultimately to a confrontation with a formidable foe. Prepare for a challenging expedition that demands precise platforming, environmental puzzle-solving, and combat prowess.
Phase 1: Navigating the Firey Downstairs
Your path to the Bryyo Seed begins by descending into the "Firey Downstairs" section of Bryyo. This area is characterized by intense heat, molten lava flows, and a network of crumbling platforms. The Grapple Beam will be indispensable here.
- Starting Point: From the Grand Divide, locate the large, circular door requiring a Grapple Lasso pull. This door leads directly into the Firey Downstairs.
- Environmental Hazard: The ambient temperature in this area will cause minor, continuous damage to Samus. While not immediately life-threatening, prolonged exposure without finding Energy Tanks can be detrimental. Keep an eye on your energy levels.
- Grapple Challenges:
- Immediately upon entering, you'll encounter a series of floating platforms over a lava pit. Use your Grapple Lasso on the designated Grapple Points (glowing blue rings) to swing across gaps. Timing is crucial to avoid falling into the lava.
- Look for large, rotating cog-like structures embedded in the walls. These often have Grapple Points that allow you to swing around obstacles or reach higher ledges.
- Some platforms will require you to use the Grapple Voltage ability. Look for inactive energy conduits (glowing yellow) and use your Grapple Lasso to connect them to a power source (often a nearby generator or another active conduit). This will activate bridges or open doors.
- Enemy Encounters:
- Magmoor: These fire-dwelling creatures will emerge from the lava. A few shots from your Plasma Beam will dispatch them quickly.
- Geemer: Watch out for these armored creatures clinging to walls and ceilings. They are vulnerable to the Plasma Beam.
- Kihunters: Flying insectoids that attack in swarms. Use your Lock-On feature and rapid-fire to clear them out efficiently.
- Key Objective: Your goal in the Firey Downstairs is to reach a large, reinforced door at the lowest level, typically requiring a Grapple Voltage puzzle to power it open. This door leads to the Hall of the Golems.
Phase 2: The Hall of the Golems
Beyond the Firey Downstairs lies the Hall of the Golems, an ancient chamber filled with colossal, dormant statues. This area is a labyrinth of crumbling architecture and hidden pathways, guarded by the very constructs that give the hall its name.
- Atmosphere: The Hall of the Golems is cooler than the Firey Downstairs but still retains an oppressive, ancient feel. The air is thick with dust and the faint glow of dormant energy.
- Golems - Dormant vs. Active:
- Initially, most Golems will appear as inert statues. However, as you progress, certain Golems will activate, becoming formidable enemies.
- Activated Golem Strategy: These stone giants are heavily armored. Their primary weakness is often a glowing core or a specific joint that becomes exposed during their attack animations. Use your Plasma Beam for maximum damage. When they charge, dodge to the side and target their exposed back or head. Missiles can also be effective against their armored plating.
- Environmental Puzzles:
- Weight-Sensitive Platforms: Some platforms will only remain active or move when Samus stands on them. Be prepared for quick jumps or Grapple Swings to cross before they retract.
- Rune Activation: You may encounter ancient runes or symbols on walls. Use your Scan Visor to analyze them. Often, you'll need to shoot them in a specific sequence (revealed by scanning nearby lore entries or environmental clues) to activate mechanisms or open hidden passages.
- Grapple Bridge Repair: Look for broken bridges or pathways. Often, a Grapple Point will allow you to pull a section of the bridge back into place, or a Grapple Voltage connection will power a mechanism to extend it.
- Pathfinding: The Hall of the Golems is multi-layered. Utilize your Map frequently. Look for elevated platforms accessible via Grapple Points or hidden passages behind crumbling walls (sometimes requiring a well-placed Morph Ball Bomb).
- Key Objective: Navigate through the Hall of the Golems, defeating any activated Golems and solving the environmental puzzles, until you reach a large, central chamber. This chamber houses the Bryyo Seed.
Phase 3: Acquiring the Bryyo Seed and Boss Encounter
Upon entering the central chamber, you will immediately spot the Bryyo Seed, pulsating with energy. However, its guardians will not allow you to claim it without a fight.
- The Bryyo Seed: Approach the Seed. A brief cutscene will play as Samus attempts to extract it.
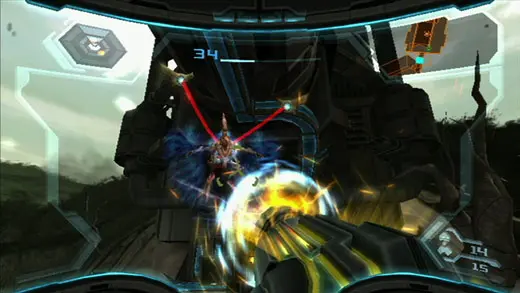
- Boss Encounter: Mogenar
Immediately after interacting with the Bryyo Seed, the ancient Golem guardian, Mogenar, will awaken and attack. This is a multi-phase boss fight that tests your combat skills and understanding of Samus's abilities.
- Mogenar Overview: Mogenar is a massive, four-armed Golem. Its primary attacks involve powerful energy blasts, ground pounds, and sweeping arm attacks.
- Phase 1 Strategy: Targeting the Orbs
- Mogenar's initial weakness lies in the four glowing energy orbs embedded in its chest.
- Recommended Weapon: Plasma Beam for consistent damage, or Missiles for burst damage.
- Attack Pattern: Mogenar will typically start by firing energy projectiles or attempting to stomp. Dodge these attacks.
- Weak Point Exposure: The orbs are always exposed. Lock on to each orb individually and fire until it shatters. You'll need to destroy all four.
- Environmental Hazard: Mogenar will occasionally create shockwaves by slamming its arms. Jump over these or use your Screw Attack if you have it for invincibility frames.
- Phase 2 Strategy: Grapple Voltage and Phazon Corruption
- Once all four orbs are destroyed, Mogenar will become enraged and begin to glow with Phazon energy. Its attacks become more aggressive and faster.
- New Weakness: Mogenar will now periodically expose a central Phazon core on its chest. This core is heavily armored but vulnerable to a specific tactic.
- Grapple Voltage Opportunity: When Mogenar charges up a powerful attack, it will often reveal a Grapple Point on one of its arms or shoulders. Use your Grapple Lasso to latch on.
- The Trick: Once latched, you must use Grapple Voltage to overcharge Mogenar. This will temporarily stun it and expose its central Phazon core.
- Damage Window: While Mogenar is stunned, unleash a barrage of Missiles or fully charged Plasma Beam shots into its exposed Phazon core.
- Repeat: This process will need to be repeated several times. Dodge its attacks, wait for the Grapple Point to appear, use Grapple Voltage, and then attack the core.
- Hypermode Option: If you're struggling, activate Hypermode during the damage window on the Phazon core for significantly increased damage. Be mindful of your Phazon buildup.
- Victory: Successfully defeating Mogenar will cause it to explode, leaving behind the Bryyo Seed.
- Reward: After Mogenar's defeat, approach the Bryyo Seed again. Samus will successfully absorb it, adding it to your inventory. This completes your primary objective on Bryyo.
Post-Seed Acquisition
With the Bryyo Seed secured, your mission on Bryyo is complete. A new objective will be given, likely directing you to return to your Gunship and proceed to the next planet. Take this opportunity to:
- Explore for Collectibles: Before leaving, consider backtracking through the Hall of the Golems and Firey Downstairs. New pathways or items may now be accessible with your enhanced abilities. Look for Energy Tanks, Missile Expansions, and Ship Missile Expansions.
- Scan Lore: Ensure you've scanned all available lore entries from Golems, environmental objects, and data terminals to fill out your Logbook.