
Understanding the Map and Navigation
Navigating the treacherous and ever-shifting landscape of the Olympic Exclusion Zone is paramount to your survival in Pacific Drive. The map isn't just a static representation; it's a dynamic tool that reveals crucial information about your surroundings, potential hazards, and valuable resources. Mastering its intricacies will be the difference between a successful scavenging run and becoming another ghost in the anomaly.
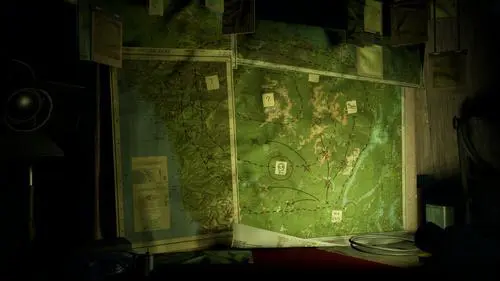
The Map Interface
When you access your map (typically by pressing the corresponding button on your controller or keyboard), you'll see a stylized representation of the Zone. Key elements to pay attention to include:
- Your Current Location: Indicated by a distinct marker, usually your car's icon.
- Roads and Paths: These are your lifelines. Pay close attention to their condition; some may be blocked by debris or anomalies.
- Points of Interest (POIs): These are marked locations that often contain valuable resources, story elements, or crafting materials. They can range from abandoned buildings and research stations to unique geological formations.
- Anomaly Zones: Areas where dangerous anomalies are present. These will often be visually distinct on the map and may pulse or change color to indicate their intensity.
- The Wall: The ever-encroaching, deadly anomaly that defines the boundaries of the Zone. Your map will show its general direction and proximity.
Points of Interest (POIs) Explained
Points of Interest are crucial for gathering resources, advancing the story, and finding unique items. Understanding their map markers is key to efficient exploration:
- Abandoned Buildings/Homes: Often marked with a simple house or building icon. These are prime locations for finding basic crafting materials like Scrap Metal, Plastic, Wood, and sometimes rarer items like Chemicals or Electronics.
- Research Stations/Labs: Typically represented by a more complex icon, perhaps a stylized beaker or antenna. These are excellent sources for Electronics, Batteries, Wires, and unique research materials. You might also find valuable blueprints or story logs here.
- Gas Stations/Garages: Marked with a fuel pump or wrench icon. These are vital for finding Fuel, Oil, and spare parts like Tires or Scrap Metal.
- Communication Towers: Often depicted as a tall, slender tower. These can sometimes yield Electronics and may be linked to specific story objectives or provide temporary boosts to your car's systems.
- Unique Geological Formations: Sometimes, natural landmarks might be marked. These could be sources of rare minerals or contain hidden caches.
- Roadside Caches/Debris: Smaller icons might indicate piles of debris or abandoned vehicles. These are good for quick scavenging of common materials.
Interpreting POI Markers: While the map doesn't always provide explicit detail on what's inside a POI before you reach it, the general icon gives you a strong hint. If you're desperate for fuel, a gas station icon is your target. If you need components for upgrades, a research station is a better bet.
Anomaly Zones and Their Dangers
Anomaly Zones are the most unpredictable and dangerous elements of the Olympic Exclusion Zone. Their markers on the map are vital warnings:
- General Anomaly Zone Marker: Often a pulsating or swirling area on the map, sometimes depicted in red or purple hues. These indicate a high concentration of anomalous energy.
- Specific Anomaly Types: As you encounter different anomalies, their icons might become more specific. For example:
- Static/Electrical Anomalies: May be represented by jagged lines or lightning bolt symbols. These can cause electrical surges, damage your car's systems, or even shock you.
- Physical Anomalies (e.g., Mimics, Jump Scares): Might be indicated by a more aggressive, jagged shape or a "danger" symbol. These are often tied to physical threats that can damage your car or directly attack you.
- Environmental Anomalies (e.g., Acid Rain, Fog): May be shown with cloud or mist-like icons. These affect visibility or cause gradual damage to your car's exterior.
- Intensity Indicators: The pulsing speed or color saturation of an Anomaly Zone marker can sometimes indicate its current intensity or the likelihood of spawning a dangerous anomaly. Brighter, faster pulses usually mean more immediate danger.
Navigating Anomaly Zones: It's generally best to avoid marked Anomaly Zones unless absolutely necessary. If you must pass through one, proceed with extreme caution, keep your anomaly detector active, and be ready to accelerate or brake suddenly. Some anomalies can be temporarily neutralized or avoided with specific car upgrades.
Essential Navigation Strategies
Effective navigation requires more than just looking at the map; it involves proactive planning and reactive adaptation.
Pre-Run Planning:
- Scout Your Route: Before leaving the garage, open your map and identify your primary objective (e.g., a specific POI for resources, a mission marker). Trace a potential route, noting any potential hazards or detours. Consider the condition of the roads – are they paved, dirt, or completely overgrown?
- Resource Awareness: Look for areas known to spawn specific resources you might need for crafting or repairs. For example, if you're low on Scrap Metal, look for industrial areas or abandoned vehicles marked on the map. If you need Rubber, check for old tire shops or junkyards.
- Emergency Exits: Identify potential escape routes back to the garage in case of unexpected trouble. Note any shortcuts or less-traveled paths that might offer a quicker retreat.
- Objective Prioritization: If you have multiple objectives, plan the most efficient route to tackle them, minimizing backtracking.
In-Run Navigation:
- Constant Map Checks: Don't rely solely on your memory. Periodically check your map to confirm your position and the proximity of your objective. The map updates in real-time, showing your car's location.
- Listen to Your Instruments: Your car's various meters and scanners (e.g., the anomaly detector, the EMF reader) provide real-time feedback. Correlate this information with your map to understand the immediate threats and environmental conditions. For instance, a rapidly spiking EMF reading might indicate an approaching anomaly not yet visible on the map.
- Adapting to Anomalies: Anomalies can dynamically alter the landscape. If a road you planned to take is now blocked by a dangerous anomaly (like a wall of static or a physical barrier), use your map to find an alternative path. Sometimes, a slight detour can save your car and your life. Be prepared to drive off-road if necessary, but be mindful of terrain difficulty.
- Marking Your Own POIs: As you discover useful locations (like a rare resource node) or dangerous areas (like a persistent anomaly hotspot), use the in-game waypoint system to add your own markers to the map. Label them clearly (e.g., "Good Scrap," "Mimic Zone") for future reference.
- The Wall's Advance: Always be aware of The Wall's general direction and proximity. Your map will often show its influence as a creeping, destructive force. If The Wall is closing in, prioritize getting back to the garage immediately.
- Using Landmarks: Beyond roads, use distinct natural or man-made landmarks visible in the game world to orient yourself, especially when the map is obscured or your GPS is unreliable.
Key Map Elements and Their Significance:
- Roads: The primary arteries of the Zone. Always prioritize using established roads when possible, but be prepared for them to be damaged, overgrown, or impassable due to anomalies. Dirt roads and trails are less reliable but can offer alternative routes.
- Buildings and Structures: Often contain valuable loot like Chemicals, Electronics, or crafting components. Look for these on your map and plan your exploration accordingly. Higher-tier structures like labs or depots usually yield better rewards.
- Unstable Ground: Some areas might be marked as unstable (e.g., with cracked earth icons). These can be hazardous and may cause your car to get stuck or damaged. Drive slowly and carefully through these areas or find alternative routes.
- Anomaly Signatures: The map might show visual cues for different types of anomalies. Understanding these can help you anticipate their behavior and avoid them. For instance, a pulsating red area might indicate a highly aggressive anomaly that needs to be avoided or dealt with carefully.
- Resource Nodes: Specific icons might denote clusters of resources, such as trees for Wood, rocky outcrops for Minerals, or specific types of debris for Scrap Metal.
By diligently studying and using your map, you'll gain a significant advantage in the unforgiving environment of Pacific Drive. It's your most reliable companion in the face of the unknown, guiding you through the dangers and towards the resources you need to survive and unravel the Zone's mysteries.