
Death Egg Zone - Act 1 (Sonic)
Welcome to the Death Egg Zone, Sonic's ultimate challenge! Act 1 is a relentless gauntlet designed to test your platforming prowess and reflexes. Unlike previous zones, there are absolutely no Rings to collect here. This means every single hit you take, whether from an enemy, a laser, or environmental hazard, results in an instant loss of a life. Precision, patience, and perfect execution are paramount for survival. Prepare for a vertical ascent through a hostile space station, filled with gravity-defying sections, lethal laser grids, and formidable robotic adversaries.
Walkthrough: The Ascent to the Red Eye
The level begins with a series of gravity-altering platforms. Pay close attention to the directional arrows and the subtle visual cues indicating gravity shifts. What was once a ceiling can quickly become your floor, and vice-versa.
- Initial Ascent: Start by moving right, then utilize the first gravity switch to stick to the ceiling. Navigate past the rotating laser emitters. Timing is crucial here; wait for the laser to pass before moving.
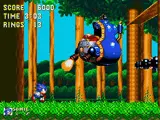
- Gravity Tunnels: You'll encounter several enclosed sections where gravity flips repeatedly. These often contain small, agile enemies called Slicer (small, flying robots that shoot projectiles) or stationary Laser Cannons. Use your Spin Dash to gain momentum and clear these sections quickly, or carefully time your jumps and attacks.
- Laser Grids: Mid-way through the act, you'll face intricate laser grids that activate and deactivate in patterns. Observe the pattern before attempting to pass. A well-timed Spin Jump or even a carefully executed Insta-Shield can sometimes get you through tight spots.
- Enemy Encounters:
- Slicer: Small, fast-moving robots that fire weak projectiles. Best dealt with by a quick Spin Attack or Jump Dash.
- Laser Cannon: Stationary turrets that fire continuous laser beams. Wait for their firing cycle to end before passing, or use an Insta-Shield to briefly deflect their shots if absolutely necessary.
- Crusher Bots: Large, slow-moving robots that extend spiked arms. They are invulnerable from the front when their arms are extended. Wait for them to retract their arms, then attack from above or behind.
- Platforming Challenges: Expect disappearing blocks, moving platforms that require precise jumps, and sections where you must quickly switch between gravity fields to avoid falling into the void below. Always prioritize safe, controlled movements over speed in this no-ring environment.
Boss Battle: The Red Eye Robot
At the end of Act 1, Sonic will confront the menacing Red Eye Robot, a formidable, stationary defense system. This boss is a test of timing and pattern recognition.

Attack Patterns & Vulnerabilities:
The Red Eye Robot has a predictable, cyclical attack pattern:
- Laser Beam: The Red Eye will first fire a powerful, continuous laser beam horizontally across the arena. This beam will sweep from one side to the other.
- Projectile Barrage: Immediately after the laser, the Red Eye will open its "eye" and launch a volley of smaller, homing projectiles. These projectiles can be destroyed with a Spin Attack or deflected with an Insta-Shield.
- Vulnerability Window: Crucially, the Red Eye's central eye is its only weak point, and it is only vulnerable when it is open. This typically occurs during and immediately after its projectile barrage.
Strategy for Sonic:
- Phase 1 (Laser Beam): When the Red Eye fires its laser, position yourself on the opposite side of the arena from where the laser originates. As it sweeps, jump over the beam or use the small platforms on either side of the arena to avoid it. Stay nimble!
- Phase 2 (Projectile Barrage & Attack Opportunity): After the laser, the eye will open. This is your chance!
- Method 1 (Aggressive): As the projectiles launch, quickly jump towards the open eye and perform a Spin Attack. You can often get 1-2 hits in per cycle. Use your Insta-Shield (jump and press jump again) to briefly extend your invulnerability frames if you're worried about the projectiles.
- Method 2 (Defensive): If you're struggling with the projectiles, focus on destroying them first. Once they are cleared, the eye usually remains open for a brief moment, allowing you to jump in for a single hit.
- Exploiting Weakness: The Red Eye requires 8 hits to be defeated. Focus on consistently landing hits during its vulnerability window. Don't get greedy; prioritize avoiding damage over landing an extra hit. Remember, one hit means a lost life!
- Platform Utilization: The arena has small, elevated platforms on the left and right. Use these to gain height for your jumps to reach the Red Eye's weak point more easily, especially during the projectile phase.
Common Pitfalls & Tips:
- No Rings: This cannot be stressed enough. Every hit is fatal. Play cautiously.
- Insta-Shield Mastery: Sonic's Insta-Shield (jump, then press jump again in mid-air) is incredibly useful here. It provides a brief moment of invincibility, allowing you to pass through minor hazards or deflect projectiles. Practice using it effectively.
- Patience: Rushing through Death Egg Zone Act 1 will almost certainly lead to a quick demise. Take your time to observe enemy patterns, laser timings, and gravity shifts.
- Spin Dash for Momentum: Use the Spin Dash to gain speed quickly, especially in gravity-flipping tunnels, but be careful not to overcommit and run into hazards.
Once the Red Eye Robot is destroyed, you will proceed directly to the final confrontation of the game. Good luck, Sonic!