Press Garden Zone Act 1
Welcome to Press Garden Zone Act 1, a vibrant yet perilous stage that blends the natural beauty of a Japanese garden with the industrial hazards of a printing press. This act introduces unique mechanics and environmental dangers that demand precise platforming and quick reflexes. Prepare to navigate treacherous paper shredders, dodge ink presses, and master the art of vertical ascent.
Act Overview & Key Features
- Theme: A captivating fusion of serene Japanese garden aesthetics and a bustling printing factory. Expect cherry blossoms juxtaposed with heavy machinery.
- Primary Hazards: Rapidly rotating paper shredders, crushing ink presses, unstable rotating platforms, and several robotic enemies designed to impede your progress.
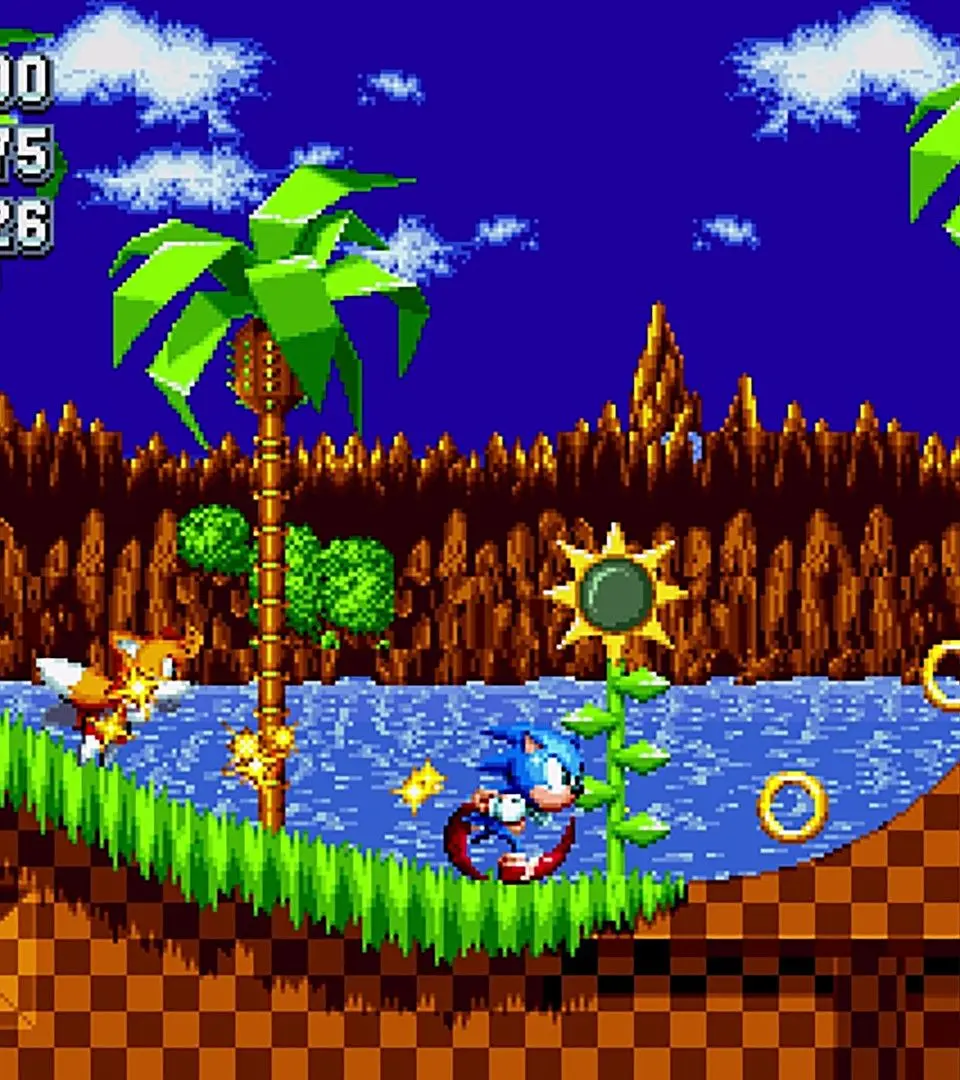
- Unique Mechanics: Powerful wind currents for vertical movement, conveyor belts that alter your speed, and ink-splattering hazards that can obscure your vision or slow you down.
- Boss: Heavy Rider, a formidable member of the Hard-Boiled Heavies, who attacks with a unicycle and a dangerous flail.
- Collectibles: A hidden Giant Ring leading to a Special Stage for a Chaos Emerald, numerous rings for protection and scoring, and various power-ups (shields, invincibility, speed shoes).
Recommended Character
While all characters can successfully complete Press Garden Zone Act 1, some offer distinct advantages:
- Sonic: His Drop Dash ability is excellent for maintaining momentum across conveyor belts and quickly accelerating after jumps, which is crucial for dodging hazards.
- Tails: His flight ability makes navigating the numerous vertical wind current sections and reaching high, hidden paths (including the Giant Ring) significantly easier. He can also carry Sonic, providing a cooperative advantage.
- Knuckles: His glide and climb abilities offer alternative routes and allow him to bypass certain platforming challenges, potentially uncovering unique paths or secrets.
For a first playthrough or for players aiming to find the Giant Ring, Tails is highly recommended due to his superior vertical mobility.
Detailed Walkthrough & Strategy
Act 1 begins with a relatively straightforward path, allowing you to get accustomed to the zone's visual style and basic enemies. You'll encounter standard Badniks like the Egg Pawn (easily dispatched with a Spin Attack or Jump) and the flying Caterkiller Jr. (requiring a well-timed jump or homing attack). Focus on maintaining momentum and collecting rings, as they are your primary defense.
Section 1: Garden Entry & Initial Printing Hazards
As you progress, the environment transitions from lush greenery to the industrial heart of the printing press. You'll soon encounter your first major environmental hazard: paper shredders. These rotating blades are instant death if touched. Time your jumps carefully, using the small platforms between them. Some shredders are stationary, while others move horizontally or vertically. Pay close attention to their patterns.
- Strategy: For stationary shredders, jump over them at their lowest point. For moving shredders, observe their cycle and jump when the path is clear. Don't rush! A well-timed Spin Dash can also carry you through gaps quickly.
- Enemy Alert: Watch out for Ink Blots, small enemies that pop out of ink puddles and shoot ink projectiles. They can be tricky to hit if you're not careful; often, a quick Spin Attack as they emerge is the safest approach.
- Collectibles: Keep an eye out for springs leading to higher platforms in this initial section; they often hide small caches of rings or a Shield power-up.
Section 2: Vertical Ascent & Wind Currents
A significant portion of Act 1 involves vertical ascent. You'll encounter areas with strong wind currents that can propel you upwards. To use these effectively, perform a jump into the current and hold the jump button to gain maximum height. Some wind currents are continuous, while others are intermittent, requiring precise timing.
- Tip: Look for platforms or springs at the top of wind current sections. These often lead to higher paths or hidden areas. If playing as Tails, use his flight to easily navigate these sections and explore off-screen areas.
- Hidden Path: After the first major wind current section, instead of going right, try to jump left onto a higher ledge. This often leads to a small cache of rings or a Speed Shoes power-up, which can be beneficial for the upcoming sections.
- Enemy Alert: Flying Buzz Bombers often patrol these vertical sections. Dispatch them quickly to avoid being knocked out of the wind current.
Section 3: Conveyor Belts & Ink Presses
Further into the act, you'll navigate areas dominated by conveyor belts and ink presses. Conveyor belts can either speed you up or slow you down, depending on their direction. Use them to your advantage for quick traversal, but be mindful of hazards at their ends.
The ink presses are another critical hazard. These massive machines slam down, crushing anything beneath them. They usually have a visible pattern or a warning light before they descend. Observe their timing and dash through when the path is clear. Some presses will leave behind a temporary ink puddle that can slow you down or obscure your vision.
- Strategy: For conveyor belts, use a Spin Dash to overcome opposing currents or to gain extra speed with assisting currents. For ink presses, wait for them to retract fully before attempting to pass. Don't get greedy with your timing. A Shield power-up can absorb one hit from an ink press if you misjudge, but it's still safer to avoid them entirely.
- Power-up Location: Often, a Shield power-up (Flame, Aqua, or Lightning) can be found shortly before or after a series of ink presses, offering some protection. The Flame Shield is particularly useful as it grants a double jump, aiding in navigating the presses.
- Common Pitfall: Getting caught between a conveyor belt pushing you into an ink press. Always assess the entire sequence of hazards before committing.
Giant Ring Location (Chaos Emerald)
Finding the Giant Ring in Press Garden Zone Act 1 requires a keen eye and mastery of the zone's verticality. It is located on a high, secluded path, often missed by players sticking to the lower routes.
- Initial Ascent: Progress through the first major section of paper shredders and wind currents. You'll pass through several loops and springs.
- After the First Ink Press Gauntlet: You will eventually reach an area with a series of vertically moving ink presses. Successfully navigate past these, typically moving from right to left across the screen.
- The High Path Junction: Immediately after the last of these vertical ink presses, you'll land on a platform. Instead of continuing straight (which leads to the main path), look for a series of small, bouncy platforms or springs leading upwards and to the left. This is often a single spring or a small series of platforms that require precise jumps.
- Precise Platforming: This path requires a series of well-timed jumps over a final set of horizontally moving paper shredders. These shredders are often positioned in a way that encourages a precise, almost diagonal jump. If playing as Tails, fly up here. If as Knuckles, glide and climb.
- Reaching the Upper Ledge: Successfully navigating these shredders will lead you to a narrow, elevated ledge. Follow this ledge to the left. It might be partially obscured by foreground elements.
- The Giant Ring: At the end of this high ledge, often obscured by foreground elements or a slight dip, you will find the Giant Ring. Jump into it to access the special stage and potentially earn a Chaos Emerald.
Missable Warning: If you fall from this high path or miss the initial upward springs, you'll likely have to restart the Act to attempt to reach it again, as backtracking is limited. The Giant Ring is usually located about two-thirds of the way through the Act.
Boss Battle: Heavy Rider
The boss of Press Garden Zone Act 1 is the Heavy Rider, a member of the Hard-Boiled Heavies. He rides a unicycle and wields a dangerous flail, making him a challenging opponent if you're not careful. The battle takes place on a relatively flat, open arena.
Heavy Rider's Attack Patterns:
- Flail Attack: Heavy Rider will swing his flail in a wide arc, often in a figure-eight pattern. This attack has considerable reach and can knock you back or damage you. Stay clear of the flail's path.
- Charge Attack: He will occasionally charge across the arena on his unicycle, attempting to ram you. This is usually telegraphed by a brief pause and a revving sound. Jump over him or use your speed to move out of the way.
- Spin Attack (Vulnerable Phase): After performing his flail or charge attack, Heavy Rider will often pause briefly and spin his unicycle in place, creating a small whirlwind. During this animation, his head is exposed and he is vulnerable to attack. This is your primary window for dealing damage.
Strategy for Defeating Heavy Rider:
- Observe and Dodge: Stay mobile and observe Heavy Rider's attack patterns. Prioritize dodging his flail and charge attacks. Use your speed to your advantage, keeping a medium distance.
- Exploit Vulnerability: The key to damaging Heavy Rider is to attack him during his brief vulnerable phase when he spins his unicycle. After he completes a flail or charge, quickly jump and perform a Spin Attack (or Homing Attack as Sonic) on his head. You typically get one or two hits per opening.
- Ring Management: Collect rings from the arena if available. Heavy Rider's attacks can be punishing, and having a buffer of rings is crucial for survival. Don't be afraid to retreat briefly to grab rings if you're low.
- Patience is Key: Don't rush your attacks. Wait for the clear opening. Trying to hit him outside of his vulnerable phase will result in damage to you. He is invulnerable during his flail and charge.
- Environmental Awareness: The arena is relatively flat, but be mindful of the edges. Don't get cornered, especially during his charge attack.
- Character Specific Tips:
- Sonic: Use the Drop Dash to quickly reposition after dodging an attack and launch into a Spin Attack during his vulnerable phase.
- Tails: His flight can be used to easily get above Heavy Rider for a head stomp during his vulnerable phase, or to escape a tricky situation.
- Knuckles: His glide can be useful for avoiding the charge attack and positioning himself for a downward punch during the vulnerable window.
After several successful hits (typically 8 hits without rings, or 10-12 with rings depending on difficulty), Heavy Rider will be defeated, clearing the way to Act 2. Congratulations on completing Press Garden Zone Act 1!