
Caer Bocram & Shaikos Ruins
Your journey continues as you pursue the elusive blastia thief, leading you to the desolate yet historically significant abandoned city of Caer Bocram. This section will guide you through its intricate environmental puzzles and then into the ancient, monster-infested Shaikos Ruins, culminating in a challenging boss encounter.
Caer Bocram: The Abandoned City
Upon entering Caer Bocram, you'll immediately notice its eerie silence and crumbling architecture. The city serves as a large-scale puzzle itself, requiring careful observation and interaction with the environment to proceed. Your primary goal here is to activate the various blastia devices scattered throughout the city to open new paths.
Navigation and Puzzles
- Entrance Area: From the initial entry point, head north. You'll encounter a large, inactive blastia.
- First Blastia Activation: To activate this blastia, you'll need to find a way to power it. Look for a smaller, glowing blastia shard nearby. Interact with it to absorb its energy. Then, return to the larger blastia and interact with it again to transfer the energy, causing it to hum to life and open a gate.
- Windmill Puzzle Hint: Further into the city, you'll come across a series of windmills. One common environmental puzzle involves manipulating the wind currents. You'll notice certain blastia devices that, when activated, change the direction or strength of the wind. Your objective is often to direct the wind towards a specific windmill or to clear a path blocked by debris that can only be moved by strong gusts. Pay attention to the direction indicators on the ground or the blastia themselves. For example, activating a blastia might cause a gust of wind to push a movable platform into place, allowing you to cross a gap.
- Path to the Central Plaza: Continue navigating through the city, activating blastia and solving minor environmental obstacles. Keep an eye out for glowing objects and interactable points.
- Central Plaza: This area often contains multiple paths and more complex blastia arrangements. You might need to activate several blastia in a specific sequence or within a time limit to unlock the next area.
Enemies in Caer Bocram
While not as dense as a dungeon, Caer Bocram still harbors some foes:
- Gatragh: Large, beast-like enemies. Weak to Fire.
- Spinos: Armored creatures. Use physical attacks.
- Mandragora: Plant-type enemies that can inflict status effects.
Notable Items in Caer Bocram
Explore every nook and cranny. Many chests are hidden off the main path.
- Life Bottle x2: Often found in side alleys.
- Apple Gel x3: Common recovery items.
- Orange Gel x1: Essential for TP recovery.
- Specific Equipment: (e.g., Chain Whip for Rita, Iron Plate for Karol) - Check behind crumbling walls or elevated platforms.
Shaikos Ruins: Ancient Depths
After successfully navigating Caer Bocram, you'll gain access to the Shaikos Ruins, an ancient dungeon teeming with more formidable enemies and culminating in a significant boss battle. This dungeon is linear but features several branching paths for treasure.
Dungeon Layout and Enemies
- Entry Chamber: The first room is usually straightforward. Proceed deeper.
- Common Enemies:
- Green Menace: Large, aggressive beasts. Weak to Earth.
- Axe Beak: Fast-moving bird-like enemies. Can inflict Poison.
- Gentlemieu: Magical creatures that cast elemental spells.
- Golems: Stone constructs with high physical defense. Use magic or elemental attacks.
- Puzzle Room (Optional): Some sections might have minor block-pushing puzzles or pressure plates to activate. These usually lead to optional treasure chests.
Recommended Preparation for Shaikos Ruins
- Level: Aim for characters to be around Level 18-22.
- Equipment: Ensure your best equipment is equipped. Prioritize defense and elemental resistances if possible.
- Accessories: Crucially, equip accessories that protect against status effects, especially Poison and Seal. The boss can inflict these. Items like the Poison Charm or Mystic Mark are highly recommended.
- Items: Stock up on Apple Gels, Orange Gels, and several Life Bottles. Panacea Bottles are also useful for status effect removal.
- Skills: Have healing skills (Estelle), elemental magic (Rita), and strong physical artes (Yuri, Karol, Raven) ready.
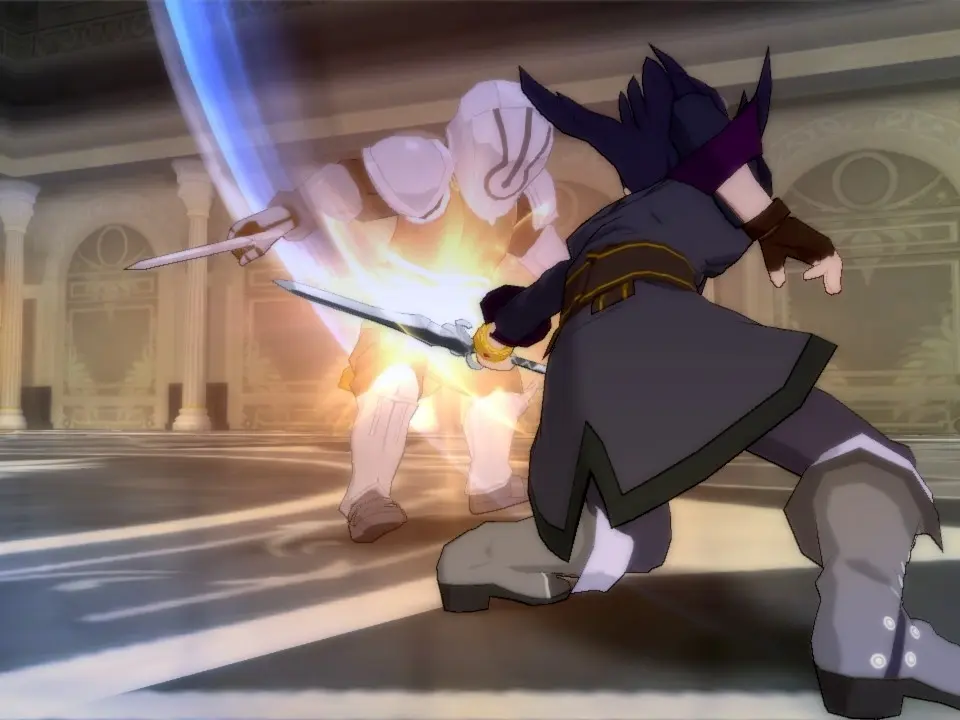
Shaikos Ruins Boss: Zagi
The challenging boss awaiting you at the deepest part of Shaikos Ruins is none other than Zagi, the blastia thief you've been pursuing. This is your second encounter with him, and he's significantly stronger than before.
Boss Strategy: Zagi (Second Encounter)
- Weakness: Zagi has no inherent elemental weakness, but he is susceptible to physical combos and burst artes.
- Key Attacks:
- Blast Shot: A ranged blastia attack.
- Cyclone: A close-range spinning attack that can hit multiple party members.
- Fatal Strike: A powerful single-target attack he uses after charging.
- Over Limit: Zagi will periodically enter Over Limit, making him more aggressive and resistant to staggering.
- Status Effects: He can inflict Poison and Seal, making protective accessories vital.
- Recommended Party Setup:
- Yuri: Your primary damage dealer. Focus on aggressive combos.
- Estelle: Essential for healing and support. Keep her away from Zagi's direct attacks.
- Rita: For long-range magic damage. Use her to interrupt Zagi's casting or to deal damage during his Over Limit.
- Karol/Raven: Karol can provide additional physical damage and healing. Raven offers ranged support and some healing. Choose based on preference.
- Battle Tactics:
- Focus Fire: Have Yuri and Karol (if present) engage Zagi directly, building up combos.
- Heal and Dispel: Estelle should be on standby for healing and using Recover or Panacea Bottles to remove Poison and Seal.
- Ranged Pressure: Rita should continuously cast her strongest spells (e.g., Fire Ball, Stone Blast) from a distance.
- Over Limit Management: When Zagi enters Over Limit, he becomes much harder to stagger. This is a good time to use your own Over Limit with Yuri for a powerful Mystic Arte, or to have Rita unleash a flurry of spells. Alternatively, play defensively until his Over Limit ends.
- Guard and Dodge: Zagi's attacks are fast. Learn his patterns and use Guard or Free Run to dodge his more powerful strikes, especially his Fatal Strike.
- Exploit Stagger: After a long combo or a powerful arte, Zagi will be briefly staggered. Use this window to unleash your strongest attacks.
Rewards for Defeating Zagi
- Gald: A significant amount for your efforts.
- EXP: A good boost for your party.
- Specific Item: (e.g., Mystic Gem or a unique weapon) - This will vary slightly depending on the game version, but expect a valuable drop.
After defeating Zagi, the path forward will open, allowing you to continue your quest. Remember to save your game after this challenging encounter!