
Kakariko Village & Death Mountain
Following your triumph in the Forest Temple, your path now leads you to the familiar yet unsettling landscape of Kakariko Village. This once peaceful settlement, nestled at the base of Death Mountain, has been consumed by the encroaching Twilight, plunging the Eldin Province into an eerie, colorless void. As Wolf Link, your immediate and crucial task is to dispel this darkness by collecting the Tears of Light scattered throughout the region. This segment of your adventure will introduce you to new environmental challenges, the formidable Goron tribe, and a vital new ability that will forever change your approach to Hyrule's vast expanse.
Restoring Light to Eldin Province: Collecting Tears of Light
Upon entering the Eldin Province, you'll find Kakariko Village and its surroundings shrouded in Twilight. Your goal is to collect all 16 Tears of Light to restore the Light Spirit Eldin. This process requires you to navigate the transformed landscape as Wolf Link, utilizing your senses to track down the Shadow Insects.
Step-by-Step Walkthrough:
- Arrive in Kakariko Village: You'll enter Kakariko Village from the south. The village is deserted, save for a few frightened residents hiding in their homes and the pervasive Shadow Insects.
- Meet Renado and Colin: Head towards the largest building in the village, which is Renado's Sanctuary. Inside, you'll find Renado, the shaman, and his daughter Luda, along with Colin and Ilia (who is unconscious). Renado will explain the situation and ask for your help.
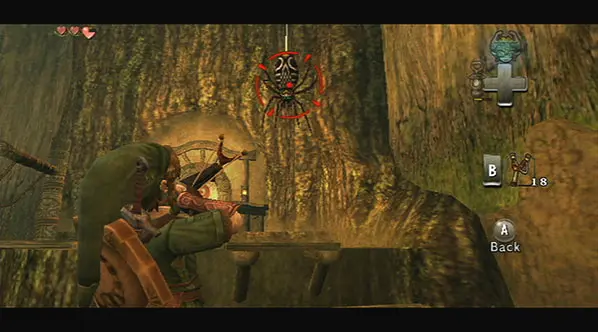
- Acquire the Vessel of Light: After speaking with Renado, Midna will appear and provide you with the Vessel of Light, which will automatically collect the Tears of Light as you defeat Shadow Insects.
- Collecting the First 10 Tears in Kakariko Village:
- Tear 1-3: Three Shadow Insects are immediately outside Renado's Sanctuary. Use your Sense to locate them and defeat them.
- Tear 4: Head towards the general store (the building with the large sign). One Shadow Insect is inside.
- Tear 5-6: Two Shadow Insects are near the entrance to Death Mountain, past the general store.
- Tear 7: Climb the ladder next to the general store and jump across the rooftops. The insect is on a higher platform.
- Tear 8: Enter the Kakariko Graveyard, located to the east of the village. One Shadow Insect is near the entrance.
- Tear 9-10: Continue through the graveyard. You'll find two more Shadow Insects deeper within, often near the large tombstone.
- Collecting the Remaining 6 Tears on Death Mountain Trail:
- Accessing Death Mountain: With 10 Tears collected, head north out of Kakariko Village towards Death Mountain. The path is blocked by a rockslide. Midna will warp you past it.
- Tear 11-12: As you ascend the initial path of Death Mountain, you'll encounter two Shadow Insects. Be wary of the rolling boulders.
- Tear 13: Continue climbing. You'll reach a point where the path splits. Take the lower path to find another Shadow Insect.
- Tear 14-15: Further up the mountain, you'll find two more Shadow Insects near some Goron structures.
- Tear 16: The final Shadow Insect is usually found near the very top of the accessible trail, often requiring a bit of platforming or a jump with Midna's help.
- Restoring Light: Once all 16 Tears of Light are collected, the Vessel of Light will glow, and the Light Spirit Eldin will appear, restoring light to the Eldin Province and transforming you back into Human Link.
Common Pitfalls & Tips for Collecting Tears:
- Use Wolf Sense Constantly: Shadow Insects are invisible to the naked eye in Twilight. Always use your Wolf Sense (press 'C' on GameCube/Wii U, 'B' on Wii) to spot them. They appear as glowing, purple-black outlines.
- Midna's Jump: Many Tears require Midna's assistance to jump across gaps or reach higher ledges. Look for glowing blue markers on the ground.
- Group Attacks: When multiple Shadow Insects are present, use Wolf Link's spin attack (hold 'B' on Wii, 'A' on GameCube/Wii U) to hit all nearby enemies. This is crucial for the groups of three.
- Listen for Cues: Shadow Insects emit a distinct buzzing sound when nearby, even if you can't see them with your normal vision.
Interacting with the Gorons: A Test of Strength
With the light restored, Kakariko Village is safe, but the path to Death Mountain remains perilous, blocked by the Gorons who are hostile towards outsiders. Your next objective is to gain their trust and clear the way to the Goron Mines.
Key Events and Challenges:
- Meet Barnes: Back in Kakariko Village, you'll find Barnes, the bomb shop owner, cowering in his shop. He's too scared to go near Death Mountain.
- The Goron Elder's Son: Renado will inform you that the Gorons are blocking the path due to their elder's son being taken by King Bulblin. He suggests you speak with the Goron Elder.
- Escorting Colin: Soon after, King Bulblin and his forces will attack Kakariko Village, attempting to kidnap Colin. You must protect him.
- Strategy: This is a mounted combat sequence. Use your sword to deflect arrows and attack Bulblins. Focus on protecting Colin from being hit. After defeating the initial wave, King Bulblin will appear. Engage him in a joust. Aim for his side or back after he charges.
- Reward: Successfully protecting Colin earns you the Hero's Bow from Rusl.
- Gaining Goron Trust: The Gorons on Death Mountain are initially aggressive. You cannot simply walk past them.
- Method 1 (Recommended): Return to Renado's Sanctuary. Renado will suggest you speak with a Goron named Gor Amoto who is in the spring at the back of the sanctuary. He will teach you a special Goron technique: the Goron Roll (or rather, how to be thrown by a Goron).
- Method 2 (Alternative): You can try to fight your way up, but it's difficult and often results in being thrown back down. The Goron Roll is the intended path.
- Ascending Death Mountain:
- Goron Throws: Use the Goron Roll technique. Approach the Gorons blocking the path. They will grab you and throw you upwards, allowing you to bypass obstacles. This requires precise timing and aiming.
- Navigating Boulders: Continue to dodge the rolling boulders as you ascend. Use the Goron throws to reach higher ledges and cross gaps.
- Encountering Dangoro: Near the top, you'll face a large Goron named Dangoro. He's blocking the entrance to the Goron Mines.
- Strategy: Dangoro is a mini-boss. He will curl into a ball and roll at you. When he charges, use your Iron Boots (which you should have equipped from the Forest Temple) to anchor yourself to the ground. He will bounce off you, stunning himself. While he's stunned, grab him and throw him off the platform. Repeat this process three times.
- Reward: Defeating Dangoro opens the path to the Goron Mines.
New Abilities and Key Items Acquired:
This section of your journey is rich with crucial new tools and abilities that will be indispensable for the challenges ahead.
- Warping (Wolf Link Ability): After restoring light to Eldin Province, Midna gains the ability to warp you to any Light Spirit's Spring you've visited. This significantly reduces travel time across Hyrule. To warp, transform into Wolf Link, target a warp portal, and press 'A' (GameCube/Wii U) or 'B' (Wii).
- Hero's Bow: Acquired from Rusl after protecting Colin from King Bulblin. Essential for ranged combat and solving puzzles.
- Goron Roll (Technique): Learned from Gor Amoto. Allows Gorons to throw you to higher ledges on Death Mountain.
With the Eldin Province restored, the Gorons appeased, and the Hero's Bow in hand, you are now fully prepared to delve into the depths of the Goron Mines and face the next major challenge in your quest to save Hyrule.