
Finding the Grapple Beam
The Grapple Beam is a pivotal upgrade on Bryyo, essential for traversing large chasms and manipulating environmental elements. This guide will walk you through the precise steps to acquire it, from navigating the treacherous Cliffside Airdock to confronting the formidable Mogenar in the Gel War Room.
Phase 1: Navigating the Cliffside Airdock
Upon landing on Bryyo, your initial objective is to reach the Cliffside Airdock. This area serves as a crucial hub, connecting various sectors of Bryyo. Be prepared for increased Space Pirate resistance and indigenous Bryyo creatures.
- Initial Descent: From your gunship, proceed through the immediate cavern. You'll encounter several Space Pirates and Gel Worms. Use your Charge Beam and Missiles to dispatch them efficiently.
- Activating the Lift: You'll soon arrive at a large chamber with a deactivated lift. Look for a series of glowing energy conduits on the walls. Use your Combat Visor to identify the power nodes. Shoot the nodes with your Power Beam to activate them sequentially. Once all nodes are powered, the lift will descend.
- Upper Platform Traversal: Take the activated lift to the upper platform. Here, you'll face more Space Pirates, including a new variant, the Aerotrooper, which can fly. Target their jetpacks for quick takedowns.
- Energy Cell Puzzle: At the end of the upper platform, you'll find a locked door requiring an Energy Cell. Scan the nearby environment with your Scan Visor. You'll locate the Energy Cell hidden behind a destructible rock formation. Use a Missile to clear the debris and collect the cell. Insert it into the console next to the door to unlock it.
- Entering the Gel War Room Access: Proceed through the newly opened door. This corridor will lead you directly into the Gel War Room Access area.
Phase 2: Traversing the Gel War Room Access
The Gel War Room Access is a short but challenging corridor filled with environmental hazards and a new type of enemy.
- Gel Pits: Be wary of the glowing, viscous gel pits on the floor. These will slow Samus down and inflict minor damage if she steps into them. Use your Jump and Space Jump to clear these hazards.
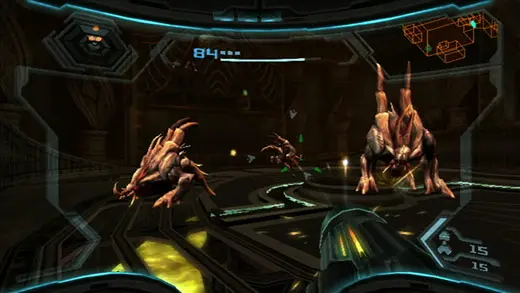
- Gel War Primes: You'll encounter your first Gel War Primes here. These creatures are heavily armored on their front. Aim for their exposed backsides or use a charged shot to stun them before unleashing a barrage of Missiles.
- Reaching the Gel War Room: At the end of the corridor, you'll find a large blast door. Scan the console next to it to open the door, granting you access to the Gel War Room.
Phase 3: Confronting Mogenar in the Gel War Room
The Gel War Room is a large, circular arena. As you enter, the doors will seal behind you, and a powerful mini-boss will emerge: Mogenar.
Mini-Boss Strategy: Mogenar
Mogenar is a colossal, multi-limbed creature encased in a thick, crystalline shell. It possesses formidable offensive capabilities and requires a specific strategy to defeat.
Recommended Loadout:
- Weapon: Power Beam (Charged Shots), Missiles
- Visor: Combat Visor (for targeting), Scan Visor (for initial scan)
Mogenar's Attacks:
- Crystal Shard Barrage: Mogenar will launch a volley of sharp crystal shards at Samus. These can be dodged with well-timed jumps or by strafing.
- Ground Pound: If Samus gets too close, Mogenar will attempt to crush her with its limbs, creating a shockwave. Jump to avoid the shockwave.
- Energy Beam: Mogenar can fire a concentrated energy beam from its core. This attack is telegraphed, giving you a moment to move out of the way.
Strategy:
- Scan Mogenar: Immediately upon entering the fight, use your Scan Visor to scan Mogenar. This will reveal its weak points and add valuable lore to your Logbook.
- Target the Limbs: Mogenar's primary weak points are the glowing, orange energy nodes located at the joints of its limbs. Lock onto these nodes with your Combat Visor.
- Charged Beam & Missiles: Fire charged Power Beam shots at the energy nodes. Each hit will cause a small explosion. After a few charged shots, the node will temporarily overload and become vulnerable.
- Missile Barrage: When a node is overloaded, quickly switch to Missiles and fire several into it. This will inflict significant damage. Repeat this process for each of Mogenar's limbs.
- Exposed Core: Once all of Mogenar's limbs have been damaged sufficiently, its central core will become exposed and glow brightly. This is its ultimate weak point. Unleash a continuous barrage of charged Power Beam shots and Missiles directly into the core.
- Repeat Phases: Mogenar will periodically regenerate its limb nodes. You'll need to repeat the process of damaging the limbs and then targeting the core until it is defeated.
Common Pitfalls:
- Running out of Missiles: Conserve your Missiles for the vulnerable phases. Look for Missile refills dropped by Mogenar during the fight.
- Getting cornered: The Gel War Room is circular, allowing for continuous movement. Keep moving to avoid Mogenar's attacks and prevent being trapped.
Phase 4: Acquiring the Grapple Beam
Once Mogenar is defeated, it will explode, leaving behind a glowing energy signature. A pedestal will rise from the center of the arena, containing your prize.
- Collect the Grapple Beam: Approach the pedestal and interact with it to absorb the Grapple Beam. Samus will perform a short animation, integrating the new ability into her suit.
- Test Your New Ability: Immediately after acquiring the Grapple Beam, look around the Gel War Room. You'll notice several glowing grapple points (usually yellow or orange rings) suspended across the room. Aim at one of these points and use your Grapple Beam (indicated by the on-screen prompt, typically by pointing the Wii Remote at the screen and pressing the B button).
- Exit the Gel War Room: Use your new Grapple Beam to swing across the gaps and reach the exit door, which will now be unlocked.
The Grapple Beam is a fundamental tool that unlocks numerous new pathways and secrets across Bryyo and beyond. Practice using it to master its mechanics, as it will be indispensable for future exploration.
Enemy Strategy: Space Pirate
Standard Space Pirates are common foes. Use charged Power Beam shots to dispatch them quickly. Headshots are particularly effective.
Enemy Strategy: Gel Worm
Small, burrowing creatures. They emerge from the ground and spit corrosive gel. A single Power Beam shot is usually enough to defeat them.
Enemy Strategy: Aerotrooper
Flying Space Pirates equipped with jetpacks. Target their jetpacks with Missiles for an instant kill, or use charged Power Beam shots to bring them down before finishing them off.
Enemy Strategy: Gel War Prime
Heavily armored creatures. Their front is almost impervious to damage. Circle around them and target their exposed back with charged Power Beam shots or Missiles.
Visor: Combat Visor
The default visor for combat. Displays enemy health, lock-on reticles, and weapon information.
Visor: Scan Visor
Used to scan objects, enemies, and environmental elements to gather information and unlock doors or puzzles.
Movement: Jump
Samus's basic jump ability. Essential for clearing small gaps and dodging attacks.
Movement: Space Jump
An upgrade that allows Samus to perform multiple jumps in mid-air, greatly increasing her vertical and horizontal traversal capabilities.