
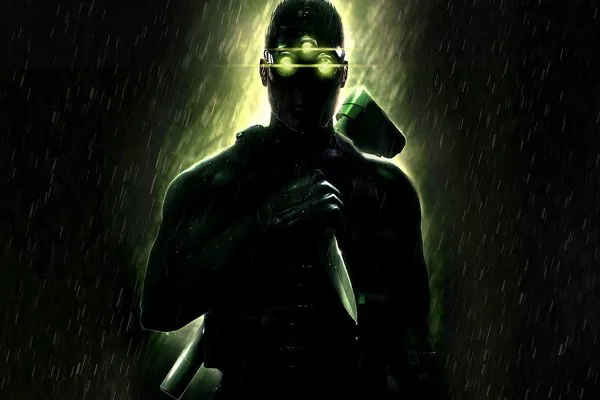
Tom Clancy's Splinter Cell: Conviction throws you into the shoes of Sam Fisher, a rogue agent on a personal vendetta. This isn't your typical stealth game; Conviction emphasizes aggressive action and fluid movement, letting you mark and execute enemies with the iconic 'Mark & Execute' feature. You'll be vaulting over cover, using gadgets, and blending into shadows to uncover a deadly conspiracy.
This guide is your key to mastering Conviction's challenges. We'll walk you through Sam's path of vengeance with detailed mission breakdowns, analyze every weapon in your arsenal, and provide tactical tips to help you earn those Gold Medals. Whether you're tackling the single-player campaign or the cooperative missions, we've got you covered.
GAME INFORMATION
Tom Clancy's Splinter Cell is a Stealth Action/Third Person Shooter for Playstation 2, rated M15+ for players in Australia.
Game Details:
- Title: Tom Clancy's Splinter Cell
- Genre: Stealth Action/Third Person Shooter
- Console: Playstation 2
- Rating: M15+
- Players: 1 player
- Developer: Ubi Soft
- Country of Release: Australia
- Guide Author: fluxwildlyuncut (Rhys Palazzolo)
- Author E-Mail: [email protected]
- Guide Version: Version 1.3
Introduction:
It is the year 2003. In response to the growing use of sophisticated digital encryption to conceal potential threats to the national security of the United States, the NSA (National Security Agency) has ushered forth a new dawn of intelligence-gathering techniques. This top-secret initiative, dubbed Third Echelon, marks a return to classical methods of espionage, enhanced with leading-edge surveillance and combat technology for the aggressive collection of stored data in hostile territories. When intelligence deemed critical to national security cannot be obtained by traditional means, Third Echelon is granted clearance to conduct physical operations.
Denied to exist by the U.S. government, Third Echelon deploys units known as Splinter Cells: elite intelligence-gathering forces consisting of a lone field operative supported by a remote team. Like a sliver of glass, a Splinter Cell is small, sharp, and nearly invisible.
March 10, 2004: The CIA contacted NSA officials regarding the loss of contact with Agent Alison Madison, a CIA operative monitoring widespread communication shortages plaguing the former Soviet Republic of Georgia. A second operative, Agent Blaustein, was inserted into the Georgian capital T'bilisi to locate Agent Madison, only t
Guide Version History:
- Version 1.0 (30/04/03): The main Walkthrough is nearly complete with only two levels to go. The Abattoir level has been finished.
- Version 1.1 (09/05/03): Added the mission 'Chinese Embassy II'. Added 2 readers contributions.
- Version 1.2 (20/05/03): Finished the guide with the last level 'Presidential Palace'. Added a few readers contributions. Fixed up a few errors.
- Version 1.3 (Current): Changed a few things about the 'Presidential Palace,' like the hold-up and killing Nikoladze. Added a lot of readers contributions. Went through and checked for spelling and grammar twice. Added new section Frequently Asked Questions. Added section to 'Reader's Notes'.
Guide Contents:
- Introduction
- The Story So Far
- About Stealth Action
- Sam Fisher Profile
- In-Game Tips
- Walkthrough
- Training
- Police Station
- Defence Ministry
- Oil Refinery
- CIA HQ
- Kalinatek
- Nuclear Power Plant
- Chinese Embassy
- Abattoir
- Chinese Embassy II
- Presidential Palace
- Frequently Asked Questions
- Credits
Reader's Notes:
This gameguide is copyright protected (C) and cannot be used without permission by the author. It has been created for PERSONAL use only and cannot be used to make a profit or to be used as a 'Free-be' when you purchase something else. You cannot rip off parts of this guide and put them on something else as that is called 'plagiarism', and it won't be tolerated. If the author finds it on a site/FAQ without asking permission, then they will ask for it to be removed. You can however use this guide to help you make your own as long as you do not copy any of the content of this guide. If you want to send anything to the author, then send it to [email protected] and be sure to put 'SC' or 'Splinter Cell' as the subject so that it is easier to sort them out. Also, you are allowed to use the format to give you an idea on how to start writing a guide.
This guide can only be posted on the following sites: GAMEFAQS (WWW.GAMEFAQS.COM), IGN FAQS (WWW.FAQS.IGN.COM), CHEATCODES (WWW.CHEATCODES.COM).
When sending e-mails, please make sure that the grammar and spelling is right. Please do not abbreviate your words (i.e. u -> You, ur -> You are, etc.) and please use the correct capitals where they are needed, such as at the start of sentences and when using 'I'. This makes it a lot easier for the author as they don't have to read through the posts correcting mistakes and fixing up abbreviations.
Inventory
A comprehensive guide to the inventory items and mission walkthrough for 'Grinko's Driver' and 'The Courtyard Laser Grid' in Tom Clancy's Splinter Cell: Conviction.
This section details the inventory items available and provides a walkthrough for specific missions in Tom Clancy's Splinter Cell: Conviction.
- SC Pistol
- Laser Mic
- Optic Cable
- Lock Pick
- Disposable Pick x1
Grinko's Driver
Objective: Find Grinko's driver without setting off any alarms. Mission failure occurs if an alarm is triggered.
- 1Start on a rooftop. Lambert will brief you to find Grinko's driver.
- 2Rappel down the wall using the chimney. You can press triangle to jump off the wall for a quicker descent.
- 3Enter the building through a window and crouch.
- 4Wait for a guard near a bookshelf to look for a book, then incapacitate or eliminate him in the shadows.
- 5Shoot out the camera above the door with your pistol.
- 6Use the computer, then proceed through the door and turn right.
- 7Open the next door, lean against the wall, and use L3 to look out.
- 8Eliminate the approaching guard with a headshot to avoid alerting the other guard and setting off the alarm.
- 9Slowly enter the room and incapacitate or eliminate the second guard. Hide both bodies in a dark corner as lights cannot be shot out.
- 10Proceed through the door on your left into a stairwell.
- 11Turn on night vision and go to the top floor to find a medical kit.
- 12Descend the stairs, shooting out cameras on every second landing. Listen for their buzzing noise.
- 13Pass a checkpoint at the bottom.
- 14Open the next door and shoot out the camera in front of you.
- 15Enter the car park. Run forward and hide behind a blue car.
- 16Shoot out the camera on the wall.
- 17Locate Grinko's driver (Hamlet). Sneak up on him when he is distracted (e.g., using the restroom) and grab him. Do not kill or knock him out, as he needs to talk.
- 18Interrogate Hamlet, who will reveal Grinko is meeting Philip Masse in the courtyard.
- 19Take Hamlet to a dark corner and knock him out.
- 20Return to the room where the two guards were previously dealt with.
- 21Find and open another door. Shoot out the camera directly above it.
- 22Enter the room, use the two computers, and locate an open vent.
- 23Jump on the desk to reach the vent and pull yourself up. This leads to a save point.
The Courtyard Laser Grid
Objective: Navigate the courtyard and bypass the laser grid.
- 1Turn on night vision to see in the ducts.
- 2Crouch and follow the vent until you reach a grate overlooking a chef.
- 3Continue to the end of the vent and drop into a cold area.
- 4Crouch and move towards a door with plastic sheeting.
- 5Observe a guard enter and speak with the chef. After the guard leaves and the door closes, sneak in and incapacitate the chef.
- 6Open the door and either shoot or sneak up on the guard standing with his back turned. Hide his body in the dark cafeteria.
- 7Proceed past where the guard was to a set of stairs.
- 8Take the left set of stairs.
- 9While on the stairs, aim at a guard below and take him out in one shot to avoid sounding the alarm.
- 10Wait for the other guard to investigate the body and eliminate him, or return to the top of the stairs for him to pursue you.
- 11Hide both bodies under the stairs. Avoid the chairs and double doors to prevent triggering an alarm.
- 12Use the com.
Similar guides you might like


100% Human-Written. AI Fact-Checked. Community Verified. Learn how AntMag verifies content