Complete Mortal Shell 2 Tremor boss fight strategy and Outworld level walkthrough, including Dragon Eye locations and how to cross unaligned blocks.
Walkthrough
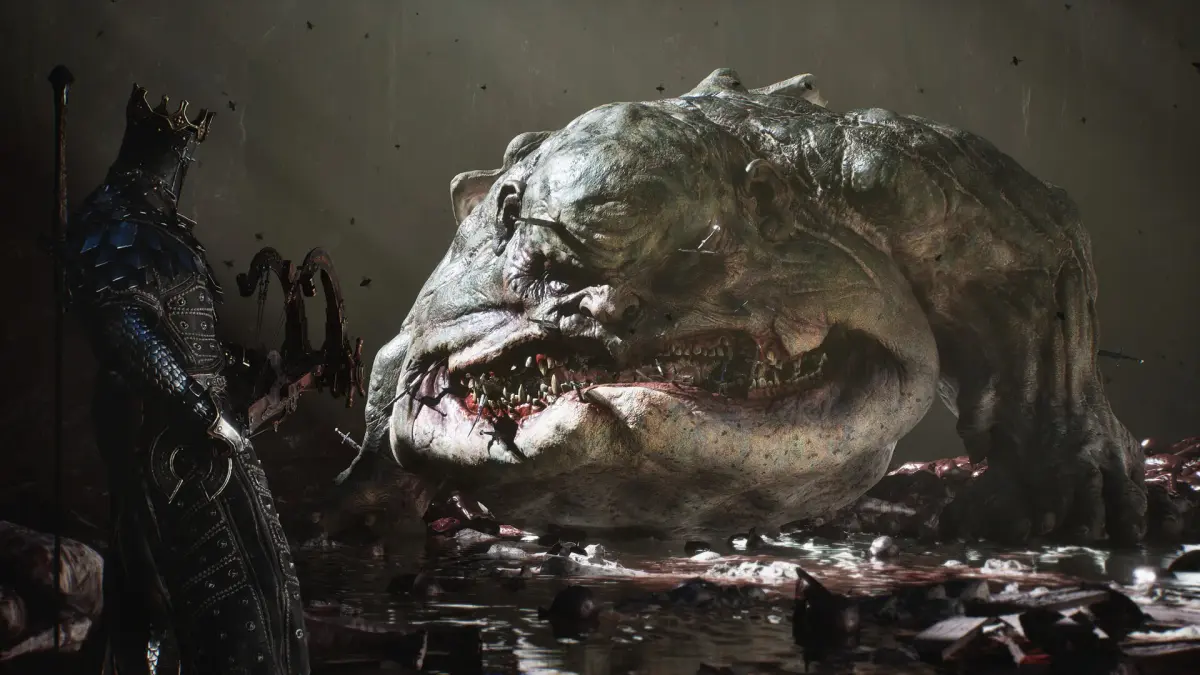
- 1Fight Tremor by dodging his projectiles and attacking with combos when you have an opening. When you get close, he will pound the ground; endure this and continue attacking until he is defeated.
- 2After defeating Tremor, walk through the portal. You will have a conversation with Gemini.
- 3You will arrive in the Outworld, the final level. Your objective is to find two stones for the altars of King Kang and King Tsung.
- 4Head forward, then left, and kill the guards. At the very end of this area are the altars of King Kang and King Tsung.
- 5Head back and go right. Kill the two enemies there. An easy tactic is to use the Super Uppercut combo to knock them off the edge.
- 6Go down towards the purple lighting to find a portal. Enter it.
- 7Go left, then up to get shotgun cartridges.
- 8Go to the center to receive a stone called the Dragon Eye.
- 9Go back and head left to a platform. You will find a medium medipak and a portal.
- 10After going through this portal, head left, then up to get some rockets.
- 11Go back and head right. Near this right is a chance to go down; do so carefully to avoid falling.
- 12When you can't go down further, go left.
- 13When you reach a square platform, go straight and continue straight into the red portal.
- 14You will land on a purple polygon figure. Go straight, then go left.
- 15When you reach a square, head down and watch your step. On your left is a series of squares that are not aligned properly. Try to stay in the center and walk straight left, aligning yourself with the next block. Diagonal steps can also help. If you fall, you may land on green turf that leads back to the purple polygon.
- 16At the end of the unaligned blocks is a portal. Walk through it.
- 17You will fall onto a small square area with a fence. Walk toward the upper part to activate a prompt to move a bridge.
- 18Step back into the portal and make your way back through the unaligned blocks to the beginning. Go right this time.
- 19Alternatively, you can fall off the blocks to return, but risk missing the green turf.
- 20Head all the way right, crossing the bridge.
- 21Once at the other side, stop and go down the ramp, then head left.
- 22Straight ahead is another Dragon Eye.
- 23Go back to the intersection and head straight, walking into the portal.
- 24You will be back in the earlier part of the level. Cross the bridge, then go down.
- 25Head all the way left, then go up where the two altars lie.
- 26Place the Red Dragon Eye on Tsung's altar and the Purple Dragon Eye on Kang's altar.
- 27Go to the portal and press X to exit this part of the level.
- 28Jump off the cliff you are on to get the large medipak below.
- 29Immediately head straight. In the next room, at the upper right, is a sniper cartridge.
- 30Keep going straight to reach an intersection. The left path leads to the end of the level, while the paths ahead and to the right lead to power-ups.
- 31To find power-ups, head forward from the intersection. There is nothing on the left path, so head for the right path. At the end of it is a large medipak.
- 32Go back to the three-way intersection and head right. Go down when possible, as there is nothing if you keep going right.
- 33Head right, then go up the first path. The second path offers nothing. At the end of this platform are some rockets.
- 34Return to the main three-way intersection.
- 35This time, go left, then head down. Go left until you reach a point where you can go down again.
Tips
- Use the Super Uppercut combo to knock enemies off the edge of platforms.
- Be very careful when navigating the unaligned blocks, as the controls can be touchy and falling can reset your progress.
- If you fall off the unaligned blocks, try to land on the green turf to return to the purple polygon figure.
- The enemies in Outworld are not armed but are stronger and take longer to kill; special moves are less effective.
- The left path at the final intersection leads to the end of the level.
100% Human-Written. AI Fact-Checked. Community Verified. Learn how AntMag verifies content