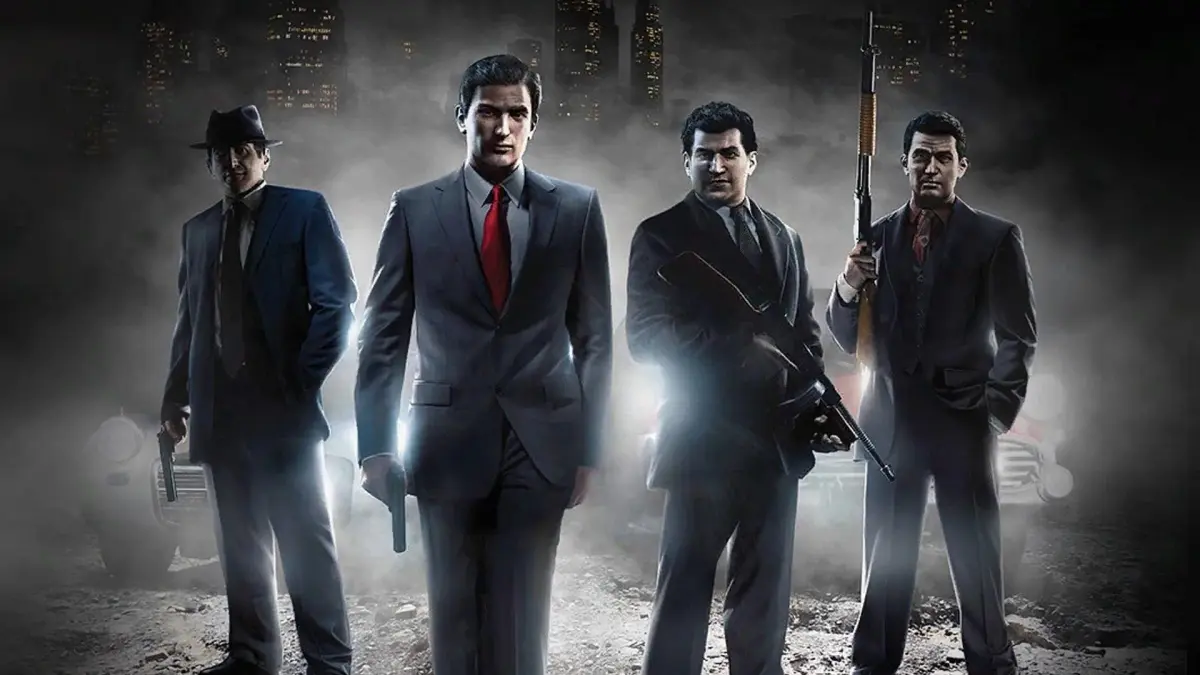
Welcome to Empire Bay, Vito Scaletta. Mafia II drops you into the shoes of a returning war hero who quickly finds himself entangled in the city's criminal underworld. This isn't just about shooting; it's about navigating a compelling story, making tough choices, and rising through the ranks of the Falcone and Clemente families. You'll be stealing cars, engaging in shootouts, and trying to outsmart the cops as you live out a gritty, atmospheric crime drama.
This guide is here to help you master every aspect of Vito's journey. We'll cover getting started, completing key objectives, and understanding the nuances of combat and weapons. Plus, we'll dive into how to manage notoriety, customize your look, and ensure you don't miss any crucial story progression elements. Whether you're aiming for that Gold Medal or just want to experience the full story, we've got you covered.
Part 1
Your friendly guide to Mafia II's Part 1. Learn how to master hand-to-hand combat, effective gunplay with the cover system, and essential driving tips to get started.
Alright, let's dive into Mafia II! This first part is all about getting you comfortable with the core mechanics. You'll be using Vito's fists, guns, and even cars to handle business, so pay attention to these basics.
Combat Basics:
- Hand-to-Hand: This is surprisingly useful. The key is timing your dodges. Hold the dodge button until your opponent throws a punch, then immediately counter-attack after they miss. It's all about patience and landing that hit when they're open.
- Gunplay & Cover: Mafia II's cover system is your best friend. Use the cover button to duck behind objects, and only pop out when you see an opening. For headshots, aim for the head, obviously! If you're using an automatic weapon like the Thompson M1A1, start aiming for the chest. The gun's recoil will naturally guide the bullets upward, making it easier to rack up hits. Also, keep an eye out for explosive gas tanks – a well-placed shot can clear out a group of enemies in a flash.
- Vehicle Combat: Don't forget you can use your ride as a weapon! Ramming into enemies, cops, or even civilians can be a quick way to take them out. Just remember, your car can take damage, and those body imprints can be fixed at a garage for a small fee. More importantly, if people start shooting back, those bullets can seriously hurt you inside the car, so don't linger too long as a sitting duck.
Driving:
Driving is a huge part of the game. To get into a vehicle, you can either smash a window or pick the lock. Once you're in, the wiring happens automatically. Getting around town is key, so get a feel for handling the cars early on.
Part 2
Navigate the early parts of Mafia II in Part 2 of our guide. Learn about crime, law enforcement, vehicle mechanics, and complete the first two chapters: The Old Country and Home Sweet Home.
This section of the walkthrough covers essential gameplay mechanics and the initial chapters of Mafia II.
- 1Chapter One: The Old Country (Sicily, July 1943)
- Start behind cover and eliminate the dictator on the steps with a headshot.
- 2Engage other soldiers during the firefight.
- 3Advance up the stairs when clear, avoiding fire from the main doors.
- 4Climb through the window to the left of the front doors and proceed forward.
- 5Take cover next to wood, equip a grenade, aim to lean from cover, and throw.
- 6Equip your rifle and move to the next room. Pick up weapons and ammo near the table; an SMG is recommended.
- 7Take cover next to the door. After the soldier kicks it in, shoot the enemy on the stairs, then the one above.
- 8Once the first floor is clear, go upstairs and turn left. Take cover at the next doorway.
- 9Deal with the two enemies in the room: one behind the desk, the other behind crates to the left.
- 10Proceed to the next door and kick it in.
- 11Shoot the soldier in the head, ensuring the hostage is unharmed.
- 12Stay clear of the doors ahead.
- 13Follow the private to the balcony and take cover.
- 14Shoot enemy soldiers on the ground, who are taking cover behind stalls and pillars.
- 15Move back inside and mount the MG-42. Use infinite ammo to eliminate enemies until the chapter ends.
- 16Chapter Two: Home Sweet Home (Empire Bay, February 8th, 1945)
- After meeting Joe, return to Little Italy.
- 17Go up the stairs next to the diner and follow the road to the red blip.
- 18Inside the apartment, go upstairs to the door next to the power meter.
- 19After the scene, go to your bedroom and sleep.
- 20Upon waking, go to the closet and get dressed.
- 21Leave the apartment to begin the fighting tutorial.
- 22Follow on-screen commands to beat the collector. A good strategy is to hold the dodge button until the enemy attacks, then strike when they miss.
- 23After defeating the collector, go to Joe's place. You cannot steal cars at this point, so walk to the red blip. Joe's apartment is on the 3rd floor to the right.
- 24When you regain control of Vito, grab the… [content cut off in source]
Tips:
- Hijack vehicles using the indicated button prompt when you need to get into a vehicle quickly. Be aware of gang members who may try to reclaim their cars.
- Observe posted speed limit signs and your speedometer to avoid police attention. Use the
Part 3
Mafia II Part 3 walkthrough covering Giuseppe's, stealing cars, and selling stamps. Includes all collectibles.
- 1Pick up PLAYBOY PLAYMATE #1 from the coffee table and follow Joe to his car.
- 2Get in the car and drive, following Joe's warning about the ice and his directions to Giuseppe's.
- 3Go to the door and follow Joe upstairs to the glowing door.
- 4After the scene, browse Giuseppe's products and purchase the lockpicks.
- 5Begin the lockpicking tutorial by moving to the lock and using the indicated button to move the sliders and pick the lock.
- 6Follow Joe back outside and walk over to the '42 Jefferson from earlier.
- 7Use your lockpick on the car, taking your time to get used to the mechanics.
- 8Once you break into the car, a cop will appear, giving you a two-star notoriety and making your plates wanted.
- 9Drive away and lose the police.
- 10Once they are off your tail, go to the bodyshop marked by the red blips and honk your horn.
- 11Repair any damages, change the paint if you wish, change the rims, and tune your car before leaving the shop.
- 12After leaving the bodyshop, follow the path to the next marker, being careful with your new car.
- 13Once the scene ends, shoot the tires out of the old wreck then aim for the gas tanks to blow the car up.
- 14Look for the car crushed across from Mike's office and enter through the mandoor.
- 15Grab PLAYBOY PLAYMATE #3 from the shelf to your right.
- 16Follow the path on your minimap (radar (your minimap with nearby blips and threats marked)) to the LoneStar bar.
- 17Once the scene ends, climb the fence and steal the car. You can either shoot the guy on the other side of the fence and take cover (using cover to shield yourself from gunfire) or run directly to the car and smash the window.
- 18Once you've got the car, drive through the gate and run away. You will be chased by enemy gang members and cops.
- 19Lose them and go back to Mike for your reward.
- 20Drive back to Joe's apartment and store your car in the garage. You can get your vehicle from the garage anytime you go out from now on.
- 21Sleep on the couch in Joe's kitchen to end the chapter.
- 22After the scene, follow Steve to the warehouse and pick up PLAYBOY PLAYMATE #18 on the floor near the door.
- 23Load one of the crates onto the truck and go to the open door to quit moving crates.
- 24Go downstairs and to one of the red blips to start collecting fees.
- 25Speak to the workers using the indicated button to get the money. After the third guy, a cutscene (a non-interactive cinematic the game plays automatically) will begin.
- 26Once you regain control, you'll need to defeat the worker. Remember to hold the dodge button until he attacks, then punch back after he swings.
- 27After taking down the worker, go back to Derek's office and give him the money and take your cut.
- 28Drive to Freddy's and meet Joe to get your next job.
- 29Once you're done speaking with Joe and Henry, drive to the red blip on your map to meet Maria.
- 30Enter the apartment and look for PLAYBOY PLAYMATE #4 next to the shelf in front of you.
- 31Go to Maria's door and let her know what you need.
- 32Drive Maria to the hospital and listen to what she has to say about the job.
- 33Drive across the road and walk to the red blip down the alley.
- 34Hop the fence and climb through the bathroom window.
- 35Exit the bathroom to the corridor, acknowledging the warning about the security guards.
- 36Walk down the hall and open the brown doors across the elevators to the lobby.
- 37Sneak next to the guard and grab PLAYBOY PLAYMATE #40 without alarming him, then sneak across the lobby behind the pillar.
- 38Go through the brown double doors and follow the corridor to the blue door on your left.
- 39Go down the stairs to the next hallway and go to the metal door on the other end.
- 40Under a light and next to a box is PLAYBOY PLAYMATE #6.
- 41Leave this room and go to the next door to the right, walk to the panel, and disable the security alarm.
- 42Go back to the lobby and up the stairs. On the second floor, watch out for the guard, then go left.
- 43Go right, then another left down the hall to the Director's office.
- 44Grab the keys, then enter the door across the hall and grab PLAYBOY PLAYMATE #5 from the window.
- 45Backtrack and take two rights down the hall.
- 46Go left when you see a guard at the ledge; don't get too close.
- 47Go through the white door to the left and pick the lock on the barred door.
- 48Go to the safe and open it.
- 49Once you've got the stamps, leave the room and go back down the stairs to the lobby.
- 50Backtrack to the bathroom, then go back out the window to your car.
- 51Drive back to Freddy's Bar to meet with Henry. You have limited time to sell the stamps.
- 52Start by driving to the gas stations nearby, then to the stations on the other island if there is time.
- 53You do not need to get out of your vehicle to sell the stamps; just honk as you would if you were purchasing gas.
- 54Get dressed and meet Joe at Freddy's Bar.
- 55Later, you will gain control of Vito outside of the bar with a uniform on.
- 56Drive to the mall and approach the glowing door to the jewelry store and pick the lock.
- 57Follow Joe.
- When picking locks, take your time to get used to the mechanics.
- After stealing the '42 Jefferson, you will get a two-star notoriety (wanted level (the star icons in the top-right showing how aggressively police pursue you)). Lose the police before heading to the bodyshop.
- At the bodyshop, everything is on Joe, so repair any damages and customize your car.
- When stealing the car from the LoneStar bar, you can either shoot the guy and use cover, or run directly to the car.
- When collecting fees, after the third guy, you will have to fight a worker. Use the dodge button until he attacks, then counter-punch.
- When sneaking in the building for the stamps, be aware of security guards and use stealth to avoid detection.
- When selling the stamps, you can do so by honking your car horn at gas stations; you do not need to exit the vehicle.
- PLAYBOY PLAYMATE #1, #3, #4, #5, #6, #18, #40 magazines
- Money from collecting fees and selling stamps
- Your car can be stored in Joe's garage for future use.
- The ability to sleep on the couch in Joe's kitchen to end the chapter.
Part 4
Complete walkthrough for Part 4 of Mafia II, guiding you through missions, combat, and finding all hidden Playboy Playmates. Includes Chapter Five and Six details.
- 1In the bookstore, take cover at the counter, shoot Irish thugs, and grab PLAYBOY PLAYMATE #9 from a box after the stairs.
- 2Continue upstairs, go left towards the doors, and pick up PLAYBOY PLAYMATE #2 from the floor to the right.
- 3Catch up with Joe and guard him from police until he opens the next door.
- 4On the roof, take cover and takedown pursuing cops. After three are dead, approach the ledge.
- 5Follow Joe across the platform, take cover on the low wall, and fire at police on the next rooftop.
- 6Move with Joe to the next area and engage more police.
- 7Through the next door, grab PLAYBOY PLAYMATE #8 next to a shelf, then follow Joe down the fire escape.
- 8Once wanted by police, avoid them and go to the nearest clothing store.
- 9Reach Joe's apartment building, go down the stairs towards the gate, and get PLAYBOY PLAYMATE #7 from the floor.
- 10Chapter Five: The Buzzsaw - Get dressed and leave Joe's apartment. Speak with the girl, then the guy. Fight him.
- 11Drive to Freddy's to meet Joe. After the scene, drive to Harry's Shop (red blip) to get the MG-42.
- 12Load the MG-42 into the van and drive carefully to the next marker, using the speed limiter if needed.
- 13After the scene, use the MG-42 to kill everyone on the road, aiming for gas tanks.
- 14Disarm the MG-42 and follow Henry and Joe to the stairs. Go up and get PLAYBOY PLAYMATE #11 from the floor next to a door.
- 15Go back down and kill remaining henchmen on the road. Grab their dropped weapons.
- 16Move across the street to the distillery and kick in the door. Take cover by the stairs and shoot henchmen behind crates and pillars.
- 17Move forward with Joe and Henry, avoiding molotovs. Kill enemies behind pillars and on stairs.
- 18Enter the office on the left and get PLAYBOY PLAYMATE #10 from the shelf next to lockers.
- 19Continue up the stairs, kill the last enemy, and grab cover. Use cover on either side to advance and kill guards.
- 20Take cover near the elevator and kill enemies inside. Take the elevator up.
- 21Immediately take cover to the left, avoiding the warehouse door. Flank enemies using the blue mandoor to the left while Joe and Henry engage them.
- 22Grab enemy weapons and move forward. Kill the enemy on the stairs, then take cover behind crates.
- 23Watch for another guard in this area and move forward to trigger a cutscene.
- 24After the scene, get PLAYBOY PLAYMATE #12 next to wood chairs to your right and exit the distillery.
- 25As the building shakes, watch for two henchmen from the next door. Take cover in the next room and kill the third henchman.
- 26Turn around and go down the stairs. Move to the door and outside.
- 27Drive through two fences and follow the red marker to your destination, losing the police.
- 28Optionally, visit the bodyshop (icon at the end of the bridge) to change plates if not being chased.
- 29Drive to El Greco's before Henry's timer runs out. Then drive to Mamma's apartment to meet Francesca.
- 30Chapter Six: Time Well Spent - Walk with the guard down the hall and up to your cell, then use the bed.
- 31In the yard, go to the bleachers to the right and grab PLAYBOY PLAYMATE #13 near a sleeping prisoner.
- 32Walk across the basketball court towards the shed. Between the fence and shed, get PLAYBOY PLAYMATE #14 from the ground.
- 33Approach the old man playing chess. Fight Brian O'Neil; dodge his attacks and hit him after he swings.
- 34Follow the fighting tutorial with your sparring partner. You can practice more or leave the gym.
- 35You'll be interrupted and start another fight. Use counterattacks to tire and defeat your opponent.
- 36Follow the prison guard to the laundry room for another fight. Use previously learned moves to win.
- 37After the fight, look for PLAYBOY PLAYMATE #15 on one of the machines.
- 38Follow the guard to clean urinals several times, then take a shower.
- 39In the shower, fight more prisoners one by one.
- 40Fight Brian O'Neil again. Use finishing moves. When he draws a knife, a scene will begin, ending the chapter.
- Aim for gas tanks when using the MG-42 for quick enemy elimination.
- Grab dropped weapons from henchmen to make subsequent fights easier.
- Use flanking maneuvers, like the blue mandoor, to gain an advantage against enemies.
- If being chased by police, consider visiting a bodyshop to change your license plates.
- When fighting Brian O'Neil, focus on dodging his attacks and striking during his openings.
- Use counterattacks effectively in hand-to-hand combat to wear down opponents.
- Playboy Playmate #9
- Playboy Playmate #2
- Playboy Playmate #8
- Playboy Playmate #7
- Playboy Playmate #11
- Playboy Playmate #10
- Playboy Playmate #12
- Playboy Playmate #13
- Playboy Playmate #14
- Playboy Playmate #15
Similar guides you might like


100% Human-Written. AI Fact-Checked. Community Verified. Learn how AntMag verifies content