Follow this walkthrough for The Legend of Zelda: Phantom Hourglass to navigate the Temple of the Ocean King (2), obtain the Phantom Hourglass, and find all three Force Gems.
Walkthrough
- 1After receiving the Phantom Hourglass from Oshus, head back into the temple. You have ten minutes to reach the bottom. Sand does not drain in safe zones.
- 2Proceed to the first door, opened by the Spirit of Power, and go downstairs. Avoid the two Phantoms by staying out of their line of sight. If seen, they chase you and drain 30 seconds from the Hourglass. Run into a safe zone to become invisible.
- 3From the center, head right to a safe zone, then up. Hit the switch.
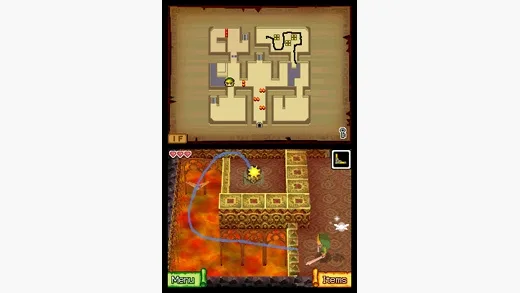
- 4Head south, then left to the next safe zone, avoiding the patrolling Phantom.
- 5Use your Boomerang to transfer fire from a lit torch to an unlit one in the southwest corner, removing fire blocking a path. Be quick as the torch will extinguish.
- 6Head west to a safe zone. Watch the Phantom patrolling the hall. When it's halfway north, dash to the safe zone to the north.
- 7Wait for the Phantom to pass, then run north and east to step on a switch, opening a stone slab guarding a key. Grab the key when safe and return to the locked door.
- 8Head through the locked door and down the stairs.
- 9On the next floor, avoid the stationary Phantom's gaze. Head south, then left to a switch. Hit it, and the Phantom will approach.
- 10Go back north past the Phantom's original position and hit a second switch to drop a key.
- 11Return to the first switch and hit it again to lure the Phantom away. Quickly pull the lever it was guarding to clear flames.
- 12Head west to a red jar. Break it to reveal a safe zone. Use the Boomerang to hit a switch across the flames, dropping them.
- 13Head south to a safe zone. Wait for the Phantom to patrol north, then go to the blue blocks. Wait for the Phantom to pass, then run north, step on a switch to lower spikes, and use the Boomerang to grab the key. Retreat to the safe zone.
- 14Once the Phantom passes again, return to the blue blocks, hit the switch to lower red blocks, and head through the locked door.
- 15On the third floor, find three Force Gems and place them on pedestals in the large safe zone near the northeast corner.
- 16Head right, then up, then left. Break a gold jar for an extra 30 seconds on your Phantom Hourglass.
- 17Continue left to a safe zone with a chest containing the first Force Gem. Carry it on your head (which slows you down).
- 18Take the first Force Gem south, then east, then north into the safe zone. Place it on a pedestal.
- 19Head to the southeast corner. Wait for the Phantom carrying a key to pass the safe zone, then run to the corner, avoiding spikes, to find the second Force Gem. Take it back to the pedestals.
- 20To get the third Force Gem, go to the southwest corner and pull a lever, releasing flames guarding stairs to a higher platform. Go up when clear.
- 21On the platform, there are two switches. Step on a switch when the Phantom crosses the hole below to make it fall to its death and drop the key.
- 22Grab the key and head to the locked door near the southeast corner to get the last Force Gem. Place it on the pedestal to open the stone slab leading to the end.
Tips
- Phantoms cannot be defeated and kill Link in one hit, draining 30 seconds from the Phantom Hourglass. Avoid their line of sight at all costs.
- Safe zones make you invisible to Phantoms.
- The Boomerang is used to transfer fire and hit switches across gaps.
- Carrying Force Gems slows Link down significantly.
- Be mindful of the Phantom Hourglass timer; return to the outside to reset it if needed.
100% Human-Written. AI Fact-Checked. Community Verified. Learn how AntMag verifies content