Navigate Temple of the Ocean King (3) in The Legend of Zelda: Phantom Hourglass. Discover shortcuts, Force Shards, and defeat Phantom Eyes.
Walkthrough
- 1On B1, head to the switch, then bomb the rocks to the left for a shortcut to the key.
- 2On the second floor, hit the two switches to drop the key. Bomb the wall south of the entrance for a shortcut. Grab the key and proceed through the blue and red blocks.
- 3Before the locked door, stop at the safe zone, then bomb the wall just west of it for a 30-second Hourglass bonus. Proceed downstairs.
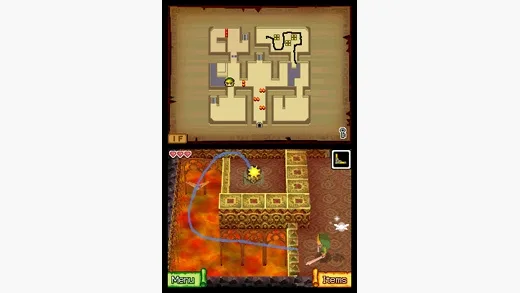
- 4On the third floor, grab the Force Shard in the northwest corner and take it to the pedestal.
- 5Head east and bomb the rocks for an additional 30 seconds.
- 6Head south and use the Boomerang to hit the switch, stopping the nearby spikes.
- 7Grab the second Force Shard in the southeast corner and return it to the pedestal.
- 8Use the shovel to reveal a rising wind that will carry you to the top platform to get the key.
- 9Kill the Phantom, grab the key, and head to the locked door.
- 10Grab the last Force Shard and return it to its pedestal. Proceed through to the next room.
- 11Run to the far left side of the room, grab the 30 seconds, then head back to the Door of Wisdom and proceed through and down the stairs.
- 12On the next floor, head east and south, just past the safe zone. Use your Boomerang to hit the switch past the gust of wind to the south, and the Phantom Eye in the corner. This disables the gust and dazes the Phantom Eye, allowing you to go past and kill it.
- 13Use the Boomerang to grab 30 seconds from the gold jar in the southeast corner.
- 14Head west then north, avoiding Phantoms. Reach just north of the center of the room, around the corner of the second Phantom Eye. Use your Boomerang to daze it when it gets close enough, then defeat it.
- 15When the third Phantom Eye is out of sight range, run for the safe zone in the middle west. Wait there to take out the final Eye, revealing a chest on the opposite end of the room.
- 16Run to the chest and grab the Power Gem.
- 17Go to the southwest corner of the room. East of there, dig up the dirt mound to reveal a rising gust of wind.
- 18Throw a bomb into the wind to destroy the rocks above, then ride up and hit the switch.
- 19Go to the north safe zone and use your boomerang to grab 30 seconds from a jar to the north.
- 20Head northeast of the switch and bomb the cracked wall to get to another switch, which will lower the spikes guarding the key.
- 21Grab the key, then head to the locked door in the southern middle of the room, and proceed downstairs.
- 22On the next floor, make your way as far west as you can go. Use the Boomerang to hit a switch on the other side of the gap, beyond the spikes. This will lower the spikes on the east side of the room.
- 23Head there and grab the 30 seconds.
- 24Proceed back west and north into a room with four Gold Chu-Chus. Defeat them, and two doors will open, with spikes dropping to reveal 15 seconds of additional time.
- 25Head east into the next room, which contains 4 Miniblins. Kill them, and two more doors will open with more spikes revealing another 15 seconds. Grab the time and head north.
- 26Use the Boomerang to hit the switch to the right, which will reveal a chest and stop the wind to the left.
- 27Grab the chest, which contains a Red Potion (restores six hearts). Head west and down to the next floor.
- 28From the entrance on the next floor, use the Boomerang to daze the eye to the east, then take it out.
- 29Head to the southwest corner and hit the switch to drop the spikes near the closest safe zone. Read the tablet (fourth tablet governing the crest).
- 30Head to the two safe zones north of there to find two more tablets (middle indicates four tablets total, north indicates the second tablet).
- 31Proceed north and west, and head to the middle left safe zone. Defeat the Phantom Eye, revealing a 30-second bonus to the west.
- 32Head to the southern safe zone and bomb the rocks guarding it. Read the tablet (third tablet governing the crest).
- 33Head back north to the northwest corner, then dig up the dirt mound to reveal a rising wind. Throw a bomb into the wind to destroy the rocks above, then ride up and hit the switch.
- 34Go to the north safe zone to find the tablet that begins and ends the sacred crest.
- 35Head to the center of the room, stepping on a switch to stop the gust of wind, to a large red door.
- 36Draw the sacred crest as indicated by the tablets: _ _ | F |______| 2 | |_L_|.
Tips
- Bombing walls often reveals shortcuts or bonuses.
- Use the Boomerang to hit switches and daze Phantom Eyes from a distance.
- The Phantom Eye will call a Phantom if it spots you, but can be defeated.
- Collect all Force Shards to progress.
- Pay attention to tablet inscriptions for clues.
100% Human-Written. AI Fact-Checked. Community Verified. Learn how AntMag verifies content