Enhance your EverQuest play with advanced UI customization and addons. Tailor your interface for optimal efficiency and a more immersive experience.
EverQuest's user interface, while functional, can be significantly enhanced to improve your gameplay experience. This section delves into advanced UI customization options and the world of third-party addons, allowing you to tailor your display for optimal efficiency and immersion.
Understanding the Default UI Elements
Before diving into custom UIs, it's crucial to understand the default elements you'll be manipulating or replacing. Familiarity with these components will make the transition to a custom UI much smoother.
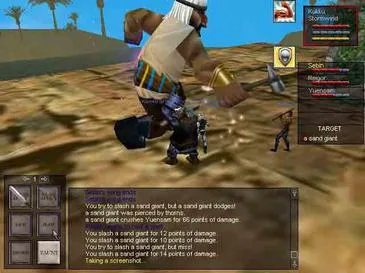
- Main Chat Window: Your primary communication hub. Can be split into multiple tabs for different chat channels (e.g., Guild, Group, Say, OOC).
- Player Window: Displays your health, mana, endurance, and various buffs/debuffs.
- Target Window: Shows the health, name, and status of your current target.
- Group Window: Essential for group play, displaying the health and mana of your party members.
- Hotbar (Action Bar): Where you place your spells, abilities, and items for quick access. Multiple hotbars can be enabled.
- Inventory Window: Manages your carried items and equipped gear.
- Spell Book: Lists all your learned spells.
- Buff/Debuff Window: Displays active buffs and debuffs on your character.
- Compass/Map: Navigation tools.
In-Game UI Customization
EverQuest offers robust built-in tools for adjusting your UI without needing external files. These are your first steps towards a personalized interface.
- Unlocking and Moving Windows:
- Right-click the title bar of any UI window.
- Select "Lock Window" to toggle its locked status. An unlocked window can be dragged anywhere on your screen.
- Strategy: Group related windows together (e.g., Player, Target, Group) for easy monitoring. Place hotbars in easily accessible locations.
- Resizing Windows:
- For most windows, hover your mouse over the edges until a double-headed arrow appears. Click and drag to resize.
- Some windows, like the Main Chat Window, have specific resize handles in the corners.
- Customizing Chat Windows:
- Right-click the chat window's title bar and select "New Chat Window" to create additional tabs.
- Right-click a chat tab and select "Filters" to control which messages appear in that specific tab. This is crucial for decluttering your main chat.
- Actionable Step: Create a "Combat" tab that only shows combat messages, a "Group/Guild" tab for communication, and a "Loot" tab for item drops.
- You can also change font size and color for different chat types within the "Options" menu (Alt+O) under the "Chat" tab.
- Hotbar Configuration:
- Open your "Actions" window (Alt+A).
- Drag spells, combat abilities, or inventory items directly onto your hotbars.
- Right-click an empty hotbar slot and select "New Hotbutton" to create custom macros.
- Strategy: Utilize multiple hotbars (up to 10 can be displayed) for different spell sets (e.g., healing, DPS, utility) or item usage. Assign keybinds to these hotbars for rapid access.
- Saving Your Layout:
- Once you've arranged your UI to your liking, type
/saveuiinto your chat window and press Enter. - This saves your current layout to a file named
UI_[CharacterName]_[ServerName].iniin your EverQuest directory (usuallyC:\Users\Public\Daybreak Game Company\Installed Games\EverQuest\UI_CharacterName_ServerName.ini). - Benefit: If your UI ever resets, you can reload it by typing
/loadui.
- Once you've arranged your UI to your liking, type
Third-Party UI Addons (Custom UIs)
For the most significant UI transformations, you'll turn to custom UI packages created by the EverQuest community. These packages can completely overhaul the look and functionality of your interface.
Where to Find Custom UIs:
- EQInterface.com: This is the premier destination for EverQuest custom UIs. It hosts thousands of user-created interfaces, ranging from minimalist designs to highly specialized layouts.
- EverQuest Forums: The official EverQuest forums often have sections dedicated to UI discussion and sharing.
- Community Discord Servers: Many EverQuest-focused Discord servers have channels where players share and discuss their favorite UIs.
Installing a Custom UI:
The installation process for custom UIs is generally straightforward but requires careful attention to detail.
- Download the UI Package:
- Navigate to EQInterface.com and browse for a UI that suits your preferences. Look for UIs that are regularly updated and compatible with the latest EverQuest expansions.
- Download the compressed file (usually a .zip or .rar).
- Extract the Files:
- Locate your EverQuest installation directory. The default path is often
C:\Users\Public\Daybreak Game Company\Installed Games\EverQuest. - Inside the EverQuest directory, you'll find a folder named
uifiles. - Extract the contents of the downloaded UI package directly into the
uifilesfolder. Each custom UI should have its own subfolder withinuifiles(e.g.,uifiles\MyCustomUI). - Important: Ensure the extracted folder contains files like
EQUI.xml,EQUI_Animations.xml, and various other XML files. If you find a subfolder within a subfolder (e.g.,uifiles\MyCustomUI\MyCustomUI), move the inner folder's contents up one level.
- Locate your EverQuest installation directory. The default path is often
- Select the Custom UI in Game:
- Launch EverQuest and log into your character.
- Open the "Options" menu (Alt+O).
- Navigate to the "UI" tab.
- In the "Load UI Skin" dropdown menu, you should see the name of your newly installed custom UI. Select it.
- Click "Load Skin" or "Apply" (depending on the client version).
- Your UI will reload, displaying the new custom interface.
- Troubleshooting Common Issues:
- "Error loading UI file": This usually means the UI files are not in the correct directory, or there's a compatibility issue. Double-check your extraction path.
- Missing Windows: Some custom UIs are minimalist and intentionally omit certain default windows. You may need to open them manually via the "EQ" button or by typing
/showname [window name](e.g.,/showname inventory). - Outdated UI: If a UI hasn't been updated for a long time, it might break with new EverQuest patches. Look for UIs that explicitly state compatibility with recent expansions.
- Resetting to Default: If a custom UI causes significant problems, you can always revert to the default UI by selecting "Default" from the "Load UI Skin" dropdown in the Options menu.
Advanced UI Configuration Tips
- Macroing UI Commands: You can create hotbuttons to quickly show or hide specific UI windows. For example, a macro with
/showname inventorywill open your inventory. - Opacity Settings: Many UI elements, both default and custom, allow you to adjust their opacity. This can be found by right-clicking the window title bar and selecting "Window Settings" or similar. Adjusting opacity can help reduce screen clutter.
- Font Customization: Some custom UIs allow for custom fonts. These usually involve placing .ttf files in a specific folder within the UI's directory. Refer to the UI's documentation for specifics.
- Multiple UI Profiles: If you play multiple characters with different needs (e.g., a healer vs. a melee DPS), consider creating separate UI layouts for each. Save them with distinct names using
/saveui [filename]and load them with/loadui [filename].
By mastering these customization techniques, you can transform your EverQuest experience, making your interface a powerful tool that enhances your efficiency and enjoyment in Norrath.
100% Human-Written. AI Fact-Checked. Community Verified. Learn how AntMag verifies content