Follow this Tomb Raider III walkthrough to defeat Sophia, escape her office building, and navigate the treacherous icy terrain of Antarctica, finding secrets and essential items along the way.
Walkthrough
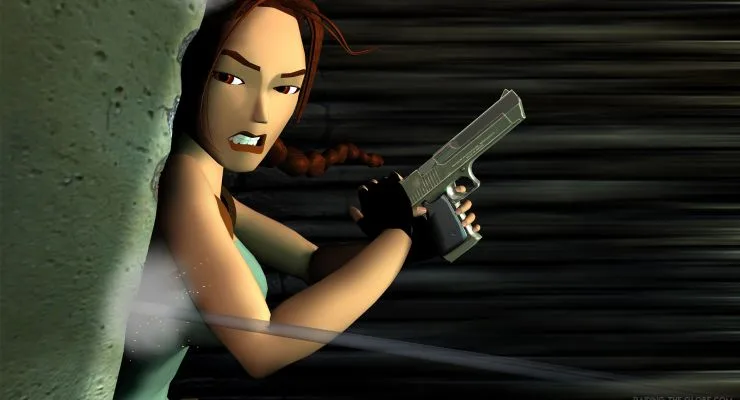
- 1Sophia has left her office. Chase her out to the street. She will fire energy bolts from the artifact; take cover and wait for her to charge up before moving, as her first shot is very powerful and can take half your health.
- 2Run up the ramp and climb onto the block. Turn around, use a running jump with a grab to reach the pink light, and swing to the next ledge. Climb up to the left and then up again.
- 3On the bridge, turn left, take cover behind a block. When clear, sprint across the bridge and push the button at the end. A Small Medi-pack is on the bridge, but wait until Sophia is dead to collect it.
- 4Return to the block and climb on top of it.
- 5SECRET #1: Face Sophia, back off the block to the ledge behind. Back off this ledge and grab the edge. Shimmy left, drop, and grab the opening. Inside, find a Large Medi-pack and a Rocket.
- 6Climb up on the yellow bridge. There is a Large Medi-pack on the left, but wait until Sophia is dead to get it.
- 7Run right past the ladder and take cover in the small alcove. When Sophia charges, quickly come out, jump and grab the ladder, and scramble up. Ignore the Small Medi-pack at the top and crawl forward.
- 8Turn around and jump to the highest ledge. Run, jump, and grab to reach the ledge ahead. Shoot the circuit box with your Pistols to defeat Sophia.
- 9Once Sophia is dead, collect any missed Medi-packs from the lower ledges. Return to the highest ledge and face Sophia's side of the street.
- 10Use a running jump to cross the street. Climb up on the block but avoid the steel platform with the artifact. Climb the ledges around it and drop to the ledge left of it. Press the button to cut off the electricity. Pick up the Eye of Isis to complete the level.
- 11Antarctica Level Start: Lara arrives in Antarctica via helicopter, which crashes on thin ice and sinks.
- 12The water in Antarctica is frigid; an exposure meter appears when in the water, draining faster in deeper areas, causing damage if it depletes.
- 13To the left in the water, find Desert Eagle Clips. Jump to the small ice island, turn towards the ledge to the right, jump into the water, and swim quickly left to climb out on a slope.
- 14Move past the hut and use a running jump to the ledge on the other side of the channel. Turn right, climb the ledge, and follow it up to a slope. Use a standing jump forward to get on top, then jump to the snowy arch and cross into the cave for a Large Medi-pack, Flares, a Rocket, and a Save Crystal.
- 15Return across the arch, head left around the corner, jump to the ledge below, and follow it to the end.
- 16Swim across the water to the ledge ahead. Climb up and wait for the exposure meter to fill, then jump back in the water. Swim to the low ledge near the ship and climb out. Climb the nearby ledges and grab the ceiling. Swim to the end and drop onto the block. From here, jump to the ship.
- 17Drop to the hold and follow the ramp down. Kill the RX Technician and proceed down the hall, killing another. Climb up behind the engine and throw the switch. Drop down the trap door and kill the RX Technician. Another appears in the hallway; kill him and push the button to open the door.
- 18In the next room, take a right and head down. Kill the RX Technician and take his Desert Eagle Clips. Drop down the hole. Another RX Technician appears as you approach the ladder; kill him, take his Uzi Clips, and climb the ladder. Push the button to drop the Speedboat into the water. Return to the previous room.
- 19Head back up the hallway into the previous room and climb to the upper level. Follow the path to emerge outside.
- 20SECRET #1: Turn right and follow the railing to the end. Turn left and use a standing jump with a grab to get into the opening. Climb down into the icy room and take the MP5 Clips (or the MP5 if you don't have it) and a Save Crystal.
- 21Head back to the end of the ship near where you started. Face the white winch holding the Speedboat and use a standing jump to land on top of it. Immediately jump again to land on a snowy ledge. Jump to the triangular ledge on the corner and climb into the opening to find a Rocket. Slide down the ledges to another snowy ledge next to the Speedboat. Use a standing jump with a grab to land on the Speedboat.
- 22Hang a right and circle around the ship.
100% Human-Written. AI Fact-Checked. Community Verified. Learn how AntMag verifies content