Follow this comprehensive Lost Sphear guide to navigate the Sacred Rahet dungeon, defeat the boss Sherra, and find all hidden treasures and memories.
Walkthrough
- 1On the world map, you will be forced to build the artifact Yggdrasil.
- 2Galdra will provide the necessary memories. Yggdrasil increases physical attacks at the cost of greatly decreased magical attacks, but only applies to the region.
- 3This opens the area to the west; collect any sparklies.
- 4Create another artifact northeast of Los Labyrinth.
- 5Venture west along the top of the land to a blue sparkle containing a memory.
- 6Find the entrance to Sacred Rahet and go inside.
- 7Encounter the merchant Torgo; browse his wares if desired.
- 8Continue west, ignoring the large open area below.
- 9Look for footholds to the left and climb up.
- 10Go to the dead end to the north and use the vulcosuit to break the rock, revealing a sparkly bit underneath.
- 11Fight the monsters to the west.
- 12Restore the boulder, then destroy it with the vulcosuit.
- 13Continue west and climb to the next area, clearing enemies.
- 14To the east, there is a large rock that can be destroyed, but the path beyond leads to a shortcut back to a previous area. Ignore it unless needed.
- 15Keep going north to a three-way split.
- 16The east path leads to a dead end with a memory sparkly bit.
- 17The northern path splits again. Break the rock on the right and climb up to find more enemies and a lost chest containing a Night Coat (requires Mine Memory x2 to restore).
- 18The other path north leads to a chest with 3 M Potions.
- 19Return to the 3-way fork and travel west.
- 20Climb up to find a cave entrance.
- 21Inside the cave, some Twilighters are present, and Galdra joins your party. You must drop one of your current characters.
- 22Continue north to a battle against a Twilighter and other monsters.
- 23After the fight, speak with the captured Twilighter. Choose to capture them for a reward at the end of the mission.
- 24The door to the north is locked; head in the other direction.
- 25To the east, there is another Twilighter fight and a chest behind a wall containing the Southern Cross weapon for Kanata.
- 26Venture south to find another Twilighter; capture them.
- 27Break the rock on the left side to access a chest with 3 Ethers.
- 28Continue east to a short scene with Sodas and Aronus.
- 29Use the save point to heal and save your game.
- 30Drop south, fight the fourth and final Twilighter, then destroy the rocks to access a sparkle bit.
- 31Proceed to the next area for more scenes and the boss fight.
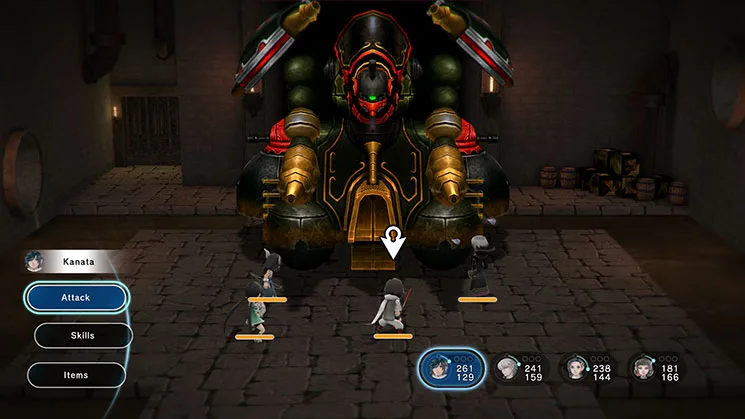
BOSS - Sherra
- Sherra is accompanied by two Shroombacks. It is advisable to defeat the Shroombacks quickly while also damaging Sherra.
- Shroombacks can use Roll Out (hits multiple characters) and Freezing Breath (can freeze a character).
- Sherra's dangerous moves:
- Single Bolt: Damages a single character for around 70 damage.
- Siren Bolt: Damages a character and can inflict Charm, causing them to attack allies. Cure Charm immediately with a Panacea.
- Heal: Heals Sherra for around 80 HP, potentially hitting multiple targets.
- Sonic Rain: An area-of-effect skill hitting everyone for 90-100 damage. There is little to do but heal afterward.
- You will be forced into vulcosuits at the start of the battle. Use skills, as normal attacks are unavailable in suits, but be mindful of VP usage.
- Once the Shroombacks are dealt with, spread out your party (switch to human form by pressing L1 in battle) and engage in a battle of attrition.
- After defeating Sherra, you will return to Command Base.
- A reward is given based on the number of Twilighters captured. Capturing all four yields the best reward.
100% Human-Written. AI Fact-Checked. Community Verified. Learn how AntMag verifies content