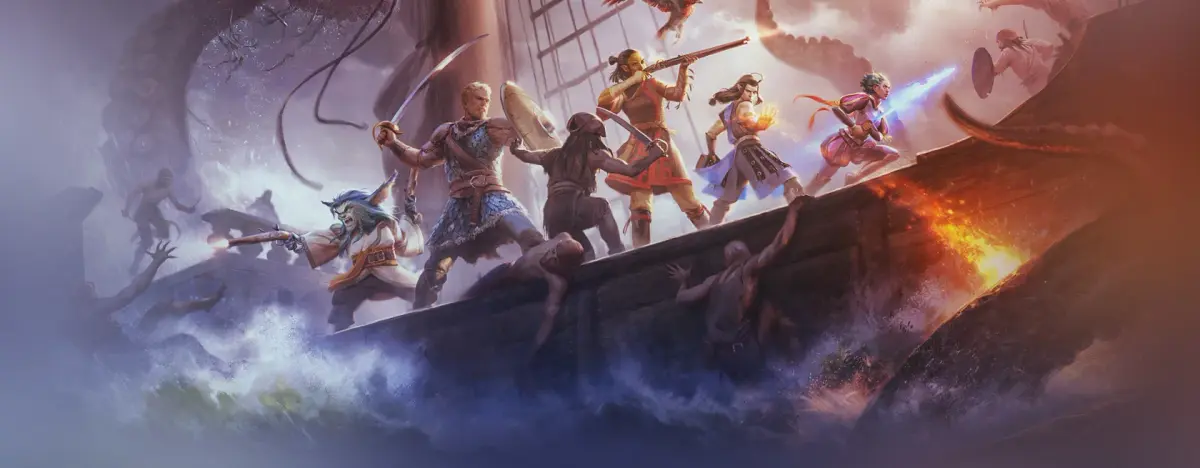
Explore uncharted islands and confront powerful foes like Uamoru the Pretender and Concelhaut in Pillars of Eternity II: Deadfire.
Sail north past Motare o Kōzi and turn northeast to the Ofecchia Channel. You will see a small island named Briny Grotto. This is the lair of one of the mega-bosses so simply make a note of it for the time being.
Uamoru the Pretender
Sail to an island 5°S, 66°E where Uamoru has taken refuge.
Approach his group stealthily. Uamoru is a Chanter / Ranger and is accompanied by a number of beasts and a Giant Dank Spore. When he's dead, loot his remains for the Aamiina's Legacy hunting bow and a pair of Bounding Boots.
Back on the island continue northeast to the Old Battleground. When you search it, you will turn up the Woedica's Strangling Grasp gloves.
Uncharted Island (5°S, 65°E)
Head north from the landing point to Sentinel Hill.
Sentinel Hill
You will come across a group of spirits conducting some sort of ritual.
Creep up on them and attack them. There is an Ancient Wraith and a host of Sirens. After defeating them, continue north and you will come to the Flooded Cave.
Flooded Cave
Make your way west along the passage. When you get to the end, have a stealthed ranged character take out the Sigil of Pain (a magical ward). Have them also attack the Dargul Marksman just looking the other way. This will start combat on your terms. Have your ranged character retreat to the rest of the group, drawing enemies to you through a Slog Zone (an area that slows movement). The leader of the undead group is an Ancient Lich Battlemage who is immune to most things and armed with a battery of nasty spells and abilities. Of course, an upgraded Red Hand can take it out in a couple of hits. Search the Lich's remains for the Brawler's Grimoire.
Keep hold of this grimoire for a later sidequest.
The enemies drop a bunch of Exceptional and Superb gear. There is a Sigil of Darkness (a magical ward) by the Lich's Study which you will need to take out before exploring further. A Cabinet in the study contains a Blackwood Log (3/5).
When you leave the cave, you will be able to name the island.
Return to your ship and continue sailing west. You will find another uncharted island some distance to the west of Motare o Kōzi.
Uncharted Island (7°S, 56°E)
Make your way north around the island to the Isolated Beach.
Isolated Beach
Investigate your surroundings to find a totem which you can destroy.
You will be thrown into battle against a group of Coral Nāga led by a shaman. After dealing with them, you can search the Abandoned Village to the south where you will find a pair of Boots of the White.
Head back around the island to Whēnura Cleft.
Whēnura Cleft
You come across a chasm with a rope crossing it.
With History 13, you can identify the rope as Dyrwoodan or Vailian. With 14 Athletics, you can cross the rope. However, a grim sight awaits you on the other side.
Have your crew members bury the corpses to receive the Footprints of Ahu Taka. Afterwards, you can proceed to the Collapsed Coal Mine.
Collapsed Coal Mine
You will hear an explosion as you approach the mine.
Search the corpse near the entrance for some Superb gear. As you head further into the mine, you will see the people responsible for the explosion: a party of explorers led by a wizard named Eccea.
Make your way around the left and you will meet Eccea coming round to keep watch. This allows you to kill her without alerting the rest of the party. Search her remains for Eccea's Arcane Blaster and her grimoire. Continue round to the main area and take out the rest of the enemies. Afterwards, loot the various containers for gems and explosives.
When you leave the mine, you will be able to name the island. Return to your ship and sail west until you reach Bekarna's Observatory.
Bekarna's Observatory
Head up the hallway for a scene with some Torn Bannermen mercenaries looking for a book. Violence is inevitable. Kill the mercenaries and a couple of eotens that join in. The named mercenaries (Carset and Mimriko) drop some reasonable loot including a pair of Gauntlets of Greater Reliability. When the area is safe, search among the books on the floor for the Shroud of the Phantasm.
Search the bookcase to the right of the staircase for _The Huntress_. You need to examine the quest books in your inventory. Head up the stairs and search the Grand Archives for _The Kingfisher_. Search a hidden panel in Bekarna's Office to find some gems. Head all the way to the left of the upper level and search the bookshelf for _The Leviathan_.
Go back downstairs and use the stairs in the Gear Room to go up to the Orrery.
Bekarna's Observatory - The Orrery
Continue to the observatory roof. If you played the first game, you will meet a familiar figure: Concelhaut. After exchanging pleasantries, violence ensues. Concelhaut is a powerful wizard and he has help. There is also a Sigil of Atrophy (a magical ward) to worry about. Concelhaut's bodyguards rather get in the way so target Concelhaut with ranged attacks. Concussive Tranquiliser is useful for stripping his buffs. When the enemies are dead, grab some excellent loot: Concelhaut drops the Ironclasped Grimoire along with his skull while one of the elite bodyguards drops the Effort great sword.
Search the table for _The Panther_, the fourth volume you need. Wait until nightfall and use the telescope to look at the four constellations mentioned in the books you picked up. Afterwards, examine the orrery and read the plaque for instructions on how to use it. Enter the coordinates of the constellations you just studied and one of the planets will open up. Search it to find Bekarna's Research and A Whale of a Wand.
Return to your ship and sail due north. You may start encountering Rathun longships which chase you and attack you. They shouldn't cause you much trouble and you get to add to your collection of Triumphs. Continue to 1°S, 52°E where you will reach an island where you can land.
Urnox the Rathun
Head inland and skirt around the edge of
100% Human-Written. AI Fact-Checked. Community Verified. Learn how AntMag verifies content