Learn the special Kremkoin trick in Pirate Panic for 75 Kremkoins and find Kremkoin locations in Mainbrace Mayhem and Gangplank Galley in Donkey Kong Country 2: Diddy's Kong Quest.
Walkthrough
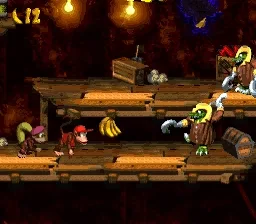
- 1In Pirate Panic, go to the cabin where King K. Rool's note is located without collecting the Bananas near the entrance.
- 2Immediately leave the room and exit, avoiding the two Bananas, while grabbing the Banana Bunch.
- 3Return to the cabin, again avoiding the two Bananas.
- 4Enter the cabin, jump over the letter (do not touch it), and grab the Red Balloon.
- 5Exit again, avoiding the two Bananas, and go grab the same Banana Bunch to the right.
- 6Once you get the Banana Bunch, return to the cabin, avoiding the Bananas once more.
- 7When you enter the cabin, a Kremkoin will appear over the letter. Touch it to receive 75 Kremkoins.
Tips
- This trick is useful if you are having difficulty locating enough Kremkoins through conventional means to check out the Lost World.
Mainbrace Mayhem
Walkthrough
- 1At the start, roll attack the Click-Clack, then roll jump off the ledge to reach the rope rigging.
- 2Jump to the Bonus Barrel and enter Bonus Room #03.
- 3In Bonus Room #03, climb rope rigging, jump to the next, climb it, then jump to the final set of rope rigging and climb up to find the Kremkoin.
- 4You appear behind some Neeks and below a rope/DK Barrel combo. Climb the rope and grab the "K" before moving left to fight a Click-Clack, followed by two more on a lower beam.
- 5Next, climb the rope rigging, staying left to avoid the Klinger (unless you want to try for the Banana Token), and jump right to where another Click-Clack waits.
- 6Jump to the next set of rope rigging to get the "O" before moving past the Klinger to jump to the next ledge (beware the Click-Clack here).
- 7Climb down the rope to win a Banana Token, then climb to the top, hit the Star Barrel, and grab the Steel Rimmed Barrel.
- 8Go left until you see Neeks charging, and use the barrel on them.
- 9Climb the rope rigging and head across the hand-over-hand section. Where you see a solo Banana, jump up to get a Blaster Barrel to shoot you to a beam with a Green Balloon.
- 10Drop back to the hand-over-hand rope and go right until you hit the rope rigging. Get past the Klinger and jump to the next set of rope rigging. Let the Klinger slide down the rope so you can grab the "N" he is guarding.
- 11Head up the rope, grab the Kannonball, and walk left with Diddy. Enemies will be wiped out as you make your way to the Kannon.
- 12Walk into the Kannon, and it will launch you to Bonus Room #04.
- 13In Bonus Room #04, destroy all the Klingers using the available implements.
- 14Once all Klingers are destroyed, grab the Kremkoin that appears below the middle rope.
- 15You appear right by the Kannon. Climb upwards, go past the Klinger, use the hand-over-hand section, and climb the next rope rigging to the top left. Leap left to land on a beam.
- 16Press the A Button to pick up your partner, hold UP, and press the Y Button to chuck them up to the Bonus Barrel. This grants access to Bonus Room #05.
- 17In Bonus Room #05, climb up and down the rope rigging to collect every star.
- 18Once all stars are collected, climb to the very top of the rope rigging and jump over to the Kremkoin.
- 19When you exit Bonus Room #05, you appear near 24 Bananas and a Banana Token.
- 20Go right and jump the gap to get the DK Coin for this level.
- 21Fall down the Banana trail to hit the target, which is a Red Balloon.
Tips
- Enemies in Mainbrace Mayhem include Click-Clack, Neek, and Klinger.
- Bonus Rooms available are #03-05.
- There are no Animal Helpers in this level.
- The difficulty is rated 1.5/10.
Monkey Museum
Go to the Monkey Museum to visit Cranky Kong. Some tips require payment. Browsing the museum adds 1% to your completion rate, which is only required in Gang-Plank Galleon.
Gangplank Galley
Walkthrough
- 1Immediately climb the barrel stack to find Bonus Room #06.
- 2In Bonus Room #06, throw each chest at the Zinger until the one with the Kremkoin breaks open. You have 10 seconds.
- 3When you shoot out, climb back up the barrel stack and roll jump right. If you fly far enough, you will grab a hook at the top of the screen.
- 4Jump across the series of hooks until you get the DK Coin for this level.
- 5A DK Barrel floats in the sky; break it if you need your other Kong.
- 6Roll through the two Kaboings to the Treasure Chest.
- 7Head right and bust the Treasure Chest on one of the Klomps for your Banana Bunch.
- 8Use the hook to grab the "K".
- 9Three Kaboings will attack next. If you have lost a Kong, use the hook set up to the DK Barrel near the highest one.
- 10Bust the Treasure Chest you find on the next Neek to win a Red Balloon.
- 11Use partner throwing (press A, hold UP, press Y) to throw your partner up into the Launcher Barrel to get on top of the high barrel stacks.
- 12Using the hooks, you will get a Banana Bunch and the letter "O" before jumping back to the main deck.
- 13Grab the Treasure Chest and bust it on the Klomp below the Star Barrel to get a Banana Token.
- 14Break the Star Barrel.
- 15Roll through the Klomp, grab the DK Barrel, and use it to clear out the Kruncha guarding the "N".
- 16Go right, kill the two Neeks, and use the hook to clear the huge gap in the ship.
- 17Grab the Treasure Chest and bust it on one of the Krunchas to get a Banana Bunch.
- 18Use the hooks to cross the hole.
Tips
- Enemies in Gangplank Galley include Zinger, Kaboing, Klomp, Neek, and Kruncha.
- Bonus Rooms available are #06-07.
- There are no Animal Helpers in this level.
- The difficulty is rated 2/10.
100% Human-Written. AI Fact-Checked. Community Verified. Learn how AntMag verifies content