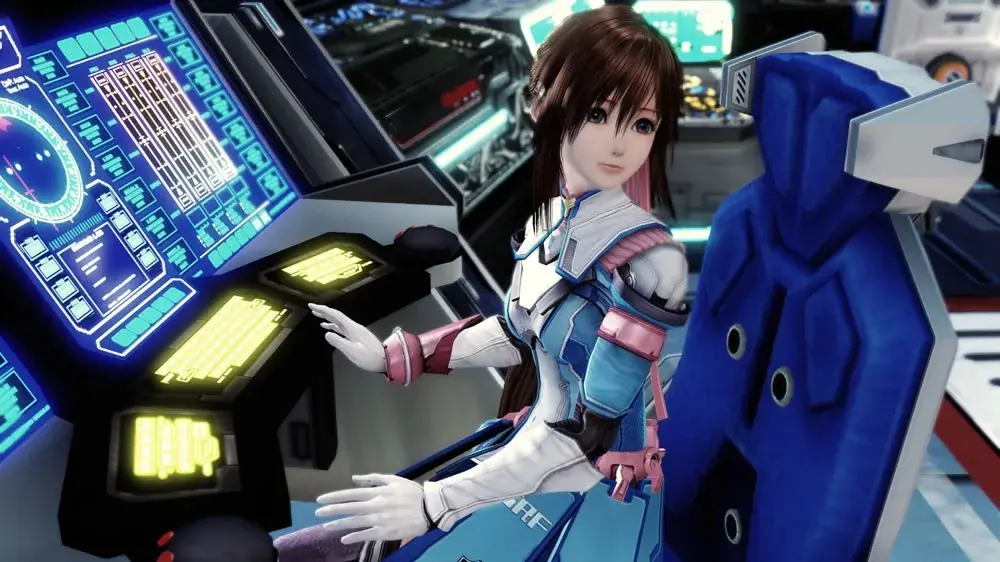
Star Ocean: The Last Hope is an epic space opera RPG from Tri-Ace where you'll journey across the cosmos with Edge Maverick and his crew. You’ll engage in real-time combat, explore diverse planets, and make critical decisions that shape your adventure. It’s a grand quest to find a new home for humanity after Earth's destruction, filled with exploration and challenging battles.
This guide is your indispensable companion for mastering The Last Hope on Xbox 360 and PlayStation 3. We’ll help you navigate the intricate combat system, uncover every secret, conquer tough bosses, and achieve the best possible endings. Get ready to optimize your progress and experience everything this vast universe has to offer.
Battles
Learn about battles in Star Ocean: The Last Hope, including tactics, encounters, the battle screen, and special arts. Avoid or gain advantage in fights.
You can view battle instructions by accessing the tutorials in the Battle Simulator. The information is covered here to provide a separate reference before and during gameplay.
Tactics
Before battle, choose Tactics from the menu to tell your allies how you want them to fight. If you want to play it smart, have them conserve their strength during long journeys, only going all-out when fighting bosses and particularly strong enemies.
Encounters
Enemies are visible on the field and you can avoid a battle if you choose. When you touch an enemy, you will enter battle. The type of battle depends on how you make contact with the enemy.
Normal
When you and the enemy can both see each other at the time you make contact, neither party has the upper hand when battle begins.
Preemptive
If you touch the enemy from behind, enemy actions will be delayed at the start of the battle, giving you an advantage.
Surprise
When an enemy touches you from behind, you will be surrounded by enemies and their Rush Gauges will be partially filled when the battle begins.
Ambush
If you touch an enemy while another enemy is nearby, the second enemy group will ambush you as soon as you finish the battle with the first enemy group. If you defeat all the enemies, you will earn bonus EXP.
Battle Basics
After making contact with an enemy on the field, you will be taken to the Battle Screen. Battles take place on a 3-D field with surroundings suited to the field area. You will control the character designated as Party Leader. Other party members will fight automatically, following the Tactics you set for them.
When you defeat all the enemies on the screen, the battle will end and you will earn EXP, Fol and sometimes items. Only the characters in your battle party at the end of a battle will earn EXP. If all members of the party are reduced to 0 HP, or if everyone is Paralyzed in combat, it's Game Over. If that should happen, press / to bring up a loading screen so you can restart from a saved game file.
The Battle Screen
The Battle Screen is where all the action takes place.
- Your current target's HP bar and Rush Gauge are displayed in the upper left corner.
- Battle messages appear in the top center of the screen.
- The battle map (a minimap (the small circular map in the bottom-left corner of your screen)) in the upper right corner shows the location of all battle participants. Your party members are shown in blue, while enemies are depicted in red. The enemy currently targeted by the character you control is highlighted on the map.
- HP, MP and Rush Gauge data for each member of the battle party are displayed at the bottom.
- The right side of the screen shows the status of your Bonus Board along with the party's current hit counter.
Battle Actions
Move - Use to move your character around the battlefield.
Guard - You may be able to guard against an enemy's blow if you are standing or moving. Your chance to successfully guard is determined by the character's GRD stat and the enemy's HIT stat.
Jump - Hold / and push in any direction to jump in that direction. Some characters can execute a jumping attack if you press / in mid-air.
Attack - Press / to attack with your equipped weapon. If you are too far away from the target, your character will automatically close to attack range when you press the button. You can chain up to three regular attacks together. The type of attack may be different depending on the direction you push when you strike.
Targeting
You will automatically target the nearest enemy in battle. Changing targets is different depending on the version of the game you are playing. In the Xbox version, you have to turn your back on the enemy you automatically target and move to face a different enemy for a time in order to switch to targeting that enemy. In other versions, you can manually switch targets by pressing /. You can press / to lock on to a target so you don't accidentally change targets as you and the enemies move around the battlefield.
Special Arts and Symbols
Special Arts
Most characters learn their own set of battle techniques called Special Arts. Additional Special Arts are learned as your characters gain higher levels. To use a Special Art, it must be assigned to a trigger button. Special Arts can be arranged into Combos, and they can be chained from regular attacks. Executing a Special Art consumes Mental Points (MP).
Symbols
In the Star Ocean universe, magic is cast through the use of symbols. Pure fighters can't learn symbol magic, but those characters who can use magic will acquire new symbols as they gain levels. There are attack symbols, recovery symbols and support symbols. Attack symbols can be assigned to trigger buttons and arranged into Combos. Each time a character uses a symbol, it consumes Mental Points (MP).
Chain Combos
A Chain Combo is a Special Art or Symbol assigned for that character through Battle Config. Activate one by pressing / or / in battle. At the beginning, you can assign one Special Art/Symbol to the left trigger button and one to the right trigger button for use in Chain Combos. Play the game for a while and you will gain the ability to assign up to three attacks to each button.
You can chain combos from regular attacks as well as linking combo attacks together. For example, you can press / to start a combo. While the attack is still in progress, press /. You will follow up with the attack assigned to that button, linking the two combo attacks together.
When you link your Special Arts or Symbols together in a Chain Combo, the later attacks will deal extra damage. The damage bonus increases with each successive attack as long as you keep the chain going.
Blindsides
When an enemy is targeting you, you can use a Blindside attack to slip around behind them.
Other Features
Explore optional dungeons, quests, Private Actions, Item Creation, the BEAT System, Skills, Battle Trophies, and Data Collections in Star Ocean: The Last Hope.
Optional Dungeons
Star Ocean: The Last Hope offers three complete dungeon areas that are not required to finish the game's story. Taking on these optional areas presents opportunity for extra challenge, additional experience, and you can find items you otherwise wouldn't be able to obtain.
Quests
Some of the people you meet need help and will offer you a quest you can work on while completing the story. They may want you to collect certain items, deliver something or make something via Item Creation. Of course, they will reward you when you complete their quest and you will earn some EXP and SP, too.
There aren't any time limits on completing quests, but you may lose access to some areas and be unable to complete quests that started there.
The Colosseum
After you complete an optional quest in Tatroi, you can challenge other fighters in the Colosseum. Choose to fight Solo, Team or Survival battles and earn Fight Coins when you win. Collect enough Fight Coins and you can exchange them for rare items and unique equipment.
Complete another optional quest and you can take part in the Bunny Races. Feed your bunny stat-boosting pies and then watch it hop onto the track to compete against other cuddlies. Keep racing and you can earn the Bunny Champion Medal.
Private Actions
A staple in the Star Ocean series, Private Actions are conversational events between characters that are separate from story events. Viewing these optional events can change characters' affinity for one another. Sometimes you have a choice of responses and they will affect affinity differently. Raising character affinity is necessary to see ending scenes involving individual characters after you finish the game.
Item Creation
With the right recipe, you can use items you already have to create new items, including equipment. You will find some recipes and your characters can work together to come up with more. In addition to creating new items, you can use Synthesis to boost the stats of a piece of equipment or add special abilities. The further you get into the game, the more important Item Creation will become.
The BEAT System
You can select one of three fighting styles for each of your characters with the BEAT System. The BEAT System fighting styles are: BEAT: S (Strike) which is an offensive battle style that emphasizes Blindsides, BEAT: N (Neutral) which is a neutral battle style that emphasizes parameter boosts, and BEAT: B (Burst) which is a defensive battle style that emphasizes Rush Mode. As you win battles, your BEAT rank may go up and increase the style's effect. You can change a character's BEAT style at any time from the Characters Menu.
Skills and Abilities
Characters will learn new Special Arts and Symbols as they gain levels through experience. Field Skills and Battle Skills are learned by acquiring Skill Manuals.
Skill Points
You can improve the effectiveness of a character's skills by increasing the skill level using Skill Points. Individual Skill Points are earned each time a character gains a level. Party Skill Points are earned when you complete a Quest or fulfill a Shop Order. When exploring, you earn Party SP for opening a chest, collecting items from a Gathering Point, or dispelling a barrier. You can also earn Party SP after a battle, if your Bonus Board includes some green tiles. Individual Skill Points are specific to the character who earned them. Party Skill Points are pooled and made available to any character. You can elect to use either Individual Skill Points or Party Skill Points to raise a skill's level. Your Party SP pool is also tapped when you invent new things via Item Creation.
Battle Trophies
Another Star Ocean tradition is the ability to earn battle trophies. In this game, each character has his/her own set of battle trophies. You can obtain battle trophies for fulfilling certain conditions in battle (such as _Defeat an enemy using a close-quarters attack_). There is an in-game list for each character, but most of the entries are hidden until you discover them in battle. Reaching battle trophy collection milestones will unlock bonuses for that character like extra battle voices, removing the level cap, and adding Capacity Points you can use to configure your combos. Information about the battle trophies you earn is stored separately from your saved game data. This makes up-to-date battle trophy status available with all existing save files and when you start a new game so you don't have to earn the battle trophies again.
Data Collections
Throughout the game, you will find and automatically record all sorts of information. Examining computer terminals may yield data on various spaceships. You may gain weapon data by finding, buying or creating a weapon, or by defeating enemies with unique weapons.
When you defeat a monster, you create a data file with its description and stats. Keep defeating the same type of monster and you will raise its analysis level. When the analysis level reaches 100%, you can transfer the data to a blank Monster Jewel. The Monster Jewel is an Accessory with stat boosts (and maybe special effects) attributable to the monster inside. Like battle trophy information, Data Collections are stored separately from your normal save files and can be shared across all your saved games.
Guide and Walkthrough (PS4) by AzMuch (5)
Comprehensive Star Ocean: The Last Hope walkthrough covering Prologue, Planet Aeos, Planet Lemuris, and more. Includes side quests and item creation.
- 1Introduction
- 2Characters
- 3Gameplay
- The Basics
- 4Exploration
- 5Battles
- 6Other Features
- 7Walkthrough - Prologue
- 8Walkthrough - Planet Aeos
- Landing Point
- 9Urd Falls Cave
- 10Northern Coast
- 11Exploration Base
- 12Walkthrough - Planet Lemuris
- Triom Village
- 13Thalia Plains
- 14Alanaire Citadel
- 15Woodley Village
- 16Van Elm Region
- 17Celestial Ship
- 18Walkthrough - Cardianon
- Cardianon Mothership
- 19Subterranean City
- 20Control Tower
- 21Setting Course for En II
- 22Walkthrough - Planet Earth
- Abandoned Town
- 23Military Facility
- 24Walkthrough - Planet Roak (Part 1)
- Northeast Astralian Continent
- 25Tatroi Area
- 26Tatroi
- 27Astral City
- 28Astral Desert
- 29Tropp Area
- 30Walkthrough - Planet Roak (Part 2)
- Tropp
- 31The Purgatorium
- 32Post-Purgatorium Diversions
- 33Walkthrough - Return to Aeos
- More Diversions
- 34Southern Reaches
- 35Miga Insect Warren
- 36Walkthrough - En II
- Central Control Room
- 37Centropolis
- 38Sanctuary
- 39Walkthrough - Nox Obscurus
- Side Trips
- 40Ravine of Extinction
- 41Pulsating Bog
- 42Halls of Termination
- 43Palace of Creation
- 44Walkthrough - Post-Game
- 45Optional - Astral Caves
- 46Optional - Cave of the Seven Stars
- 47Optional - The Wandering Dungeon
- 48Quests
- 49Side Quests
- The Desert Cacti
- 50The Trials of the Sacred Gems
- 51The Colosseum
- Arena Battles
- 52Bunny Races
- 53Private Actions and Character Endings
- 54Item Creation
- Smithery
- 55Cooking
- 56Alchemy
- 57Artistry
- 58Engineering
- 59Crafting
- 60Compounding
- 61Item Synthesis
- 62The BEAT System
- 63Skills and Abilities
- Edge
- 64Reimi
- 65Faize
- 66Lymle
- 67Bacchus
- 68Meracle
- 69Sarah
- 70Myuria
- 71Arumat
- 72Equipment
- Weapons
- 73Armor
- 74Accessories
- 75Items
- Usable Items
- 76Skill Manuals
- 77Recipe Memos
- 78Food
- 79Valuables
- 80Ship Furnishings
- 81Other Items
- 82Battle Trophies
- 83Spaceship Data Files
- 84Weapon Data Files
- 85Monster Data
- Monsters 001 - 075
- 86Monsters 076 - 154
- 87Shops and Shop Orders
- 88Trophy/Achievement List
- 89Closing Notes and Legal
Triom Village
Walkthrough for Triom Village in Star Ocean: The Last Hope. Learn about Lymle joining, Ghimdo's request, and items like the Demon Amulet.
- 1Head to the Flight Deck for a scene.
- 2Talk to Reimi and Faize to get their reports.
- 3Leave the Flight Deck to continue the scene on the planet's surface.
- 4Travel east from the Calnus to reach the southern entrance to Triom Village.
- 5Through the ensuing scene, the village elder, Ghimdo, asks you to accompany his granddaughter, Lymle, as she seeks a symbol to counteract the Bacculus virus.
- 6After the scene, you will have control of Edge outside Ghimdo's house. Lymle has joined your party and you receive Weapon Data 050: Candy Wand.
- 7Re-enter Ghimdo's house and open the Treasure Chest near the east wall to find a Demon Amulet.
- 8Note that one other Treasure Chest in the village is encased in ice and requires a return trip.
- 9Check the shops for wares and Shop Orders. The Tiger Dojo shop east of Ghimdo's house sells Skill Manuals; buy the Skill Manual "Parapsychology" and teach it to Lymle.
- 10South of Tiger Dojo is the Can-Can General Goods shop, selling usable items and Item Creation ingredients.
- 11Next door is Reflected Moon Weapons. Buy the Blessed Sword here, which is required to make the Flame Sword through Item Creation. Also consider buying a Bowstring to turn Reimi's Eldarian Bow into a Hunting Bow.
- 12Wander through the garden patches on the east and west sides of town to find Basil, Blueberries, and Blackberries.
- 13Southwest of the village center is a house where you can rest for free to recover HP and MP, and there is a Save Point inside.
- 14Talk to the Big-Hearted Man near the south village entrance to receive Basil x2, and then Bigberries x2 upon speaking with him again.
- 15Leave the village through the south entrance and make your way back to the Calnus.
- 16Inside the Calnus, view three new Private Actions with Faize in his quarters.
- 17Interact with the Item Creation console in the Meeting Room. Pair Lymle with other party members to invent Symbol Cards. Raise Edge's Smithery Skill and Faize's Alchemy Skill to Level 3 and put them in an invention group with Lymle to invent the Flame Sword and a Monster Jewel.
- 18Leave the Calnus and spend some time exploring the Thalia Plains.
- Lymle joins your party at Level 1. Her low level and meager HP make her vulnerable, so keep an eye on her Health when you get into battles.
- The Demon Amulet boosts INT and DEF, making it a good accessory for Lymle.
- The "Elusion" Skill makes it easier to escape from battles, but you can buy this manual at other shops.
- The Blessed Sword has less attack power than Edge's Storm Blade but is needed for Item Creation.
- Reimi's Iron Protector has higher DEF than the Mystic Chainmail.
- The Sacrificial Doll accessory will automatically revive the wearer if they fall in battle, then disappear.
- Lymle's Item Creation specialty is Artistry, and most of her inventions are Symbol Cards.
- Weapon Data 050: Candy Wand
- Demon Amulet (inside Ghimdo's House)
- Blueberries x2
- Recipe Memo 02, Earth Gem (Ice Barrier)
- Basil, Blueberries, Blackberries (found in garden patches)
- Basil x2, Bigberries x2 (from Big-Hearted Man)
- Skill Manual "Parapsychology" (purchased at Tiger Dojo)
- Blessed Sword (purchased at Reflected Moon Weapons)
- Bowstring (purchased at Reflected Moon Weapons)
- Flame Sword (invented via Item Creation)
- Monster Jewel (invented via Item Creation)
Similar guides you might like

100% Human-Written. AI Fact-Checked. Community Verified. Learn how AntMag verifies content