Navigate PC Building Simulator 2 part compatibility challenges. Ensure your PC builds function flawlessly, avoiding boot failures and performance bottlenecks.
Welcome, aspiring PC builders! In PC Building Simulator 2, understanding part compatibility is paramount to success, whether you're tackling a simple repair or crafting a high-end gaming rig for a demanding client. A mismatch can lead to frustrating boot failures, performance bottlenecks, or even outright component damage (in the game, of course!). This detailed guide will walk you through the essential compatibility checks you need to perform for every build.
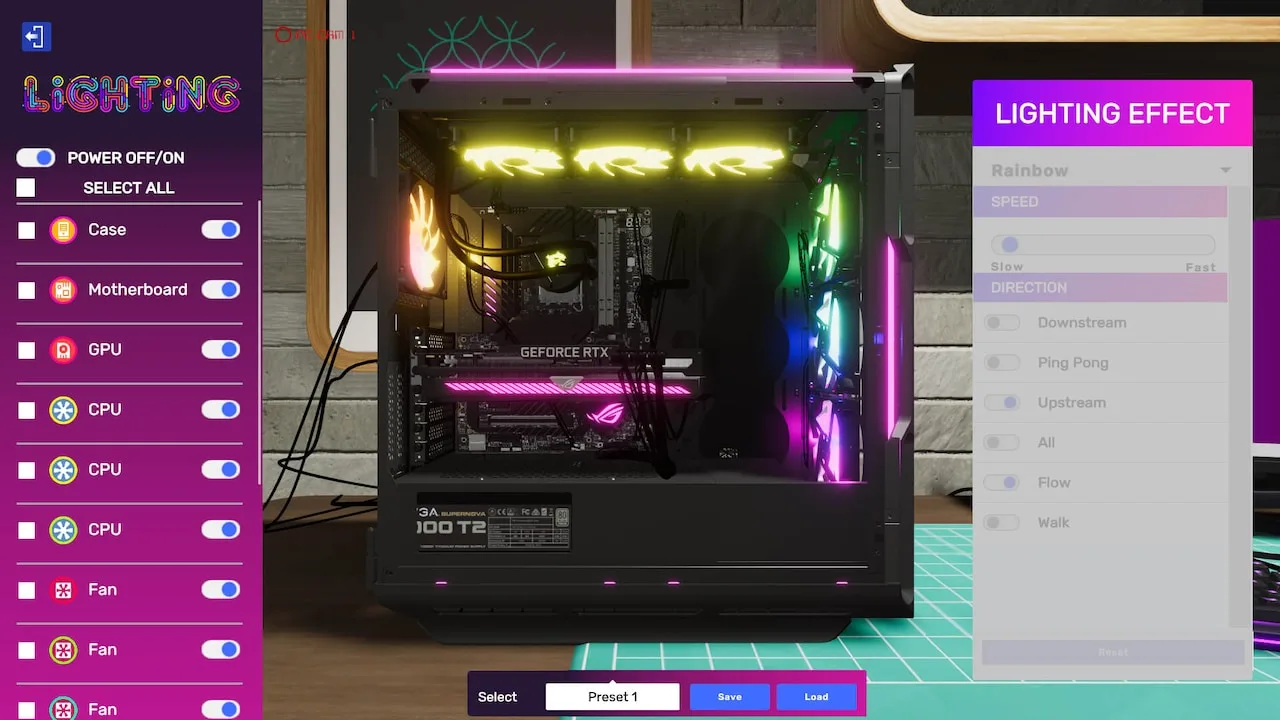
The Compatibility Checker: Your Best Friend
Before you even think about installing a component, always utilize the in-game Compatibility Checker. This invaluable tool is accessible from two primary locations:
- Shop Interface: When browsing components in the "Shop" tab, you'll see a "Compatibility" button or icon next to each item. Clicking this will highlight compatible parts already in your inventory or installed in the current PC.
- Inventory/Installed Parts: When you have a component selected in your inventory or are hovering over an installed part in a PC, a similar compatibility option will appear, allowing you to check against other components.
While the Compatibility Checker is powerful, it's a general guide. True mastery comes from understanding the underlying principles.
Core Component Compatibility
1. Motherboard & CPU
This is the most critical compatibility check. Your CPU's socket type MUST match the motherboard's socket type. Failure to do so means the CPU physically won't fit, and the PC will never boot.
- Actionable Step: When selecting a CPU (e.g., an Intel Core i9-12900K), note its socket type (e.g., LGA 1700). Then, when browsing motherboards, filter or look for boards explicitly supporting that socket type (e.g., ASUS ROG Strix Z690-F Gaming WiFi with LGA 1700).
- Location: Both CPUs and Motherboards are found under the "Components" section in the "Shop."
- Strategy: Always pick your CPU or Motherboard first, then find the matching counterpart. check the chipset compatibility too; while less common for outright failure, a CPU might be compatible with a socket but not fully supported by an older chipset on the motherboard, limiting features or overclocking.
2. Motherboard & RAM (Memory)
RAM compatibility involves two key aspects: DDR generation and speed.
- DDR Generation: RAM sticks come in generations like DDR4 or DDR5. A DDR4 motherboard (e.g., MSI MAG B550 TOMAHAWK) cannot use DDR5 RAM, and vice-versa.
- RAM Speed: While a motherboard might support a range of RAM speeds (e.g., 3200MHz to 4800MHz), installing RAM faster than the motherboard or CPU officially supports will often result in the RAM running at a lower, supported speed. For optimal performance, match the RAM speed to the motherboard's supported speeds, or enable XMP/DOCP in the BIOS for higher speeds.
- Actionable Step: If your motherboard is a GIGABYTE Z790 AORUS ELITE AX, it uses DDR5. Ensure you select DDR5 RAM (e.g., Corsair Vengeance RGB DDR5-6000). Check the motherboard's specifications for its maximum supported RAM speed.
- Location: RAM is found under "Components > Memory" in the "Shop."
- Strategy: Pay attention to the number of RAM slots on the motherboard (e.g., 2 or 4) and the maximum capacity supported. For dual-channel performance, install RAM in pairs in the correct slots (usually indicated by color or numbering on the motherboard itself).
3. Motherboard & Storage (SSDs/HDDs)
Storage compatibility is generally straightforward but has nuances with M.2 drives.
- SATA Drives: All modern motherboards have SATA ports. Any 2.5-inch SSD or 3.5-inch HDD will connect via a SATA data cable and a SATA power cable.
- M.2 Drives: M.2 slots on motherboards can support either SATA M.2 or NVMe PCIe M.2 drives. An NVMe M.2 drive (e.g., Samsung 990 Pro) requires a PCIe-compatible M.2 slot. A SATA M.2 drive (e.g., Crucial MX500 M.2) requires a SATA-compatible M.2 slot. Some M.2 slots are dual-compatible, but always check the motherboard's manual (accessible in the game's "Tablet" or "Information" tab).
- Actionable Step: If a client requests an NVMe SSD, ensure your chosen motherboard (e.g., ASUS Prime Z790-A WiFi) has at least one PCIe Gen 4 M.2 slot.
- Location: Storage devices are under "Components > Storage" in the "Shop."
- Strategy: Be mindful of M.2 slot generation (PCIe Gen 3, Gen 4, Gen 5). A Gen 4 NVMe SSD will work in a Gen 3 slot but at reduced speeds. For optimal performance, match the generations.
4. Motherboard & Graphics Card (GPU)
Modern GPUs use PCIe slots. Compatibility is almost universal for the slot type, but physical size and power are key.
- PCIe Slot: All modern GPUs use a PCIe x16 slot. Most motherboards have at least one.
- Physical Size: GPUs can be very long and thick. Ensure the chosen case has enough clearance for the card's length and that it won't block other components or case fans.
- Power Connectors: GPUs require dedicated PCIe power connectors from the PSU (e.g., 6-pin, 8-pin, 12-pin). Ensure your PSU has the necessary connectors and sufficient wattage.
- Actionable Step: When installing a large GPU like an NVIDIA GeForce RTX 4090, first check the case's maximum GPU length specification (found in the "Case" section of the "Shop" or the case's info panel). Then, ensure your PSU (e.g., Corsair RM1000e) has enough 8-pin PCIe connectors (or the new 12VHPWR connector for 40-series cards).
- Location: GPUs are under "Components > Graphics Cards" in the "Shop."
- Strategy: Always check the GPU's power requirements and the PSU's available connectors. A common mistake is having enough wattage but not the correct physical connectors.
5. Case & All Components
The case dictates the physical limitations of your build.
- Motherboard Form Factor: Cases support specific motherboard sizes (e.g., ATX, Micro-ATX, Mini-ITX). An ATX motherboard won't fit in a Mini-ITX case.
- GPU Length: As mentioned above, check the case's maximum GPU length.
- CPU Cooler Height: Large air coolers (e.g., Noctua NH-D15) have significant height. Ensure the case has enough clearance for the cooler to fit with the side panel on.
- PSU Size: Most cases support standard ATX PSUs, but some smaller cases require SFX or SFX-L PSUs.
- Radiator Support: If using AIO liquid cooling, ensure the case supports the desired radiator size (e.g., 120mm, 240mm, 360mm) in the top, front, or rear mounting locations.
- Actionable Step: If building in a compact case like the Fractal Design Define Nano S (Mini-ITX), ensure your motherboard is also Mini-ITX. If using a large air cooler, check the case's "Max CPU Cooler Height" specification.
- Location: Cases are under "Components > Cases" in the "Shop."
- Strategy: It's often easiest to pick your case early, as it sets the physical boundaries for the rest of your component choices.
6. Power Supply Unit (PSU) & All Components
The PSU must provide sufficient and correct power to all components.
- Wattage: The total wattage draw of all components (CPU, GPU, Motherboard, RAM, Storage, Fans) must be less than the PSU's rated wattage. The game provides a handy "Estimated Wattage" display during builds. Aim for a PSU with at least 15-20% more wattage than your estimated peak draw for efficiency and future upgrades.
- Connectors: Ensure the PSU has all the necessary connectors: 24-pin ATX for the motherboard, 4/8-pin EPS for the CPU, 6/8-pin PCIe for the GPU, and SATA power for drives.
- Actionable Step: After selecting your CPU (e.g., AMD Ryzen 9 7950X3D) and GPU (e.g., AMD Radeon RX 7900 XTX), check the "Estimated Wattage" in the build screen. If it's 700W, consider a 850W or 1000W PSU (e.g., Seasonic FOCUS Plus Gold 850W) to be safe.
- Location: PSUs are under "Components > Power Supplies" in the "Shop."
- Strategy: Don't skimp on the PSU. A good quality, appropriately wattaged PSU ensures system stability and longevity.
Advanced Compatibility & Troubleshooting
- BIOS Updates: Sometimes, a newer CPU generation might be compatible with an older chipset motherboard, but only after a BIOS update. The game will often prompt you if a BIOS update is required. Perform this by installing the old CPU (if available), booting, updating the BIOS from the "BIOS" tab, then swapping to the new CPU.
- Clearance Issues: Beyond GPU length and CPU cooler height, watch out for RAM height interfering with large air coolers, or front-mounted radiators blocking drive cages. The game's visual build process will often highlight these issues.
- Cable Management: While not strictly a "compatibility" issue, good cable management is crucial for aesthetics and airflow. Ensure your case has sufficient routing options and that your PSU has modular cables if you want a cleaner look.
By following these detailed steps and understanding the relationships between components, you'll master part compatibility in PC Building Simulator 2 and become a true expert builder!
100% Human-Written. AI Fact-Checked. Community Verified. Learn how AntMag verifies content