Defeat Boss 1, Brug Mass, in Metroid: Other M by targeting its eye and using Overblasts and missiles. Find Missile Tanks and Energy Tanks.
Walkthrough
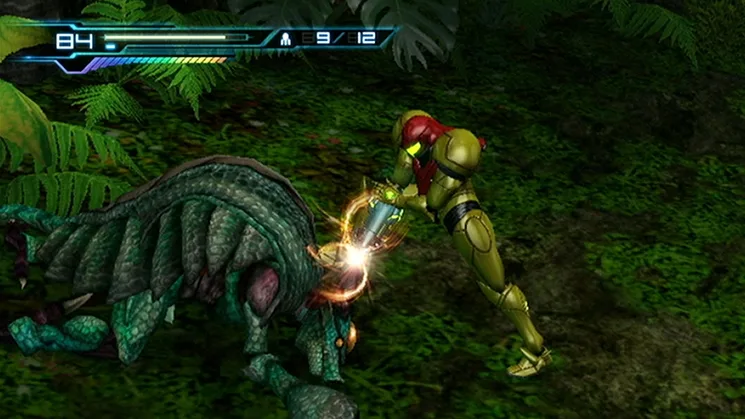
- 1Immediately aim at the Brug Mass's eye and lock onto it.
- 2Continue aiming as it attacks in slow motion; Samus will dodge automatically.
- 3As soon as the cutscene (a non-interactive cinematic the game plays automatically) (an in-game cinematic event) ends, run up and Overblast (a powerful melee attack) the Brug Mass.
- 4Sense Move (a dodge maneuver) its attack to the right and fire a missile at its frozen arm once you can lock on.
- 5Overblast it again and Sense Move left this time, then fire a missile at its other arm.
- 6Overblast it a third time and run back to avoid its attack.
- 7Back up to get a clear shot, then use a missile on its body to make the Emperor Brug fall out.
- 8Shoot the Emperor Brug with your beam or a single missile to defeat it.
Tips
- Missiles can be used instead of Overblasts, but they are less reliable and may miss if not timed perfectly. Overblasts are about as fast as using missiles.
Walkthrough:
After defeating the Brug Mass, you will need to backtrack to return power to the Main Sector.
- Go back to the hallway you came from.
- Notice the Zoomer that jumps out of the floor on the right. Use the Morph Ball (a form that allows Samus to roll into small spaces) to enter it.
- Go down the tube, drop a bomb at the end, and pick up your first Missile Tank!
- Pass the Navigation Booth (a save point), jump off the ledge where the handrail is missing, and go back to the bridge and pass it.
- In the next room, which has Skrees and Zoomers and red lighting, look for a cage on the floor and enter it with the Morph Ball.
- Roll to the top, lay a bomb, and collect the first Energy Tank!
- Roll forward into the next room after laying another bomb.
- Interact with the Terminal (an interactive console), and promptly destroy the two hives with three missiles each. You can clear out the Reos first, but they are usually too slow to hit you.
- Interact with the Terminal again to restore the power.
- Head back to the bridge you crossed earlier. You will fall down and see some Sidehoppers. Ignore them, go south, and kick climb (a climbing move) to find a Missile Tank.
- Go to the other side of the room and look up at the ceiling. Shoot it with a missile and kick climb up to the top.
- Interact with the Terminal to return the bridge to its normal state.
- Use the elevator in the room ahead, then interact with the Terminal at the top.
- Go to the new platform on the left and enter the opening with yellow lights on it for a Missile Tank.
- Go up to the Navigation Booth and save.
- Adam will tell you to go to Sector 1. Take the door to the right.
- Go up the elevator and into the unlocked door.
- There is a Reo hive in the third vent above. Destroy it.
- Kick climb your way up and collect the Missile Tank at the top.
- Jump down and continue forward.
- Notice the vent surrounding the elevator at the bottom. Climb into the left vent to pick up the Missile Tank.
- Take the elevator down.
- Use the platforms in this room to jump to the very top. Avoid the Bulls; they will explode if you get too close.
- On the left side of the highest platform, you will find the first Energy Part!
- Jump down and exit via the door on the left.
- This next room has a few Bulls and five Sidehoppers that drop from the ceiling. Use the beam on the Bulls and Overblasts on the Sidehoppers. Be careful when they drop from the ceiling.
- Proceed forward to enter the Main Elevator and go to the green elevator for Sector 1, with 9% of the items.
- Concentrate to replenish any missiles you may have lost.
100% Human-Written. AI Fact-Checked. Community Verified. Learn how AntMag verifies content