Navigate Pyrosphere HARD in Metroid: Other M, facing Vorash, heated rooms, and Sovas. Includes tips for defeating Asborean and surviving lava.
Walkthrough
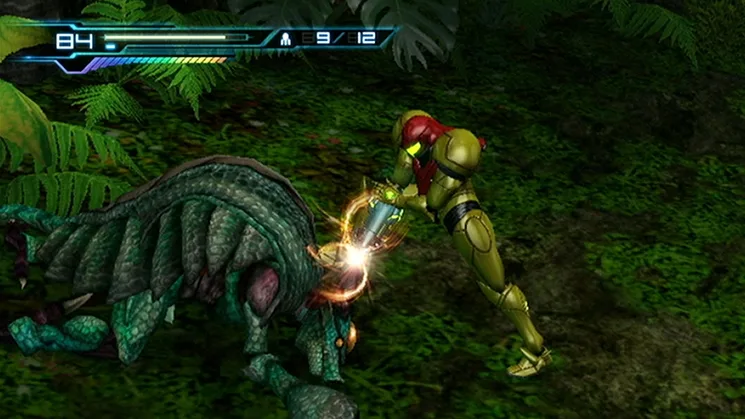
- 1Roll down the initial hallway. A large monster named Vorash will attack; use Sense Move (a quick dodge maneuver) to avoid instant death. Vorash will destroy the path behind you, causing Samus to automatically enter her Morph Ball form.
- 2Run right, ignoring enemies, and save at the Navigation Booth (a save point).
- 3Leave the room and take the lower path into the first heated room. Your energy will deplete slowly; keep running. It takes approximately 70 energy to pass through this room. On Hard Mode, you may need to Concentrate (a defensive ability) if the next room proves difficult.
- 4Vorash will jump over you and attack. Use Sense Move forward. To avoid falling into lava, run to the edge of each platform. When an invisible wall stops you, hold the Jump button to jump as high as possible to the next platform. Continue running to safety.
- 5Warning: The next room activates the Red Door Glitch. Do not re-enter this room, or you will be forced to restart later.
- 6Zebesians will appear in the following room. Defeat as many as possible before Mellas appear. Watch out for their fireballs.
- 7Use the Ice Beam to destroy the fiery Fly Pod. In the next room, freeze the Sovas (flying enemies) and proceed. You cannot roll over one section with the Morph Ball, so run and stay towards the screen to avoid fire and Sovas.
- 8Four Dessgeegas are hidden in the sand in this area. Use Overblast (a powerful charged shot) and Aerial Missile, or fire three missiles from a distance. Defeating these four enemies unlocks the door. Stay close to the screen to avoid Sovas and Kick climb (a climbing move) up the first shaft. In the second shaft, fall to the second ledge, hang on the left side, and shoot the switch. Defeat the Sovas before jumping across to reduce the risk of being knocked off. Enter the space to find a Navigation Booth ahead; save there.
- 9Enter another heated room where Magdollites (lava-dwelling enemies) will attack. Jump as high as possible at the end of each platform, ignoring the first two. You can jump over them. Roll down the hill and use a charge shot on the third Magdollite. Attempting to dodge the third will likely result in being hit by the fourth's fireball. Pay attention to the fireball's direction; if it goes upward while you are jumping, remain still. Exit the room quickly as it is heated. Pass through the next passage swiftly, avoiding Sovas and Mellas, and enter the Floor Observation Room. Prepare to use Sense Move.
- 10Dodge the Asborean (a large, aggressive enemy). Prepare a charge shot. Be cautious when it stands upright, as it may quickly skate instead of its slower attack. When this happens, prepare to Sense Move, but shoot if it pauses. Fire at it when it drops miniature Asboreans while standing or when it sticks its head out after sliding. Be close for the attack to connect. To avoid being hit as it slides, try to follow behind it and jump when it changes course. Have a charge shot ready when it stops skating, as you will have little time before it rushes to grab you.
- 11If you see the red weak spot on its chest (e.g., when it tries to grab you or use its claws), use a charge shot. If you stun the Asborean, it will collapse, and its head will roll out, presenting an opportunity for a Lethal Strike (a finishing move). This animation differs from when it stops sliding. After ripping out the body, shoot it with two beam shots or a charge shot.
- 12Exit left. Roll through the next heated room and avoid the Sovas the volcano fires onto lit areas. Save at the Navigation Booth.
- 13Overblast attacks make short work of the Zebesians here. This is a good area to practice an Overblast chain (a series of consecutive Overblast attacks). Use the Terminal (an interactive object). Morph Ball to the left to fall down the pit.
- 14Warning: Imminent death ahead.
- 15In the Crater Interior, proceed to the right. Lava will begin filling the crater. Do not get stuck in the rising lava, or you will die. Run right, avoiding Sovas and platforming as needed. Do not use charge shots, as they slow you down. You can run through lava if you have enough Energy, as it does not seem to slow you down. Your Energy will be refilled at the end.
- 16Use Sense Move to dodge Goyagma's attacks. If you are caught in the air when a Quick Time Event (QTE) appears, it may waste time as you cannot act. You will need to use the Morph Ball near the end. Hang onto the right wall, then jump to the tunnel on the left wall. Kick climb to the top.
Tips
- Conserve energy in heated rooms by moving quickly and avoiding unnecessary combat.
- Utilize the Ice Beam effectively against Sovas to control crowds.
- Master the Sense Move to dodge Vorash and Asborean's powerful attacks.
- In the Crater Interior, prioritize speed over charged attacks to outrun the rising lava.
- The red door glitch room is a critical point; avoid re-entry to prevent a game restart.
100% Human-Written. AI Fact-Checked. Community Verified. Learn how AntMag verifies content