Defeat Vorash in Metroid: Other M using charge shots and Sense Move. Learn how to use Grapple Points and navigate the Blast Furnace.
Walkthrough
- 1When Vorash leaps, use a charge shot and Sense Move (a dodge maneuver) to avoid its fireballs.
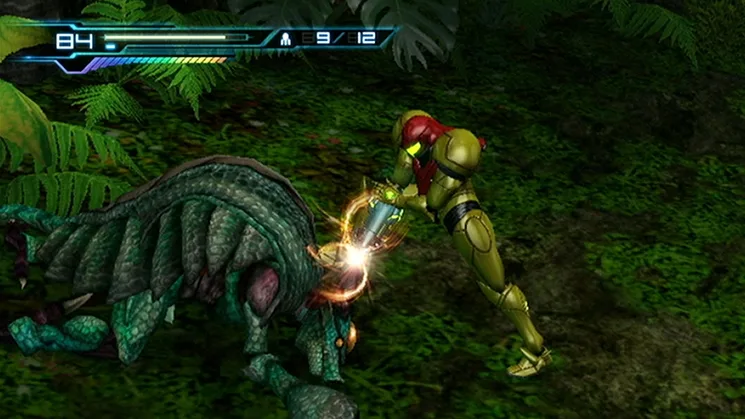
- 2Be ready to charge shot Vorash when it reveals the Grapple Point (a glowing point to grapple onto) in its mouth.
- 3After a successful charge shot, Vorash will open its mouth again. Use the Grapple Beam to latch onto the Grapple Point.
- 4Once you land after grappling, Sense Move Left while charging your beam.
- 5Release the charge shot, fire four to five normal shots, and then a missile. Failure to perform this sequence quickly will cause Vorash to retreat into the lava.
- 6If Vorash peeks its head out to shoot fireballs but its mouth is not open, shoot its face with a missile, then shoot its chest.
- 7Eventually, the Grapple Point Vorash ate will be gone. Dodge its attacks.
- 8When Vorash rushes toward you, Sense Move out of the way and charge shot it in the back.
- 9Use the closest Grapple Point to exit the Blast Furnace.
- 10Kick climb up and use the door.
- 11Save at the Navigation Booth (a save point).
Tips
- In a Low% run (completing the game with the minimum possible items), you may not have time for a second charge shot due to lacking Accel Charges. The Sense Move can be tricky with this strategy.
- The fast method to traverse the Environmental Test Floor saves time but requires practice. Hug the wall left until the corner, then run straight back, aligning your path with the edge of the closest Sandfang's pit. Shinespark (a speed boost) as soon as possible and jump straight up. Press the '2' button to spin left toward the platform and use the terminal. Go to the back left corner, charge shot away from it to push yourself right next to the wall. Run straight right and shinespark straight up as soon as you can. You do not need to react to the usual audio cue for this. Charge your beam and fire it when possible, then instantly start charging again. Press '2' to spin left toward the newly revealed platform. Charge shot boost yourself onto the platform as you reach it.
- For a less technical method in the Environmental Test Floor: Kill the Dessgeegas (enemies), then destroy any Sandfangs that interfere. The Grapple Point in the Test Floor can be moved by shooting the other side of the crane with missiles. Spin it clockwise three times, then use the Grapple Point to reach the Terminal. Spin it clockwise two more times, then swing over to the door.
- From outside the door, face the right half of the door and run forward to charge the Speed Booster. Shoot any Meelas (enemies) in your path and Shinespark directly up from the landing of the stairwell, then spin towards the stairwell to land on it. Immediately run left up the stairs, ignoring Heat Bulls and Zebesians (enemies), and use the Grapple Point at the end.
- Drop into the main Desert Refinery. Kick climb between the right wall and the rotating ledge. Reach the right side of the room and jump onto the other rotating ledge. Shoot the Sovas (enemies) before climbing higher. Kick across to the left catwalk and activate the terminal. Return to the first rotating ledge and climb up to reach the top floor with the unlocked door.
- Speed Boost straight through the next area, shooting enemies if desired. Shinespark straight up at the end and hold 'up' to land. Take the Morph Ball tunnel on the left. When the tunnel forks, take a left to reach the Navigation Booth and save.
- In the next room, the Rhedogian (enemy) will ambush you. Sense Move left or right to dodge. Deal with it as usual. When it starts to fly, use Search View (a special vision mode) to fire a missile at it. If it shoots missiles first, Sense Move away and try again. After hitting it, it will fly higher. Shoot two more missiles at it, and the Rhedogian will fall.
- Take the elevator down, ignore the Dragotix (enemies), and use the Grapple Points to cross. Drop down the ledge in the next room, ignore the Dessgeegas, and use the closest door. Go through the shafts and the Navigation Booth. Avoid the Magdollites (enemies) as before, then use the platforms in the background to reach the Grapple Points. These will lead you to a door at the top of the room. Ignore all Magdollites and save at the Navigation Booth.
- Ahead, point at the empty shell in Search View. Freeze the robots making the lasers or jump over them. Take the door at the top to reach the Geothermal Power Plant.
- In Search View, point at the door you just came from. When you encounter the monster, stay in Search View and find the eruption port on the wall, slightly to the right of your facing direction. Wait for Adam to speak to you after aiming at it.
- Use one Super Missile on the eruption port to trigger a cutscene (a non-interactive cinematic the game plays automatically) and a boss. The port is difficult to see.
- Plasma Beam is authorized.
100% Human-Written. AI Fact-Checked. Community Verified. Learn how AntMag verifies content