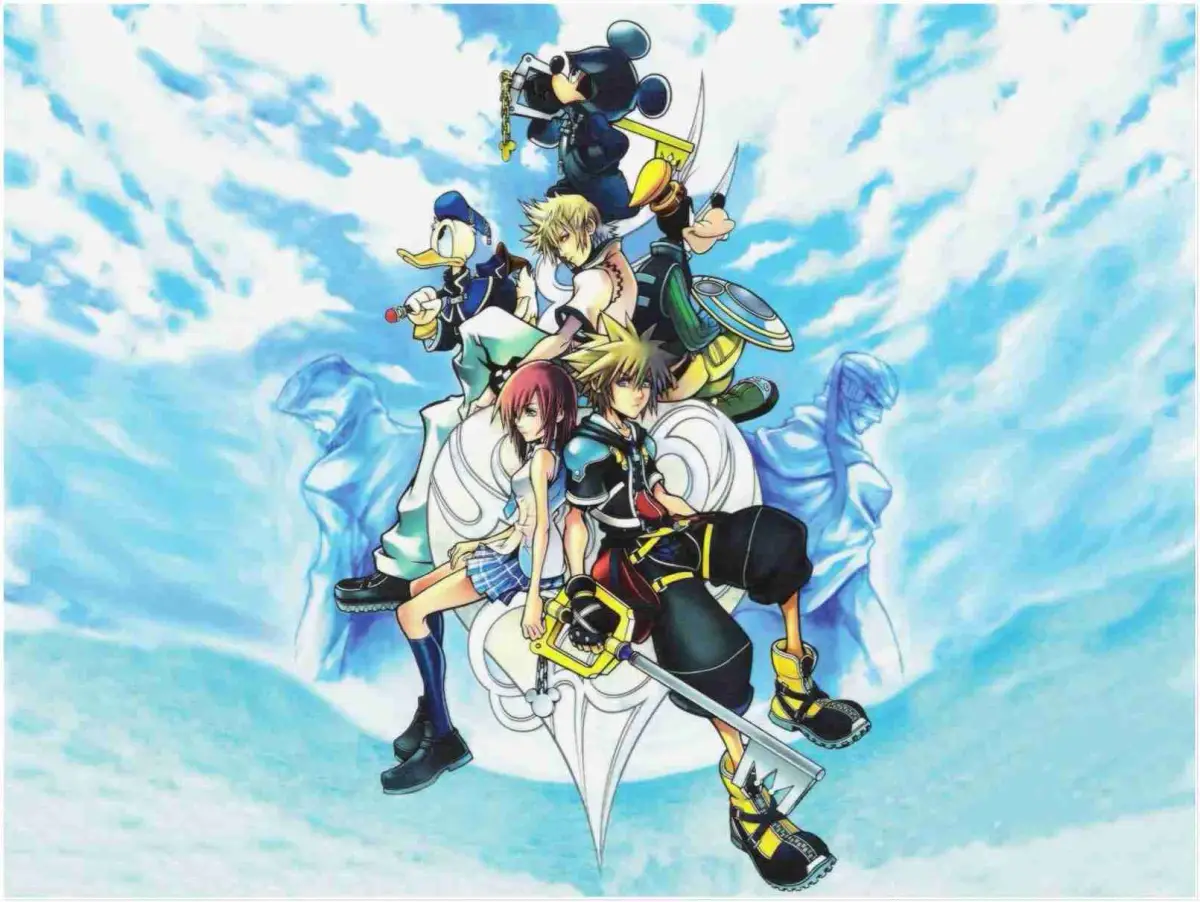
Welcome to Kingdom Hearts II, Square Enix's expansive RPG exclusive to the PlayStation 2. As Sora, you'll journey through diverse worlds, mastering powerful Drive Forms and engaging in thrilling combat. This is the heart of the Kingdom Hearts saga, a true exclusive that captivated players with its blend of Disney magic and Final Fantasy flair.
This guide is your key to conquering every challenge this epic adventure throws your way. We'll help you navigate every diverse location, master every powerful Drive Form, and conquer every boss, ensuring you achieve true heroism. From finding every secret to understanding the intricate mechanics, consider this your ultimate companion to achieving a perfect playthrough.
Part 1
Kingdom Hearts II Part 1 walkthrough covering Prologue, Twilight Town, Hollow Bastion, The Land of Dragons, and Beast's Castle.
- 1Begin the Prologue section of the walkthrough.
- 2Proceed through the Twilight Town section of the walkthrough.
- 3Continue with the Hollow Bastion section of the walkthrough.
- 4Follow the guide for The Land of Dragons.
- 5Complete the Beast's Castle section of the walkthrough.
- The guide is updated for Kingdom Hearts II HD 2.5 ReMIX.
- This walkthrough is version 1.00 and was updated on 10/06/2014.
Part 3
Master the controls of Kingdom Hearts II with our guide to button functions and dive into the Prologue section, covering items, abilities, and initial enemy encounters.
Alright, let's get you squared away with the basics for Kingdom Hearts II! Before we dive too deep, it's super important to know your way around the controller. Think of this as your cheat sheet for all the buttons.
Controls
Here's a quick rundown of what each button does. Keep this handy!
| Button | Function |
| L1 | Hold down to display magic shortcut menu |
| L2 | Cycle through available targets while locked on |
| R1 | Engage or disengage target lock |
| R3 | Revert camera to default frontal view |
| D-Pad | Move cursor / Move cursor in command menu |
| Left Stick | Move character / Move Camera (when in first person mode) |
| Right Stick | Move camera |
| Start | Display main menu / Pause (during battle and cutscenes) / Skip events (during cutscenes) |
| Select | Toggle first-person view on and off |
| Circle | Cancel / Jump / Ascend when flying or swimming |
| Triangle | Special Commands (Talk/Open Chests/Save, etc.) / Use Special Abilities / Call Allies (battles) / Press while holding the L1 button to cast assigned spell |
| Square | Use abilities (Dodge Roll, etc.) / Descend when flying or swimming / Press while holding the L1 button cast spell |
| Cross | Confirm / Attack / Press while holding the L1 button to cast assigned spell |
Prologue
This is where it all begins! You'll start in Twilight Town, and things might seem a little strange at first. Pay attention to the dialogue and what's happening around you.
Items Found
- Twilight Town Map
- Potion (you'll find a few of these!)
- Crystal Orb
- Hi-Potion (a nice upgrade from the regular Potion)
- Mansion Map
- Namine's Sketches
Armor/Accessories
- Champion Belt/Medal
- Ability Ring
- Elven Bandana
Keyblades
- Kingdom Key (your trusty starting weapon!)
Abilities/Spells
- Aerial Recovery (useful for getting back up quickly)
- Guard (essential for blocking attacks)
- Scan (lets you see enemy info)
Bonuses
- +1 Magic/Defense/Strength (depending on your choice)
- +1 AP/+2 AP
- HP +5 (always good to have more health!)
- +1 Magic
Enemies
You'll encounter a few familiar faces and some new ones:
- Seifer
- Dusk
- Twilight Thorn (this is your first real boss!)
- Creeper
- Hayner
- Vivi
- Setzer
- Shadow Roxas
- Assassin
- Axel
The 1st Day - Pictures
After you gain control, head towards the store. You'll need to use the Triangle button to talk. After some more story, you'll need to target the cat using R1. Things will shift to the sandlot, and you'll get to choose one of Roxas's struggle weapons. Your choice here gives you a small stat boost:
- Prioritize unusual attacks gives you +1 Magic.
- Prioritize defense gives you +1 Defense.
- Prioritize offense gives you +1 Strength.
The fight against Seifer isn't too tough. Just keep attacking, and you'll parry his moves while dealing damage. Don't worry too much about it; it's more about learning the ropes!
Part 4
Complete walkthrough for Part 4 of Kingdom Hearts II, covering the acquisition of the Keyblade, earning Munny through mini-games like Mail Delivery and Junk Sweep, and more.
A Dusk steals the camera, leading Roxas to the Old Mansion. Chase and capture it to initiate a battle where Roxas eventually obtains the Keyblade. Use the Reaction Command Reversal to defeat the Dusk.
The 2nd Day - Munny
Save your game. Pence gives you the [TWILIGHT TOWN MAP]. Head to Market Street: Station Heights for a scene. Your objective is to collect Munny and meet the group at Station Plaza. Several mini-games are available for collecting Munny, with Mail Delivery and Junk Sweep being the fastest.
Mail Delivery
Deliver five letters as quickly as possible. The first is straight ahead, followed by a bird, then another person. After three, grind on a railing to be launched at the second bird, then quickly turn to find the final person.
- 50 Munny - Under 00:20:00
- 30 Munny - Between 00:20:00 and 00:59:99
- 10 Munny - 01:00:00 or higher
Cargo Climb
Hit the cargo bag uphill using a three-hit combo, trying to stay straight. After three combos, the bag will pop up, allowing a long-distance hit. This must be done twice to get the cargo into disposal.
- 50 Munny - Under 00:30:00
- 30 Munny - Between 00:30:00 and 00:59:99
- 10 Munny - 01:00:00 or higher
Grandstander
Juggle the ball in the air for as long as possible. You have 5 chances, and losing one occurs if the ball hits the ground. To break 20+ hits, keep the ball in the corner.
- 50 Munny - 20+ hits
- 30 Munny - Between 5 and 19 hits
- 10 Munny - Less than 5 hits
Poster Duty
Place 20 posters around Tram Common. Many come in groups of three; use Triangle to quickly put them up. Start on the west side for nine posters, then move to the tram for the tenth in a tricky spot. The remaining ten are easy to find.
- 100 Munny - Under 01:30:00
- 50 Munny - Between 01:30:00 and 01:59:99
- 30 Munny - 02:00:00 or higher
Bumble-Buster
Take out two groups of four bee swarms. They spread out, so target them while they are clumped together.
- 50 Munny - Under 00:20:00
- 30 Munny - Between 00:20:00 and 00:59:99
- 10 Munny - 01:00:00 or higher
Junk Sweep
Break 9 pieces of junk in as few hits as possible. This is straightforward as the layout remains consistent. From the start, run to the back right.
Part 5
Learn how to tackle the Dive to the Heart in Kingdom Hearts II! Choose your starting weapon wisely and understand the Munny rewards for your early efforts.
Alright, let's get this part of the walkthrough rolling! You're going to start by doing some cleanup work. Head to the back left of the area and start swinging your weapon. You should be able to knock out about 4 pieces of junk. Then, swing diagonally from the back right to the front left to get the rest. The goal here is to get between 7-10 hits on each piece of junk.
Your Munny reward depends on how many hits you take:
- 50 Munny - 10 or fewer hits
- 30 Munny - Between 11 and 14 hits
- 10 Munny - 15 or more hits
Once you've managed to collect at least 200 Munny, you can head back to Hayner at the Station Plaza. He'll give you a reward based on how much Munny you've gathered. Just a heads-up, if you manage to collect a whopping 2000 Munny, the game will automatically move you forward!
- AP +1 - 200-1199 Munny
- AP +2 - 1200+ Munny
You'll get the [MUNNY POUCH] item, but don't get too attached – it gets stolen pretty quickly during the next scene.
The 3rd Day - Dive to the Heart
Head out to the Station Heights for a scene. After that, you'll have to fight another Dusk. Remember, you can't damage it with the Struggle Club, so just focus on dodging until the Dive to the Heart sequence begins. You'll find yourself in the Station of Serenity, and it's time to make a big choice: the Dream Sword, the Dream Rod, or the Dream Shield. This decision will actually affect when you learn certain abilities as you level up. No matter what you pick, you'll gain [+1 MAGIC] automatically. For the full breakdown of what each choice does for your stats and ability learning, check out the chart below.
| Lvl | Experience | Stat Increase | Lvl | Experience | Stat Increase |
| 2 | 40 | Defense | 51 | 417978 | Defense, Max AP |
| 3 | 100 | Strength, Max AP | 52 | 450378 | Magic |
| 4 | 184 | Defense | 53 | 483578 | Defense |
| 5 | 296 | Defense, Max AP | 54 | 517578 | Strength |
| 6 | 440 | Strength, Defense | 55 | 552378 | Defense, Max AP |
| 7 | 620 | Defense | 56 | 587978 | Magic |
| 8 | 840 | Magic, Max AP | 57 | 624378 | Defense, Max AP |
| 9 | 1128 | Defense | 58 | 661578 | Strength |
| 10 | 1492 | Strength | 59 | 699578 | Defense |
| 11 | 1940 | Defense, Max AP | 60 | 738378 | Magic |
| 12 | 2480 | Magic | 61 | 777978 | Defense, Max AP |
| 13 | 3120 | Defense, Max AP | 62 | 818378 | Strength |
| 14 | 3902 | Strength | 63 | 859578 | Defense, Max AP |
| 15 | 4838 | Defense | 64 | 901578 | Magic |
| 16 | 5940 | Magic, Max AP | 65 | 944378 | Defense |
| 17 | 7260 | Defense | 66 | 987978 | Strength |
| 18 | 8814 | Strength, Magic | 67 | 1032378 | Defense, Max AP |
| 19 | 10618 | Defense, Max AP | 68 | 1077578 | Magic |
| 20 | 12688 | Magic | 69 | 1123578 | Defense Max AP |
| 21 | 15088 | Defense | 70 | 1170378 | Strength |
| 22 | 17838 | Strength | 71 | 1217978 | Defense, Max AP |
| 23 | 20949 | Defense | 72 | 1266378 | Magic |
| 24 | 24433 | Magic, Max AP | 73 | 1315578 | Defense |
| 25 | 28302 | Defense | 74 | 1365578 | Strength |
| 26 | 32622 | Strength | 75 | 1416378 | Defense, Max AP |
| 27 | 37407 | Defense | 76 | 1467978 | Magic |
| 28 | 42671 | Magic | 77 | 1520378 | Defense, Max AP |
| 29 | 48485 | Defense, Max AP | 78 | 1573578 | Strength |
| 30 | 54865 | Strength | 79 | 1627578 | Defense Max AP |
| 31 | 61886 | Defense | 80 | 1682378 | Magic |
| 32 | 69566 | Magic | 81 | 1737978 | Defense, Max AP |
| 33 | 77984 | Defense | 82 | 1794378 | Strength |
| 34 | 87160 | Strength | 83 | 1851578 | Defense, Max AP |
| 35 | 97177 | Defense, Max AP | 84 | 1909578 | Magic |
| 36 | 108057 | Magic | 85 | 1968378 | Defense |
| 37 | 119887 | Defense, Max AP | 86 | 2027978 | Strength |
| 38 | 132691 | Strength | 87 | 2088378 | Defense, Max AP |
| 39 | 146560 | Defense | 88 | 2149578 | Magic |
| 40 | 161520 | Magic, Max AP | 89 | 2211578 | Defense, Max AP |
| 41 | 177666 | Defense | 90 | 2274378 | Strength |
| 42 | 195026 | Strength | 91 | 2337978 | Defense, Max AP |
| 43 | 213699 | Defense | 92 | 2402378 | Magic |
| 44 | 233715 | Magic | 93 | 2467578 | Defense, Max AP |
| 45 | 255177 | Defense, Max AP | 94 | 2533578 | Strength |
| 46 | 278117 | Strength | 95 | 2600378 | Defense, Max AP |
| 47 | 302642 | Defense | 96 | 2667978 | Magic |
| 48 | 328786 | Magic | 97 | 2736378 | Defense, Max AP |
| 49 | 356660 | Defense | 98 | 2805578 | Strength |
| 50 | 386378 | Strength | 99 | 2875578 | Defense |
The table above shows the experience needed to reach each level and the stat increases you'll get. Remember, your initial choice will influence when you get certain boosts. Think about what stats you want to prioritize early on!
Similar guides you might like


100% Human-Written. AI Fact-Checked. Community Verified. Learn how AntMag verifies content