
Navigate Dispatch Episode 8: Synergy with our comprehensive walkthrough. Learn hero assignments, hacking sequences, and crucial choices to save the city and earn achievements.
This guide covers Dispatch Episode 8: Synergy. After the initial cutscenes, you'll begin your dispatch shift. Your initial team consists of Prism, Golem, and Punch Up, with others joining later. Be aware that failing calls will decrease City HP, and reaching zero results in losing the city and missing an achievement.
Hero Assignments & Strategies:
- Return to Crypto Night: Punch Up
- Evacuation Order (Reach Charisma 7 for XP boost): Prism
- Capture Experiment 1067: Golem (requires Mobility)
- Bomb Threat: Prism AND Punch Up/Golem
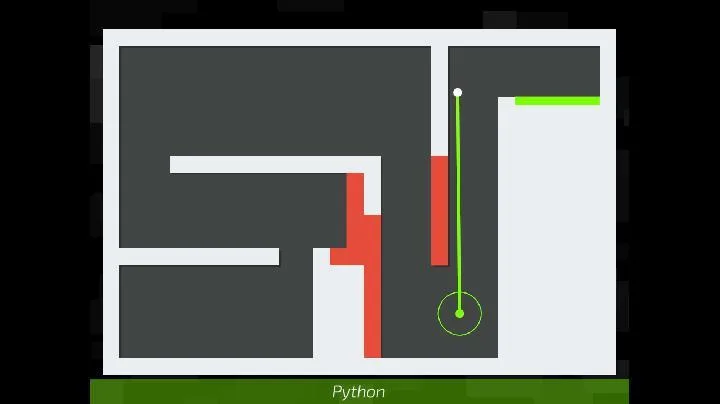
- Locate the Tracker (Timed Hacking Sequence): Follow the Build path, lure the antivirus, and complete build paths to reach the Tracker. Find both calibration spots on the middle right and top right.
- Rescue Flambae: Golem (requires Mobility and Vigor)
- Help Brainbook: Prism (requires Intellect)
- Shopping Spree (Reach Combat 6 for XP boost): Punch Up AND Flambae OR Golem (requires Vigor and Mobility)
- Locate Sonar/Coupe OR Phenomaman/Waterboy (Hacking Sequence): Avoid the Antivirus. Collect the first frequency on the top left. For the second on the top right, use the left Build path to lure the Antivirus, then the bottom Build path to trap it, and finally the left Build path to reach the frequency.
- Rescue Sonar/Coupe: Flambae OR Golem (requires Mobility)
- S-S-S-S-Sewer Bomb: Prism OR Sonar (requires Intellect)
- Rescue Phenomaman/Waterboy: Flambae AND Punch Up/Malevola OR Golem (requires Mobility and Vigor)
- Help Sweetalker: Prism/Punch Up/Malevola OR Sonar/Coupe. Options include a Z-Team speech (Charisma 8), Sonar's Red Ring Roast, or Coupe's combat training.
- Return of the Kaiju: Punch Up/Malevola AND Phenomaman (requires Combat and Vigor). Options: Attack with everything (Combat 10) or break the collar (Vigor 10).
- Witch Hunt: Prism/Punch Up/Sonar (requires Charisma or Intellect) OR Phenomaman. Options: Phenomaman's exclusive dialogue, rally against the enemy (Charisma 6), or reason with them (Intellect 6).
- Boom!: Flambae/Golem/Phenomaman/Invisigal AND Waterboy (requires Mobility)
- Escape Artist: Phenomaman OR Golem OR Invisigal (requires Mobility and Vigor)
- The Summoning: Flambae/Malevola/Invisigal AND Punch Up/Phenomaman/Golem (requires Mobility, Vigor, and Combat)
- Lockdown (Hacking Sequence): Use Build Paths to navigate and place electricity to reach the exit. Sequence: Left, Left, Right, Up for the first passcode; Left, Right, Up, Up for the second; Right, Left, Up, Up, Down, Right for the final.
- The Torrance Terrors (Reach Vigor 8 for XP boost): Punch Up/Golem AND Flambae/Malevola (requires Combat and Vigor)
- Attack Coupe/Sonar: Prism/Sonar AND Punch Up/Golem/Phenomaman (requires Intellect, Charisma, and Vigor)
- S-S-S-S-Sewer Bomb: Sonar OR Prism OR Waterboy (requires Intellect)
- Eastside Gang (Reach Vigor 8 for XP boost): Punch Up/Golem AND Flambae/Malevola/Phenomaman (requires Combat and Vigor)
- Help Pom Pom: Flambae/Golem/Invisigal AND Punch Up/Phenomaman/Sonar/Golem (requires Mobility and Vigor)
- Roadblock: Punch Up/Golem AND Flambae/Malevola/Phenomaman (requires Combat and Vigor)
- Coffee Run (No consequences): Flambae OR Golem OR Invisigal (requires Mobility)
- Attack Coupe/Sonar 2: Prism/Sonar AND Flambae/Coupe/Phenomaman/Invisigal (requires Intellect, Mobility, and Combat)
- Defeat Mister Fister (Combat restriction 6): Punch Up OR Malevola (requires Combat, Vigor, and Mobility)
- Housing Crisis: Waterboy AND Golem/Punch Up/Phenomaman (requires Vigor)
- Help Brickhouse: Flambae/Invisigal AND Punch Up/Phenomaman/Golem (requires Vigor and Mobility)
- Defeat SmileMore (Charisma restriction 9): Sonar OR Prism (requires Intellect and Charisma)
- Neighborhood Watch: Golem OR Phenomaman OR Punch Up. Options: Aid in fight (Combat 8), move to safety (Mobility 7), or convince to turn back (Charisma 7).
- Atomic Automatons: Phenomaman OR Punch Up AND Coupe OR Flambae AND Golem (requires Mobility, Combat, and Vigor)
- We Meet Again: Flambae/Malevola/Coupe/Invisigal (requires Combat and Mobility)
- Entrapment: Sonar/Prism (requires Intellect) OR Waterboy OR Flambae. Options: Waterboy's exclusive, Flambae's exclusive, or get smart (Intellect 8).
- Pursue Red Ring: Flambae/Coupe/Phenomaman/Invisigal AND Punch Up/Golem (requires Mobility and Vigor)
- S-S-S-S-Sewer Bomb: Phenomaman OR Golem OR Flambae OR Invisigal (requires Mobility). Options: Phenomaman's exclusive, Golem's exclusive, or run to the ocean (Mobility 8). Correct answer is Yellow (Intellect 1).
- Bridge Rescue: Golem/Invisigal/Phenomaman AND Punch Up/Golem (requires Vigor and Mobility)
- Get to the Chopper (Combat 8 for XP boost): Sonar/Prism AND Flambae/Coupe AND Punch Up/Golem/Phenomaman (requires Vigor, Mobility, and Intellect)
- Defeat Mindf*cker (Timed Hacking Sequence): Navigate reversed controls and Build Paths to reach the exit. Sequence: Up, Left, Left, Right for the first Build spot; Left, Right, Up, Up for the second; Right, Left, Up, Up, Down, Right for the final.
- Help Equilibrium: Flambae OR Golem OR Phenomaman OR Coupe OR Invisigal (requires Mobility)
- Hospital Takeover (Vigor 6 for XP boost): Golem/Punch Up AND Coupe/Flambae (requires Vigor and Combat)
- Return of the Delivery Bots (Intellect 6 for XP boost): Sonar/Prism/Waterboy AND Flambae/Phenomaman/Coupe/Malevola (requires Intellect and Combat)
- Attack Coupe (Final): Blonde Blazer AND (requires high Combat and/or Vigor)
Weakening Sonar/Coupe: As the area expands, Coupe/Sonar will appear. Treat these as calls that will pop up multiple times. Reducing the Red Ring HP bar to 0 is crucial and ends the shift. Saving the city allows an ex-team member to rejoin later; failing removes this option.
End of Shift Choices:
- After the final call, watch the cutscene. You'll have dialogue options with no consequences.
- Then, you'll have a one-on-one with Invisigal. Choose between:
- Options 1 (no consequences):
100% Human-Written. AI Fact-Checked. Community Verified. Learn how AntMag verifies content