Detailed walkthrough for 'The Missing Master' mission in Synergy, including hero assignments, objectives, and strategies for all hacking sequences and combat encounters.
Walkthrough
- 1Initial Choices: After cutscenes, choose a dialogue option for Blazer. Initial heroes are Prism, Golem, and Punch Up. Invisigal may be absent.
- 2Return to Crypto Night: Assign Punch Up.
- 3Evacuation Order: Assign Prism. Aim for Charisma 7 for an XP boost.
- 4Capture Experiment 1067: Assign Golem (requires Mobility).
- 5Bomb Threat: Assign Prism AND Punch Up/Golem.
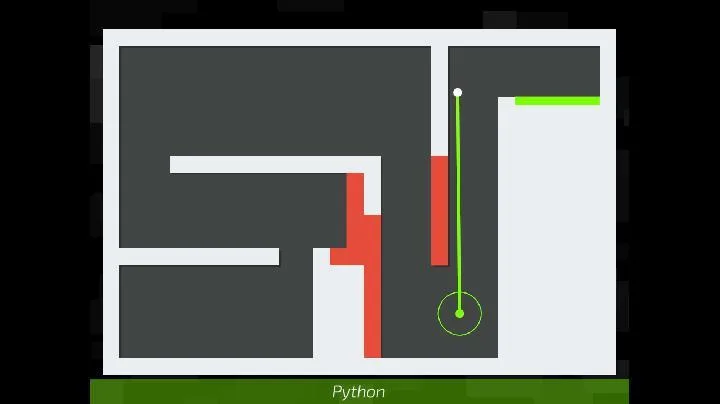
- 6Locate the Tracker (Timed Hacking Sequence):
- Follow the Build path, juke the Antivirus.
- 7Lure Antivirus to the upper section, loop around, and use the bottom Build path to cut it off.
- 8Complete the upper Build path to create a western path, then the bottom Build path to restore the upward path.
- 9Juke the Antivirus while grabbing electricity to destroy it.
- 10Use the third Build path to reach the Tracker spot.
- 11Find both calibration spots: middle right and top right.
- 12Rescue Flambae: Assign Golem (requires Mobility and Vigor).
- 13Help Brainbook: Assign Prism (requires Intellect).
- 14Shopping Spree: Assign Punch Up AND Flambae OR Golem (requires Vigor and Mobility). Aim for Combat 6 for an XP boost.
- 15Locate Sonar/Coupe OR Phenomaman/Waterboy (Timed Hacking Sequence - Two Options):
- Move to the Tracker spot, avoid the Antivirus.
- 16First frequency is top left.
- 17Second frequency is top right; use the left Build path to lure the Antivirus, then the bottom Build path to trap it. Use the left Build path to reach the frequency.
- 18Rescue Sonar/Coupe: Assign Flambae OR Golem (requires Mobility).
- 19S-S-S-S-Sewer Bomb: Assign Prism OR Sonar (requires Intellect).
- 20Rescue Phenomaman/Waterboy: Assign Flambae AND Punch Up/Malevola OR Golem (requires Mobility and Vigor).
- 21Help Sweetalker: Assign Prism/Punch Up/Malevola OR Sonar/Coupe.
- Charisma option: Z-Team inspirational speech (Charisma 8).
- 22Sonar option: Red Ring Roast.
- 23Coupe option: Last minute combat training.
- 24Return of the Kaiju: Assign Punch Up/Malevola AND Phenomaman (requires Combat and Vigor).
- Option 1: Attack with everything (Combat 10).
- 25Option 2: Break off the Red Ring collar (Vigor 10).
- 26Witch Hunt: Assign Prism/Punch Up/Sonar (requires Charisma or Intellect) OR Phenomaman.
- Phenomaman option: You know them right?
- 27Charisma/Intellect option: Rally against the real enemy (Charisma 6) or Reason with them (Intellect 6).
- 28Boom!: Assign Flambae/Golem/Phenomaman/Invisigal AND Waterboy (requires Mobility).
- 29Escape Artist: Assign Phenomaman OR Golem OR Invisigal (requires Mobility and Vigor).
- 30The Summoning: Assign Flambae/Malevola/Invisigal AND Punch Up/Phenomaman/Golem (requires Mobility, Vigor, and Combat).
- 31Lockdown (Timed Hacking Sequence):
- Use the top right Build Path to reach the passcode: Left, Left, Right, Up.
- 32Use the passcode at the locked spot to reach electricity.
- 33Bring electricity to the top left Build Path, creating a path down on the top right.
- 34Grab second electricity, bring it to the bottom right, and place it to create a path to the center.
- 35Use the center Build Path to create a downward path.
- 36Grab electricity from the right, bring it to the center double-lightbulb spot.
- 37Grab top right electricity, bring it to the center lightbulb spot.
- 38Exit once both electricity are placed.
- 39Weakening Sonar/Coupe: This objective will pop up multiple times. Completing it reduces the Red Ring HP bar. The shift ends when the bar reaches 0. Saving the city unlocks a future choice.
- 40The Torrance Terrors: Assign Punch Up/Golem AND Flambae/Malevola (requires Combat and Vigor). Aim for Vigor 8 for an XP boost.
- 41Attack Coupe/Sonar: Assign Prism/Sonar AND Punch Up/Golem/Phenomaman (requires Intellect, Charisma, and Vigor).
- 42S-S-S-S-Sewer Bomb: Assign Sonar OR Prism OR Waterboy (requires Intellect).
- 43Eastside Gang: Assign Punch Up/Golem AND Flambae/Malevola/Phenomaman (requires Combat and Vigor). Aim for Vigor 8 for an XP boost.
- 44Help Pom Pom: Assign Flambae/Golem/Invisigal AND Punch Up/Phenomaman/Sonar/Golem (beast mode) (requires Mobility and Vigor).
- 45Roadblock: Assign Punch Up/Golem AND Flambae/Malevola/Phenomaman (requires Combat and Vigor).
- 46Coffee Run: Assign Flambae OR Golem OR Invisigal (requires Mobility). No consequences for failure.
- 47Attack Coupe/Sonar 2: Assign Prism/Sonar AND Flambae/Coupe/Phenomaman/Invisigal (requires Intellect, Mobility, and Combat).
- 48Defeat Mister Fister: Assign Punch Up OR Malevola (requires Combat and Vigor, with some Mobility). Do not exceed Combat 6.
- 49Housing Crisis: Assign Waterboy AND Golem/Punch Up/Phenomaman (requires Vigor).
- 50Help Brickhouse: Assign Flambae/Invisigal AND Punch Up/Phenomaman/Golem (requires Vigor and Mobility).
- 51Defeat SmileMore: Assign Sonar OR Prism (requires Intellect and Charisma). Do not exceed Charisma 9.
- 52Neighborhood Watch: Assign Golem OR Phenomaman OR Punch Up (requires Vigor, Mobility, or Charisma).
- Option 1: Aid them in the fight (Combat 8).
- 53Option 2: Move them to safety (Mobility 7).
- 54Option 3: Convince them to turn back (Charisma 7).
- 55Atomic Automatons: Assign Phenomaman OR Punch Up AND Coupe OR Flambae AND Golem (requires Mobility, Combat, and Vigor).
- 56We Meet Again: Assign Flambae/Malevola/Coupe/Invisigal (requires Combat and Mobility).
- 57Entrapment: Assign Sonar/Prism (requires Intellect) OR Waterboy OR Flambae.
- Waterboy option: Get wet.
- 58Flambae option: Get hot.
- 59Intellect option: Get smart (Intellect 8).
- 60Pursue Red Ring: Assign Flambae/Coupe/Phenomaman/Invisigal AND Punch Up/Golem (requires Mobility and Vigor).
- 61S-S-S-S-Sewer Bomb: Assign Phenomaman OR Golem OR Flambae OR Invisigal (requires Mobility).
- Phenomaman option: Send the bomb into space.
- 62Golem option: Absorb the blast.
- 63Mobility option: Run it to the ocean (Mobility 8).
- 64Correct answer: Yellow (Intellect 1).
- 65Bridge Rescue: Assign Golem/Invisigal/Phenomaman AND Punch Up/Golem (requires Vigor and Mobility).
- 66Get to the Chopper: Assign Sonar/Prism AND Flambae/Coupe AND Punch Up/Golem/Phenomaman (requires Vigor, Mobility, and Intellect). Aim for Combat 8 for an XP boost.
- 67Defeat Mindf*cker (Timed Hacking Sequence):
- Navigate right, left, then right to the Build path.
- 68At the second dead end, cross the invisible spot.
- 69Go over the Antivirus to the next dead end, then cross another invisible spot.
- 70On the right side, controls are reversed. Use the top right Build spot with reversed sequence: Up, Left, Left, Right.
- 71Use the bottom right Build path with reversed sequence: Left, Right, Up, Up.
- 72Use the final Build spot (jumping invisible spot) with reversed sequence: Right, Left, Up, Up, Down, Right to exit.
Tips
- Failure on calls after 'Bomb Threat' will decrease City HP. Ensure it doesn't reach zero to save the city and earn an achievement.
- Use special items and heroes like Malevola/Waterboy for healing when heroes risk injuries.
- Pay attention to goal requirements (Charisma, Combat, Vigor) for XP boosts.
- Some missions have restrictions (e.g., Combat 6 for Mister Fister, Charisma 9 for SmileMore).
- The 'Weakening Sonar/Coupe' objective may reappear; completing it is crucial for reducing Red Ring HP.
100% Human-Written. AI Fact-Checked. Community Verified. Learn how AntMag verifies content